Have you seen the Waves of Inspiration Bundle? This coastal collection includes an inspiring set of stamps and detailed dies, both early-release products from the upcoming 2022–2023 Annual Catalog.
For a limited time, during the early release, you can also purchase the Waves of the Ocean DSP pack. This unique of paper, made from images of hand-poured paint, coordinates with Calypso Coral, Coastal Cabana, Daffodil Delight, Granny Apple Green, Night of Navy, Pacific Point, Petal Pink. Its only available while supplies last.
Explore artistic expression with the Waves of the Ocean Collection and the amazing cards below.
I’d love to be your Stampin’ Up!® Demonstrator. The Waves of Inspiration Bundle and Waves of the Ocean DSP are available in my online store. Simply click any of the product photos below!
We are excited to share projects with you again this year. We hope to inspire you to create beautiful new projects. Each month we will have a different theme based on the next month’s celebrations using Stampin’ Up! products.
Once you are done with each post, scroll down to the bottom and you will see a list of Blog Hop participants, you can click on their name to go to their post, or you can click the next button to go to the next post in line. Happy crafting! This month’s theme is Easter.
For this month’s Easter theme my cards feature the cute bunny in the Easter Friends Stamp Set. I decided to try something a little different using Watercolor Paper and Watercolor Painters. The grass was created using Granny Apple Green and Garden Green reinkers by brushing the color with Watercolor Painters along the bottom of the Watercolor Paper.
Then using a Blending Brush and Balmy Blue Ink pad I brushed the ink onto the watercolor paper to create the sk. Using the 2021-2023 In Color Shimmer Vellum and the Peach Dies, I added a few little flowers with Mini Glue Dots. Then layered the Watercolor cardstock on Soft Seafoam Cardstock and then on a So Saffron and Balmy Blue card base.
I stamped a couple of bunnies in Gray Granite and Smoky Slate on Basic White cardstock. I used the Light Flirty Flamingo Blends to color in the bunny nose, then fussy cut them out. I’ve added them to my card with Stampin’ Dimensionals. The sentiment is stamped in Tuxedo Black on Vellum. I trimmed them down and punched the end of the strip with the Banners Pick a Punch. I put 2 Mini Glue dots on the back of the Vellum by rolling the up into tiny little strips and placing them behind the H in Happy and the S in Easter. To finish them off I added a few Iridescent Rhinestone Jewels.
For more inspiration from the Luv 2 Stamp Group Blog Hop Team, click on the image below to visit the talented Patty Bennett. Don’t forget to continue following links on each blog to see everyone’s projects!
So Saffron Cardbase: 5-1/2″ x 8-1/2″, score in half at 4-1/4″
Watercolor Cardstock: 4′ x 5-1/4″
Soft Seafoam Cardstock: 4-1/8″ x 5-3/8″
Thank you so much for hopping by today! All the Stampin’ Up! supplies used to make my card are available in my online store. Simply click any of the product photos below!
I’ve had the Lighthearted Lines stamp set sitting on my stamp shelf for almost a year. it was high time I made some cards with this fun stamp set. The Sweet Symmetry DSP with its bright pretty colors is the perfect fun choice to go with the sentiments in the Lighthearted Lines stamp set.
Using the Basic Border Dies, I die cut multiple pieces of the Dsp. Selecting the patterns to mix and match was lots of fun. Once I had them adhered together I trimmed them down to fit the card bases.
To make this sentiment just a bit more fun, I wanted to easily stamp “Forever” inside on this card. I snipped apart the bottom half of this sentiment, now I can easily use a few of the words individually. I stamped the sentiment in Flirty Flamingo on Basic White. I die cut the sentiment for the front of my card using the Stitched So Sweetly Dies and adhered it to a Night of Navy label. Foam adhesive sheets are fast becoming my new favorite adhesive to give my cards dimension. I love that I can quickly cut them to fit and give just a bit more stability.
I used a number of dies to create all the different labels for my cards. The finishing touch on these bright color cards are the Brushed Brass Butterflies. I had a lot of fun putting these cards together.
You’re Stuck With Me Card Measurements
Bumblebee Cardstock Base: 5-1/2″ x 8-1/2″, score in half at 4-1/4″
Sweet Symmetry DSP: 6′ x6′, then trimmed to fit card front
I hope you found some inspiration from these fun cards. All the Stampin’ Up! supplies used to make my card are available in my online store. Simply click any of the product photos below!
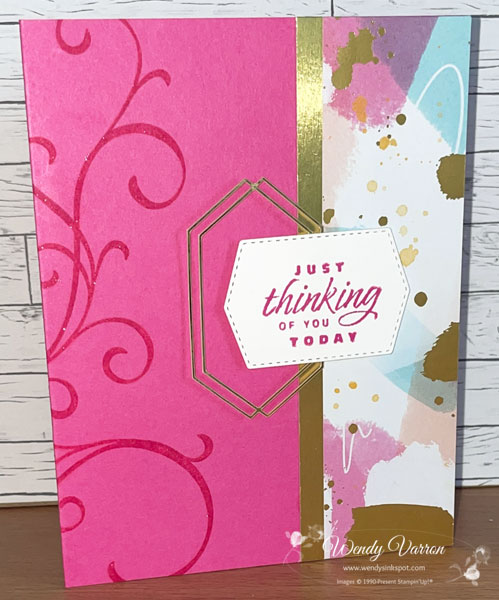
This month my Customer Thank You Cards are inspired by the Annual Catalog. If you are ever looking for inspiration the Annual Catalog is a great place to start, it’s a treasure trove of amazing creations. I took the inspiration from page 68, the Simply Elegant Suite card. I love the elements in this card, it showcases Designer Series Paper and stamping directly on to the cardstock card base.
To make my card I started with stamping the beautiful swirl from the Sentimental Swirl stamp set on the left side of the cardbase. I love stamping tone on tone, it really makes the already pretty colors so much richer. I also stamped some of the swirls on the inside of my cards.
Next, I cut strips of the Abstract Beauty DSP and Gold Foil paper. I adhered the DSP to the Gold Foil Strip, then using Multipurpose Liquid Glue, added them to the right side of the card base.
I stamped the sentiment from the Flowering Tulips stamp set in Magenta Madness on the label. Before adding the label to my card, I adhered a gold foil element from the Expressions in Ink Ephemera Pack to the back of the lable with some Stampin’ Seal. I cut a piece of Foam Adhesive sheet which I added to the back of the label over the Gold Foil element. Doing this keeps the Gold Foil element lifted off the card but firmly in place on the back of the label.
I wanted to use all the 2020-2022 In Colors and the Abstract Beauty DSP was perfect to pair with these pretty colors. Once I started taking photos of my cards, I had some inspiration to add just a touch of bling, I brushed a little Wink of Stella on the swirls. I love the look, but it was hard to photograph.
Just Thinking of You Today Card Measurements:
Cardbase: 5-1/2″ x 8-1/2″, score in half at 4-1/4″
Abstract Beauty DSP: 1-1/2″ x 5-1/2″
Gold Foil: 3/4″ x 5-1/2″
I’d love to be your Stampin’ Up!® Demonstrator. All the Stampin’ Up! supplies used to make my card are available in my online store. Simply click any of the product photos below!
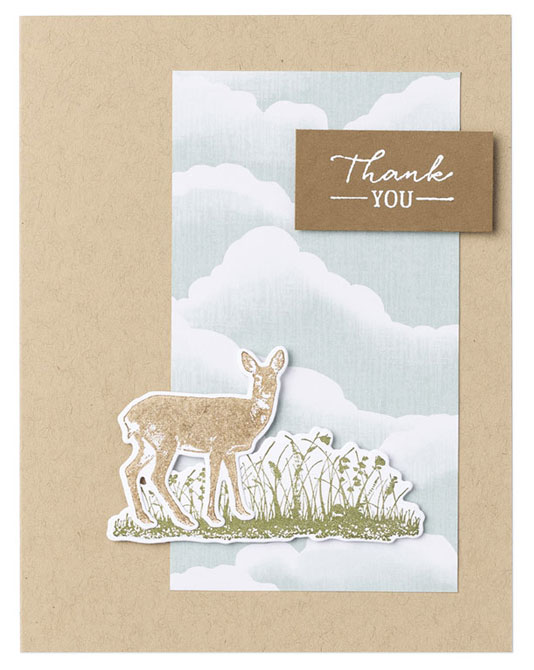
If you like versatility in your papercrafting, you’ll love the Grassy Grove Bundle! This stamp and die bundle features nature-inspired images that are perfect for all types of occasions. The Grassy Grove Bundle makes crafting ornate, artistic cards with perfectly framed nature scenes—such as a lone deer or a colorful sunset peeking out from behind a grove of die-cut trees.
The Grassy Grove images pair as well with sentiments from other stamp sets as it does with the four all-occasion greetings that come with the bundle. That means you get even more mileage out of the stamp sets you already have in your collection just by adding this bundle!
Sale-A-Bration is coming to an end, today is the last day. Don’t miss out on on the free gifts from Stampin’ Up! with a purchase.
My slim line cards today are inspired by Patty Bennett. She shared a cute ladybug card with this same layout, which is perfect to showcase Designer Series Paper. I wanted to share one last card for Sale-A-bration with the Simply Marbleous DSP and Special Moments Stamp set, both available during Sale-A-Bration.
When I am making several cards at one time, I like to prep all my elements first and put them together in an assembly line fashion. I cut the card stock and Simply Marbleous DSP, then adhered the DSP and Basic White cardstock with Multipurpose Glue to the larger card stock layers.
The daisies were punched in Basic White and matching color card stock. Using a bone folder I gently curled the white petals up, and the color petals down. I love the different direction of the petals and it made lining up the flowers easy when I adhered them together with Mini Glue Dots.
Next, I colored some White Glittered Organdy Ribbon with Stampin’ Write Markers to match the DSP for each card. Then created knots for each card. I adhered a strip of the ribbon to the card then using a smaller piece of ribbon tied a knot.
I adhered the daisies with Stampin’ Dimensionals and added a few of my favorite embellishments, Iridescent Rhinestone Basic Jewels. They are the perfect bling to add to any project.
I’d love to be your Stampin’ Up!® Demonstrator. All the Stampin’ Up! supplies used to make my card are available in my online store. Simply click any of the product photos below!


")
")

 Designer Series Paper")


")


 Designer Series Paper")


")
")
 Specialty Designer Series Paper")


")
 Designer Series Paper")


 Glittered Organdy Ribbon")


