February 2022 Customer Thank You Cards – Happy & Heartfelt

Thank you for joining us for our Stampin’ Up!® Demonstrator Training Program Monthly Blog Hop! We are so happy that you could join us today for this blog hop for ideas and creative inspiration. We are a group of Stampin’ Up!® Demonstrators from around the world that are taking part in training that is helping us to build a successful Stampin’ Up!® business and reach some goals we have set. We really appreciate your support.

You may be starting here or have come from another blog – either way you can find the link list at the bottom of this post so that you can see every blog post and idea today.

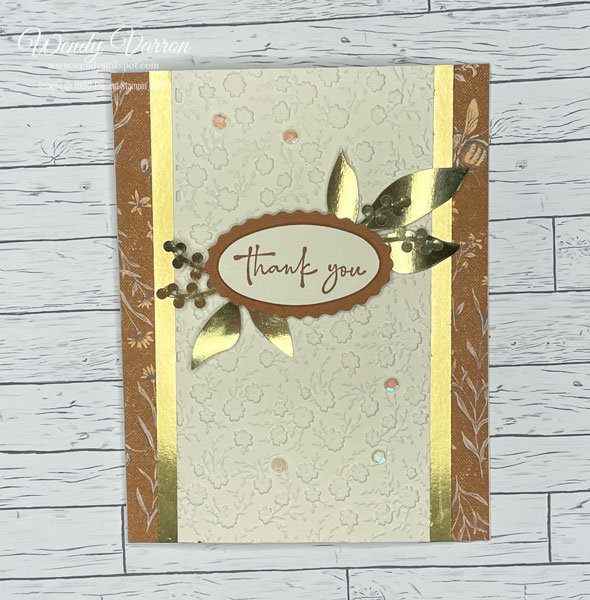
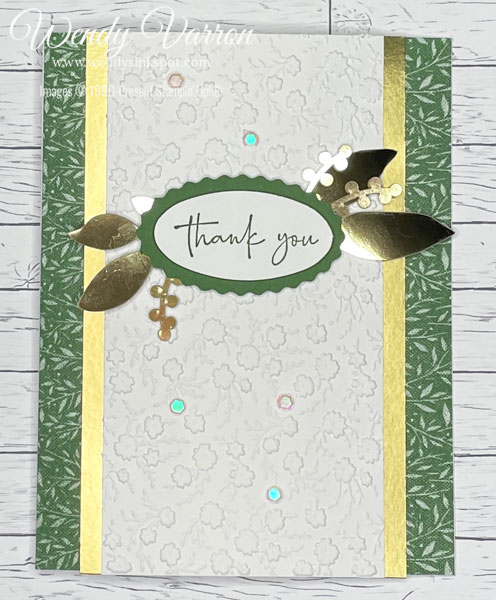
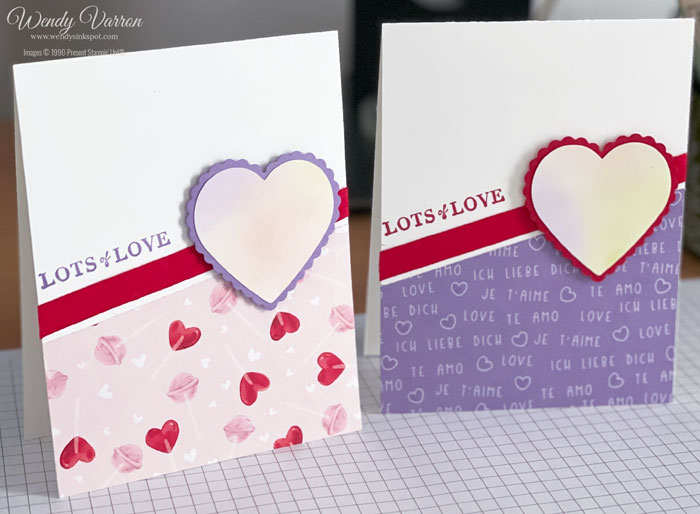
This month my Customer Thank You cards feature the Happy & Heartfelt Stamp set and the Heart & Home Designer Series Paper. I love the colors and designs of the Heart & Home DSP, I’ve use several of them on my cards this month. This is a great card layout if you need to create some cards in multiples, they are quite easy to do.

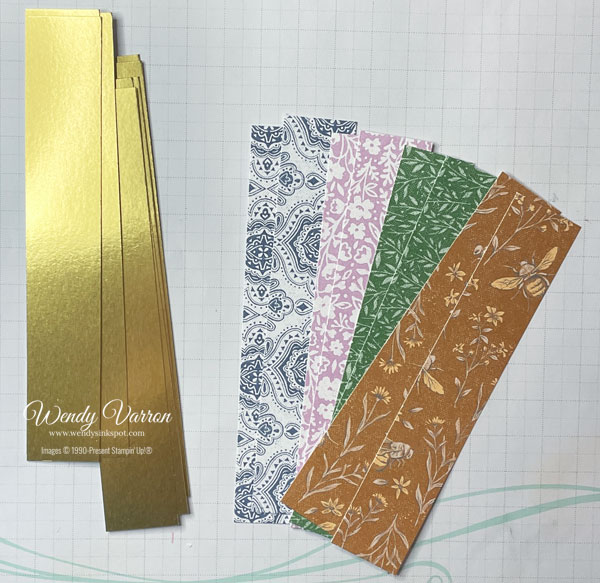
After selecting the patterns I wanted to use, I cut the strips of Heart & Home DSP & Gold Foil for my cards. Then using the Happy & Heartfelt Stamp Set, I stamped the Thank You in coordinating colors on Basic White and Very Vanilla cardstock and punched them out along with coordinating scalloped ovals with the Double Oval Punch.

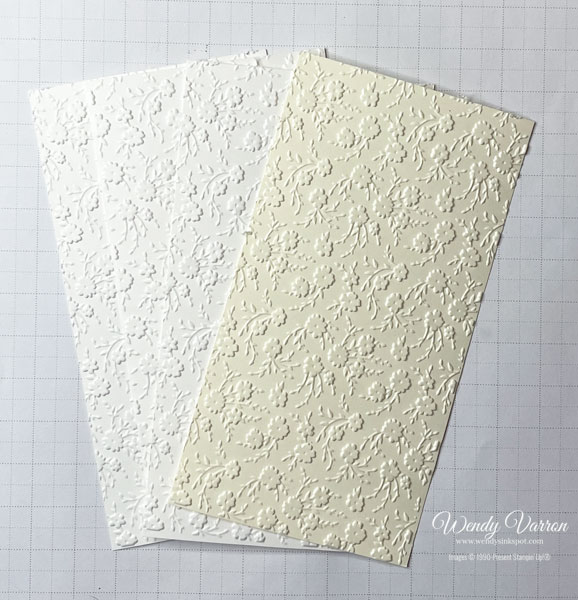
Next, I embossed some Basic White and Very Vanilla cardstock with the Ornate Floral 3D embossing folder. Then I adhered the Gold Foil Strips to the embossed card stock and trimmed them.

Taking the strips of the Heart & Home DSP, I adhered them to my card bases. Before adhering the embossed layer, I attached the sentiment stamped ovals to the scalloped ovals with Stampin’ Dimensionals. Using Mini Glue Dots on the back of the labels I adhered a few of the Gold Foil leaves and stems from the Expressions in ink Ephemera pack. Then using Stampin Dimensionals, I attached the labels to the embossed layer. To finish my cards I adhered the embossed layer to the card base and added a few of the iridescent sequins from the Expressions in Ink Ephemera Pack.

As mentioned at the top, this is a blog hop so make sure you ‘hop’ around to all the amazing projects on this hop! Click on the links below to visit them.


Happy & Heartfelt Card Measurements

  • Very Vanilla/Basic White card base: 5-1/2″ x 8-1/2″, score in half at 4-1/4″
  • DSP Strips (2): 1″ x 5-1/2″
  • Gold Foil Strips (2): 1″ x 5-1/2″
  • Embossed card stock layer: 2-7/8″ x 5-1/2″

I hope you enjoyed my cards today. Leave me a comment below and let me know what you think.

I’d love to be your Stampin’ Up!® Demonstrator. All the Stampin’ Up! supplies used to make my card are available in my online store. Simply click any of the product photos below!

Product List

Happy Stamping!

You’ve Conquered Another Year with Brave Vikings

I knew as soon as I saw the Brave Vikings cling stamp set in the Mini Catalog, that this would be a great set to create my Mom’s Birthday Card. Happy Birthday Mom!!

I wanted the Vikings and the Ship to be the focal point of the card, so I decided to create the background with the image of the ship. I stamped the ship in Crumb Cake ink on the Crumb Cake cardbase.

I stamped the Vikings in Tuxedo Black Memento Ink on some scrap Basic White cardstock. These are great images if you enjoy coloring. I used Stampin’ Blends to color them and then fussy cut them out to add to my card.

I adhered a piece of Basic White Cardstock to the inside of the card and added the viking to the inside. How cute is the inside of the card with this fierce viking?

I die cut a circle using the Layering Circles dies. I adhered the circle to my cardbase and the viking to the circle with Stampin’ Dimensionals. I stamped the sentiment on Basic White cardstock and die cut it with the message die. I cut a second label in Crumb Cake cardstock with the message dies as well and layered them together. Using Stampin’ Dimensionals attached it to the cardbase.

To finish the card, I added a few of the Iridescent Rhinestones Basic Jewels and brushed a little of Wink of Stella in the ships.

Brave Viking Card Measurements

  • Crumb Cake Cardbase: 5-1/2″ x 8-1/2″, score in half at 4-1/4″
  • Basic White Cardstock inside of card: 4″ x 5-1/4″

I’d love to be your Stampin’ Up!® Demonstrator. All the Stampin’ Up! supplies used to make my card are available in my online store. Simply click any of the product photos below!

Product List

Happy Stamping!

Wendy’s Top 5 Picks

Today I thought it would be fun to share my Top 5 favorite products from the 2022 Mini Catalog and Sale-A-Bration brochure. I am absolutely loving all the spring colors, floral images and variety & versitility of sentiments. First up, my Top 5 picks for the Mini Catalog.

Wendy's Top 5 Jan-June 2022 Mini Catalog Products

1.Symbols Of Fortune 12" X 12" (30.5 X 30.5 Cm) Specialty Designer Series Paper
157652s I love the soft colors and gold foil accents. This Designer Series Paper makes making beautiful cards so easy!
2.Sentimental Swirls Photopolymer Stamp Set (English)
157996s I love the large swirl, the font of the sentiments, and that the floral and leaf images coordinate with the Strawberry Builder Punch and Flowers & Leaves punches!
3.Butterflies & Flowers Layering Decorative Masks
158142s There so many creative options when you layer the masks together to create amazing images!
4.Happy & Heartfelt Cling Stamp Set (English)
158005s There are so many great sentiments that can be used for multiple occasions, Mother's Day, Father's Day, Baby, Love, Birthdays just name a few.
5.Iridescent Rhinestones Basic Jewels
158130s I love to add some sparkle to my project and these pretty Jewels make it easy!


Can you believe Sale-A-Bration is half over?! I love that so many of the products coordinate with some of the bundles available in the Mini Catalog! Here are my top 5 picks for Sale-A-Bration.

Wendy's Top 5 Sale-A-Bration 2022 Products

1.Friendly Hello Bundle (English)
159990s I love coordinating products, DSP, soft colors and floral images. This bundle has it all!
2.Sunshine & Rainbows 6" X 6" (15.2 X 15.2 Cm) Designer Series Paper
158126s I love the bright colors and patterns of this brilliant DSP stack! And it coordinates with the Rainbow of Happiness Bundle.
3.Special Moments Photopolymer Stamp Set (English)
158081s I love the mixed fonts and variety of sentiments in this stamp set!
4.Daffodil Afternoon 12" X 12" (30.5 X 30.5 Cm) Designer Series Paper
158127s I love all the pretty floral images of this DSP and it coordinates with the Daffodil Daydream Bundle!
5.Catching Butterflies Cling Stamp Set (English)
158108s I love the fun images and its perfect if you love to color your stamped images!

What are your Mini Catalog and Sale-A-Bration favorites? Share them in the comments below.

Happy Stamping!

Daffodil Daydream Bundle

The Daffodil Daydream Bundle—which includes the Daffodil Daydream Stamp Set and Daffodil Dies—is the perfect pick for a variety of paper projects. Featured in the January–June 2022 Mini Catalog, this beautiful bundle offers a fresh opportunity to try coloring techniques, practice stamping patterns, and learn to layer die-cut pieces into a dimensional daffodil.

No matter the season, you’ll find a reason to delight in these daffodils! With sentiments for Easter and Mother’s Day, you can create meaningful messages for cards, thoughtful tags for treat packages and gift bags, and scrapbook pages celebrating either occasion. Pair the sweet sentiments with stamped and die-cut daffodils for creations your flower-loving friends and family will absolutely adore!

So Many Possibilities

Did you know that the Daffodil Afternoon Designer Series Paper—an exclusive Sale-A-Bration item—directly coordinates with the Daffodil Daydream Bundle? When you buy the bundle between 4 January and 28 February, you can add the paper to your cart for free!
Watch the video below for some inspiration for incorporating the Daffodil Afternoon DSP into your Daffodil Daydream Projects.

Keep scrolling for more inspiration. These are just a few of the amazing projects that you can create with the Daffodil Daydream Bundle.

How does the Daffodil Daydream Bundle inspire you? Let me know in a comment below!

Happy Stamping!

A Thousand Well Wishes

My favorite Designer Series Paper from the Jan-June 2022 Mini Catalog is the Symbols of Fortune DSP. I love the soft colors and the foil accents. I have been wanting to pair it with the Mother of Pearl Specialty Paper which is also part of the Symbols of Fortune Suite Collection.

The first thing I did was to cut the Symbols of Fortune DSP, then the Mother of Pearl Specialty Paper to layer beneath the DSP. Once I adhered the layers together, I arranged the together until I was happy with the look before I added them to the cardbase.

I attached the larger rectangle layer with the Soft Succulent Crane Pattern to the Smoky Slate Cardbase first, then added the smaller rectangle with the reeds next. Before adding the Square with the Foil Accent I added a few strips of Tear & Tape and added a piece of the Soft Succulent Shimmer Ribbon. Once the ribbon was added I adhered the square layer to my card. I wanted the ribbon to lay across the front of my card, to hold it in place I added a small piece of Tear & Tape to hold it in place.

Using the Crane of Fortune Bundle, I stamped a few of the dragon flies in Calypso Coral on a piece of Basic White cardstock and die cut them. I used the Tasteful Labels dies to cut the circle label, and stamped the sentiment in Soft Succulent. I adhered the dragon files to the label with some Mini Glue dots.

I added the label to the card with Stampin’ Dimensionals. To finish off my card I added a few Polished Dots. I love all the soft colors in this card. I hope you do too!

A Thousand Well Wishes Card Measurements

  • Smoky Slate Cardbase: 5-1/2″ x 8-1/2″, scored in half at 4-1/4″
  • 3 pieces of Symbols of Fortune DSP: 1-1/2″ x 4-7/16″, 2″ x 5″, 2-1/2″ x 2-1/2″
  • 3 pieces of Mother of Pearl Specialty Paper: 1-7/8″ x 4-9/16″, 2-1/8″ x 5-1/8″, 2-5/8″ x 2-5/8″

I’d love to be your Stampin’ Up!® Demonstrator. All the Stampin’ Up! supplies used to make my card are available in my online store. Simply click any of the product photos below!

Product List

Happy Stamping!

Luv 2 Stamp Group Blog Hop-January 2022

Welcome to the Luv 2 Stamp Group’s 2022 Blog Hop! We are excited to share projects with you again this year. We hope to inspire you to create beautiful new projects. Each month we will have a different theme based on the next month’s celebrations using Stampin’ Up! products.

Once you are done with each post, scroll down to the bottom and you will see a list of Blog Hop participants, you can click on their name to go to their post, or you can click the next button to go to the next post in line. Happy crafting! This month’s theme is Love.

This month, my cards were created with Valentine’s Day in mind. I decided to use the Celebrate You stamp set and the Sweet Talk DSP, both are available in the Jan-June 2022 Mini Catalog.

Before creating my card, I wanted to make some colorful hearts. So, using Blending Brushes, I brushed the same colors of ink that are in the Sweet Talk DSP on a piece of Basic White Cardstock. Then, I used the smaller heart from the Heart Punch Pack to punch out the hearts. I love the soft colors (the Subtles color family is my favorite) and I have lots of extras to use on more cards or other projects.

My Basic White Cardbase is cut to 4-1/4″x11″. I cut a piece of Sweet Talk DSP at an angle to add the bottom of my card with Multipurpose Liquid Glue. Then added a few pieces of Tear & Tape along the edge of the DSP to add a piece of Real Red Faux Linen Ribbon. I wanted to be sure to leave some white space between the ribbon and DSP.

I used my Stamp-a-majig to add the sentiment along the edge of the ribbon. You could also use the Stamparatus to line up the sentiment before stamping.

I punched the scalloped hearts from the Heart Punch Pack to layer behind the hearts I created earlier. I added the hearts to my card with Stampin’ Dimensionals. As much as I LOVE to add bling to a card, I decided to add just a subtle touch with a Wink of Stella, I brushed it lightly on the tiny hearts on the DSP. I tired get a good picture of the shimmer but that was not to be. Anyway, I wanted the bling to be subtle so these could be given as masculine Valentine’s cards. However, you could dress them up with some Iridescent Rhinestone Basic Jewels, Polished Dots or even the From My Heart Faceted Gems.

For more inspiration from the Luv 2 Stamp Group Blog Hop Team, click on the image below to visit the talented Patty Bennett. Don’t forget to continue following links on each blog to see everyone’s projects!

Lots of Love Card Measurements

  • Basic White Thick cardstock base: 4-1/4″x 11″, scored in half at 5-1/2″
  • DSP: 4-1/4″x 5-1/2″ cut in half at an angle to add to the bottom of the card front.

Thank you for visiting my blog today! I hope you enjoyed my cards. I’d love to be your Stampin’ Up!® Demonstrator. All the Stampin’ Up! supplies used to make my cards are available in my online store. Simply click any of the product photos below!

Product List

Happy Stamping!

Scroll to Top