To begin, with the Mini Paper Pumpkin box laying flat, I used some painters tape to hold the Decorative Mask in place. Using a Blending Brush and Poppy Parade ink pad, I brushed the ink on the top of the box, the front edge and the back edges. I love the candy cane stripe background that the mask gives for the layers I added on the top of the box.
Next, I fussy cut the star from on the Memories & More Cards Pack and using the Scalloped Contours Dies, die cut the rectangle in Poppy Parade cardstock. I adhered the Poppy Parade rectangle to the Mini Paper Pumpkin box with Liquid Glue, then added the Star with Stampin’ Dimensionals. The little snowflakes are stickers from the Memories & More Cards pack. I added some Subtle Shimmer Sequins to give it a little sparkle.
Thank you for stopping by today, I hope you enjoyed my project!
I’d love to be your Stampin’ Up! Demonstrator. All the Stampin’ Up! supplies used to make my project are available in my online store. Simply click any of the product photos below!
Do you need to create a card for an upcoming occasion? Get the Inspired Thoughts Bundle and you’ll have inspiration at your fingertips! The Inspired Thoughts Stamp Set is packed with greetings for a variety of occasions. Whether you want to say a simple “Hello” or “Thank you” or need to find the words to convey thoughts of sympathy, this stamp set has it covered.
The Inspired Thoughts stamp set includes greetings for many occasions—and you’ll get options you can use on both the inside and outside of your card. Plus you can use all the greetings with one clear block, which makes it easy to use and cost effective.
Once the stamping is done, pair them with the images in the Inspiring Canopy Dies that are part of the bundle. The images are designed to work for many occasions and seasons. You’ll love seeing what you can do with the Inspired Thoughts Bundle.
The Inspiring Canopy Dies are the ideal complement to the stamp set. Together these products make a lovely team. It’s the perfect bundle for creating cards all year long. You save 10% when you order the bundle!
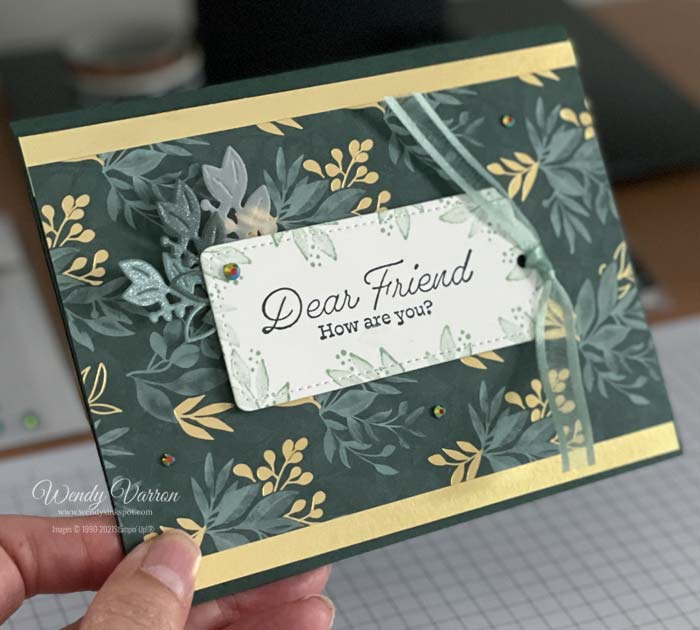
This pretty card was created with the Eden’s Garden Collection. I love the shades of green and the gold foil accents in the Ever Eden Designer Series Paper. It coordinates perfectly with the Soft Succulent & Evening Evergreen sheets of the 2021-2023 In Color Shimmer Vellum, and the Soft Succulent & Evening Evergreen Open Weave Ribbons. That’s one of the things I love about Stampin’ Up! products, the perfect color coordination across all their products. Color coordination makes me happy!
Creating the Card
To create the layers of my card I started with a piece Evening Evergreen cardstock for the base of my card. Then I cut a piece of the Ever Eden DSP to 3-1/2″ x 5-1/2, and 2 strips of Gold Foil Specialty Paper to 1/2″ x 5-1/2″. I adhered the DSP to the Gold Foil on the long edges and attached the DSP to the cardbase. You can see, in the image above,I cut the Gold Foil a touch longer than 5-1/2″. Not to worry, I just snipped the ends off with my Paper Snips.
The label was die cut with the Tailor Made Tags on Basic White cardstock. Using the Eden’s Garden Stamp set, I stamped the leaves in Soft Succulent around the edges of the tag. Next, I stamped the sentiment in Evening Evergreen. I die cut a few of the leaf stems from the Eden Dies in Vellum and the Soft Succulent and Evening Evergreen Shimmer Vellum. I attached them to the bottom of the label using a few glue dots. I tied a piece of the Soft Succulent Open Weave Ribbon before attaching the label to my card with some Stampin’ Dimensionals.
To finish my card I added a few of the Garden Gems. I’m sure by now you know I can’t resist adding a bit of bling whenever I can. I love the look of this card. I hope you do as well, leave a comment below and let me know what you think of my card.
Eden’s Garden Dear Friend Card Measurements
Evening Evergreen Cardstock card base: 5-1/2″ x 8-1/2″, score in half at 4-1/4″
Ever Eden DSP: 3-1/2″ x5-1/2″
Gold Foil Specialty Paper: (2) 1/2″ x 5-1/2″
I’d love to be your Stampin’ Up! Demonstrator. All the Stampin’ Up! supplies used to make my card are available in my online store. Simply click any of the product photos below!
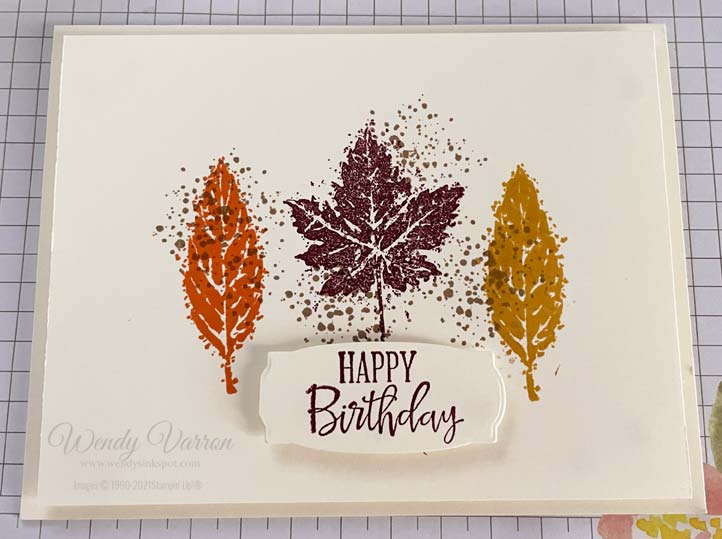
I have a bad habit of waiting until the last moment to make cards for special occasions. My husbands birthday earlier this month is a perfect example. I made this card the evening before his birthday, so I wanted to create a card quickly and without a lot of fuss. The Gorgeous Leaves stamp set was the perfect choice. The stamps are great on their own if you don’t want to use the Intricate Leaves Dies.
Once I decided on which stamp set to use it was time to decide on the colors to use. I love the colors of the leaves as they change in the fall. The tree right outside my window has a variation of red, orange and yellow leaves, so that was my inspiration for the color choice.
To start, I used the stamp with the splotches from the Gorgeous Leaves stamp set in Crumb Cake. Next, I stamped the leaves on top of the splotches. I started with the leaf in the center in Merry Merlot, then added the leaf in Pumpkin Pie and Bumblebee.
The Happy Birthday sentiment is from Peaceful Moments stamp set, I love the fonts in this set. Using the Message die, I die cut a set of blank labels with the Stampin’ Cut & Emboss machine on Very Vanilla cardstock, so that I have multiple blank labels to use later. I picked a label that would fit the sentiment and stamped it in Merry Merlot. Putting the card together i used Stampin’ Dimensionals for all the layers.
I’d love to be your Stampin’ Up! Demonstrator. All the Stampin’ Up! supplies used to make my card are available in my online store. Simply click any of the product photos below!
Gorgeous Leaves Card Measurements:
Very Vanilla Card Base: 5-1/2″ x 8-1/2″, scored in half at 4-1/4″
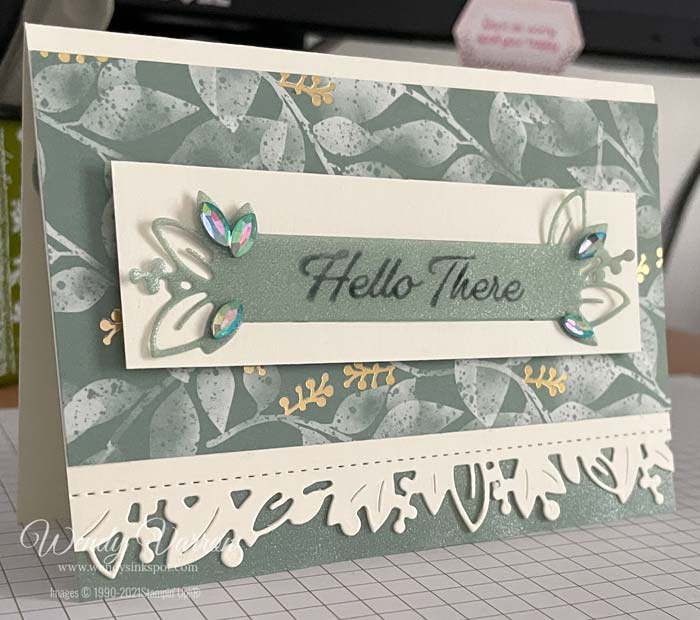
The Eden’s Garden Suite is one of my favorite Suites. I love the colors of the Ever Eden Designer Series Paper as well as the sentiments and images in the Eden’s Garden Cling Stamp set. And of course, I can’t forget the Garden Gems. If the specialty papers and gems in this suite are on your wishlist, they are only available while supplies last, don’t wait to order them, as they will not be in the January – July 2022 Mini Catalog.
Putting it all together
Using several pieces of Washi Tape to hold the die in place, I die cut the edge of my note card with the Eden Die to make this pretty edge. I added a piece of the In Color Shimmer Vellum on the inside of the card. It’s such a pretty effect against the die cut edge. Then added a piece of the Ever Eden DSP.
The sentiment was stamped on a piece of the In Color Shimmer Vellum with Staz On Ink, then die cut with the label from the Eden Dies. I adhered it to a piece of Very Vanilla cardstock, and using Stampin’ Dimensionals attached it to to the card. Finally, I added a few of the Garden Gems to give it a bit of bling.
Let me know in the comments below how you like today’s card. I’d love to be your Stampin’ Up! Demonstrator. All the Stampin’ Up! supplies used to make my card are available in my online store. Simply click any of the product photos below!
Eden’s Garden Card Measurements
Card base: Very Vanilla Note card or Cardstock cut to 5″ x 7″, scored in half at 3-1/2″
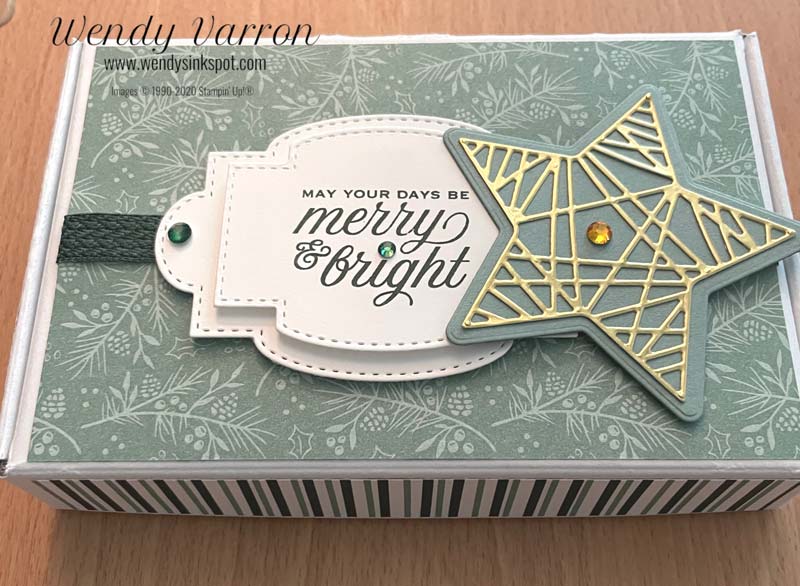
I dressed up this Mini Paper Pumpkin box with the Tidings of Christmas Suite, available in the 2021-2022 Annual Catalog. It is one of my favorite Christmas suites. I love the fonts of the sentiments, the classic colors and images for Christmas. The suite includes the Tidings & Trimmings Stamps, Christmas Trimmings Dies, Tidings of Christmas Designer Series Paper, and the Evening Evergreen 3/8″ Chevron Weave Ribbon. Click the image below to order yours!
Before decorating the Mini Paper Pumpkin box, I cut the Tidings of Christmas DSP for the box and took the picture below for reference on where to place all the pieces. You will need to cut:
(1) 3 5/8 x 5 3/8”, for the Top of the box
(2) 7/8 x 5 3/8”, for the Front and Back edges of the box
(2) 7/8 x 3 3/8”, for the Left and Right edges of the box
Let’s Decorate the Box
First, cut a 6 1⁄2” piece of Evening Evergreen Chevron Weave Ribbon and adhered it to the 3-5/8″ x 5-3/8″ DSP, then adhered the DSP to the top of the box. Next, I adhered the 7/8″ x 5-3/8″ DSP on the Front and Back edges, and the 7/8″ x 3-3/8″ DSP to the left and right edges. I used Multipurpose Liquid Glue to adhere all the DSP pieces, with liquid glue you have a few moments to make sure that the DSP is right where you want it.
The sentiment is stamped in Evening Evergreen Ink on Basic White cardstock and die cut with the Stitched So Sweetly labels. I die cut a second label and used Stampin’ Dimensionals to layer the sentiment on the larger label. I positioned it over the ribbon slightly to the left to ensure room to add the star.
I die cut the base of the star in Soft Succulent cardstock. Using adhesive sheets with gold foil, I die cut the detailed star layer. The adhesive sheet made it very easy to adhere it to the Soft Succulent cardstock star. If you haven’t tried adhesive sheets yet, I highly recommend them for detailed die cutting. I attached the star using Stampin’ Dimensionals. The Holiday Rhinestone Basic Jewels were the finishing touch.
I hope you enjoyed today’s project! I’d love to be your Demonstrator. If you’d like to purchase any of the supplies I used for this project, Click on the link(s) the below.
Start with Savings Starter Kit promotion will provide you with an excellent opportunity to purchase your Starter Kit at a great deal! Instead of the standard $99 Starter Kit—which is already a great deal—you can pick up a completely custom Starter Kit for only $75!!! That’s an amazing value!!
PROMOTION DETAILS:
Promotion Period: November 4-30, 2021
When a new demonstrator orders their custom Starter Kit, they will be able to redeem $125 of qualifying products for only $75 (normally $99).
New demonstrators who submit their Independent Demonstrator Agreement (IDA) before November 4 or after November 30 will not be eligible for this promotion. Starter Kit orders must be placed between November 4 and 30 to receive the discount.
Joining Deadline: November 30, 2021; 11:50 PM (MT)