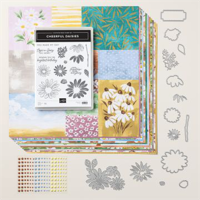
Discover the Wildly Flowering Suite
Let your paper crafts bloom with the Wildly Flowering Suite Collection! This hand-designed collection of products is perfect for a variety of crafting occasions, whether you’re making cards, scrapbook pages, or other paper projects. With its versatile floral themes and coordinated tools, you’ll find it easy to create stunning designs that impress and delight.

A Bouquet of Crafting Possibilities
The Wildly Flowering Suite Collection is more than just a set of tools—it’s a complete crafting experience. Let’s take a look at the products in this pretty floral suite:
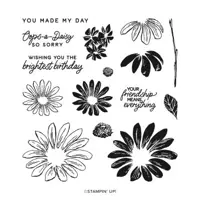
Wildflower Designs Cling Stamp Set

Stamp the intricate floral images on your projects and watch your creativity blossom. The cling stamps ensure precise and crisp impressions every time.
- 8 beautifully detailed cling stamps
- Suggested clear blocks (sold separately): b, d, h
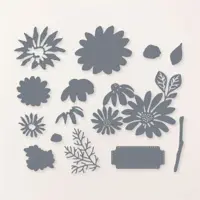
Wildflower Designs Dies

Pair the stamped images with these coordinating dies to effortlessly cut out your flowers and leaves. It’s a time-saving tool that adds a professional touch to your crafts.
- 7 coordinating dies
- Largest die: 5″ x 3-7/16″ (12.7 x 8.7 cm)
- Use with a Stampin’ Cut & Emboss Machine
Wildly Flowering 12″ x 12″ (30.5 x 30.5 cm) Designer Series Paper

Mix and match these beautifully patterned papers to create layered and textured backgrounds. The double-sided designs offer even more variety and versatility.
- 12 sheets of double-sided patterned paper: 2 each of 6 designs
- Acid free and lignin free
Dashing Designs 3D Embossing Folder

Enhance your projects with this coordinating 3D embossing folder. It adds depth and dimension, making your floral designs pop.
- Size: 4-1/2″ x 6-1/4″ (11.4 x 15.9 cm)
- Use with a Stampin’ Cut & Emboss Machine
Adhesive-Baked Textured Dots

Add the perfect finishing touch with these adhesive-backed embellishments. They’re easy to use and add a bit of sparkle and texture to your creations.
- 120 pieces in antique brass color
- Sizes: 4 mm and 5 mm
Color Coordination for Cohesive Designs
The Wildly Flowering Suite Collection features a carefully curated palette of colors: Crumb Cake, Early Espresso, Misty Moonlight, Moody Mauve, Mossy Meadow, and Wild Wheat.
Let Your Creativity Blossom
With the Wildly Flowering Suite Collection, the possibilities are endless. Whether you’re a seasoned crafter or just starting out, this collection provides all the tools you need to create beautiful, floral-themed projects. Stamp, cut, emboss, and embellish to your heart’s content and watch your paper crafts bloom!

Ready to let your creativity blossom? Explore the Wildly Flowering Suite Collection today and start crafting your floral masterpieces!
Want to leave a comment, Please Click Here
Happy Stamping!

I’d love to be your Stampin’ Up! Demonstrator. To purchase the products in the Wildly Flowering Suite Collection or any Stampin’ Up! products, click on any of the product images below or shop my online store www.wendysinkspot.com/shop.
Want to leave a comment, Please Click Here