Gift Packaging

Luv 2 Stamp Group Blog Hop – Halloween Treat

Welcome to the Luv 2 Stamp Group Blog Hop!

We hope you enjoy our Halloween Theme!

We are excited to share projects with you again this year. We hope to inspire you to create beautiful new projects using Stampin’ Up! products. Once you are done with each post, scroll down to the bottom and you will see a list of Blog Hop participants, you can click on their name to go to their post, or you can click the next button to go to the next post. Happy Crafting!

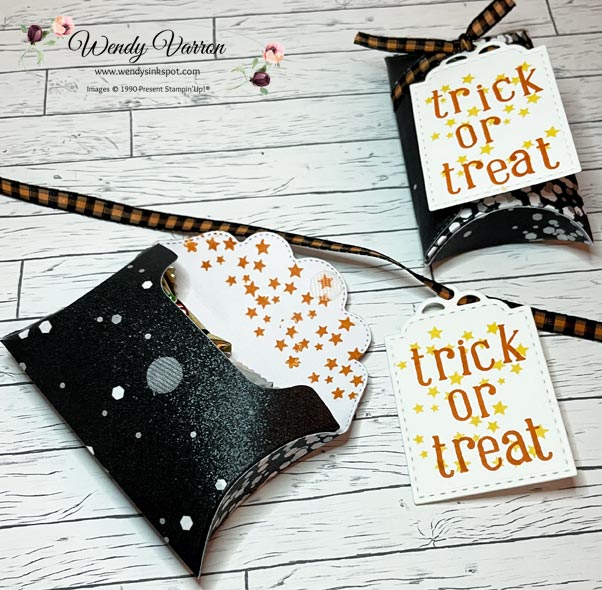
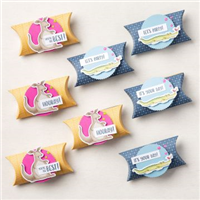
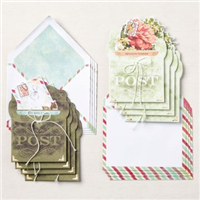
The kid in me thinks of candy, candy and candy at Halloween. I remember as a kid, sleeping with my candy bag so that my favorite candy, gum, snickers, rolos and twizzlers…. wouldn’t mysteriously disappear in the night. With candy in mind, I decided to feature treat packaging for Halloween with the Mini Pocket Envelope Dies and the Pretty Pillow Box Dies.

I die cut the Mini Pocket Envelope and Pillow Box using the Metallic & Shimmer Specialty Paper. I just love how shimmery this paper is and its perfect for Halloween. I used the star stamp from the Alphabest Stamp set and Pumpkin Pie ink to decorate the inside of the envelope and box.

I used the Designer Tags Dies and Basic White cardstock to create the tags for the treats. Using the stars again, I stamped them in So Saffron on the tag, then stamped the Trick Or Treat in Pumpkin Pie ink. Before I made these tags I did a few tests on some scrap cardstock with different colors and lining up the letters. I really liked the effect of not linking up the letters and leaving some of them a little crooked.

Stampin’ Blends are great for adding color to ribbon, embellishments as well as coloring images. I used the Pie Stampin’ Blends to add color the super cute Black & White Gingham Ribbon.

For more inspiration from the Luv 2 Stamp Group Blog Hop Team, click on the image below to visit the talented Kurstan del Rosario. Don’t forget to continue following links on each blog to see everyone’s projects!

I hope you enjoyed my project. I’d love to be your Stampin’ Up!® Demonstrator! All the Stampin’ Up! supplies used to make my card are available in my online store. Simply click any of the product photos below!

Happy Stamping!

A Million Thanks

Let me introduce you to the newest Kit in the Kits Collection, A Million Thanks.

Say “Thank You” in style with this beautiful kit, which includes everything you need to create 9 all-occasion cards to express your gratitude. Mix & match card bases, sentiments, pre-cut die pieces, and embellishments to create expertly crafted cards with ease. This kit is just what your collection needs!

All the Details

  • A Million Thanks Photopolymer Stamp Set
  • Acrylic Stamp Block
  • Classic Stampin’ Spot: Evening Evergreen 
  • Pre-designed projects 
  • Step-by-step instructions
  • Pre-cut pieces (No prep work! Get right to crafting)
  • Makes 9 cards: 3 each of 3 designs 
  • UV coating on card bases (looks like clear embossing)
  • Folded card size: 5-1/2″ x 4-1/4″ (14 x 10.8 cm) 
  • 9 pre-printed envelopes 
  • Enough adhesive to complete projects 
  • Printed die-cut sheets
  • 1 sheet of adhesive-backed black dot embellishments
  • A 9-7/8″ x 6-1/2″ x 2-3/4″ (25.1 x 16.5 x 7 cm) printed designer box for storage or crafting on the go

Expand your creativity by adding in these coordinating colors: Basic Black, Blushing Bride, Crumb Cake, Evening Evergreen, Mossy Meadow, Pale Papaya, Pear Pizzazz.

The Kits Collection by Stampin’ Up! makes creativity easy! All-inclusive kits have everything you need to get started including artistically-designed projects, step-by-step instructions, precut pieces, and more. Choose the kit that’s right for you! We have an assortment of options designed in a range of styles for a variety of occasions. New kits are added regularly and available while supplies last.

Happy Stamping!

Symbols of Fortune Mini Paper Pumpkin Box

I love decorating the Mini Paper Pumpkin Boxes. I used the Symbols of Fortune Suite Collection to decorate my box today. Wouldn’t this be a great gift box if you were going to gift some scratch off tickets?


To decorate the box like I did, you will need to cut the following:

  • DSP
    • (1) 3-5/8″ x 5-3/8″, for the top of the box
    • (2) 7/8″ x 5-3/8″, for the front and back edges of the box
    • (2) 7/8″ x 3-3/8″, for the Left and Right edges of the box
  • Vellum
    • (1) 3-1/4″ x 5″

For reference the picture shows where each of the pieces of DSP go on the box. This is from the Tidings & Trimmings box I decorated for Christmas. Click here to see that post.


Here are the pieces of Symbol of Fortune DSP I adhered to my box with Multipurpose Liquid Glue.

The label is from the Pretty Pillow Box dies. the sentiment is from the Crane of Fortune Bundle, stamped in Mint Macaron on Basic White cardstock. I cut a second label in Mint Macaron, cut it in half and layered it on the back side of the Basic White label.

The foliage is die cut with the Mother of Pearl Specialty Paper. I attached it to the back of the label with Mini Glue Dots.

I love the shimmer of the Mother of Pearl Specialty Paper. Its near impossible to see in the photo but if you love a bit of sparkle, this is the paper for you.

The crane is stamped in Smoky Slate on Basic White cardstock. Before I stamped the crane, I used a Blender Pen to remove the Smoky Slate ink from the “crown” of the crane, then used a Poppy Parade Stampin’ Write Marker to ink it up.

Next, I used Stampin’ Dimensionals to adhere the label and crane to the Vellum. Then, attaching some Tear & Tape on the back of the Vellum so it can’t be seen, I attached the Vellum to the top of the Paper Pumpkin box. Finally I added a few of the Polished Dots.

I’d love to be your Stampin’ Up!® Demonstrator. All the Stampin’ Up! supplies used to make my card are available in my online store. Simply click any of the product photos below!

Product List

I hope you enjoyed my project today. Leave a comment below and let me know.

Happy Stamping!

Scroll to Top