Simple Stamping

Biggest Wish

My son’s birthday was this past Sunday. He is our youngest and has just turned 20! Where did that time go? Masculine cards are always challenging for me but I think this one turn out quite nice. The inspiration for this card came from the Annual Catalog. The colors, Granny Apple Green, Coastal Cabana, Bermuda Bay and Pacific Point, caught my eye as I was flipping though for inspiration.

Putting it all together

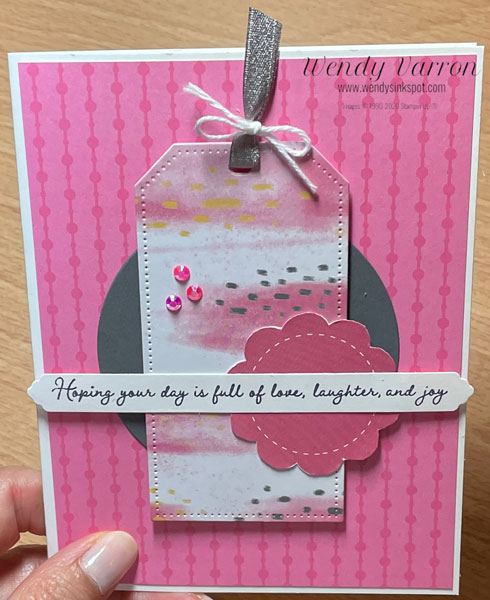
Once I pulled the ink pads out I decided to use the same colors in the Brights 6x 6″ Designer Series Paper Assortment. I cut strips of each color and adhered them to a piece of Basic White Cardstock. Then using my mini paper trimmer I trimmed up the strips to fit on my card.

I stamped Happy, from the Biggest Wish Stamp set, in alternating colors of Granny Apple Green, Coastal Cabana and Bermuda Bay on a strip of Basic White Cardstock. Photopolymer stamps make stamping this sentiment multiple times very easy. Once I placed the stip on the cardstock layer where I liked it, I added the Birthday sentiment in Pacific Point. I attached the carstock layer with the DSP strips to a Basic White Cardbase. Then I attached the sentiment strip with Stampin’ Dimensionals to my card and trimmed it down to fit my card.

To finish off my card, I of course had to add some bling. I used Stampin’ Blends to add a bit of color to a few Silver & Clear Epoxy Essentials to add to my card.

I’d love to be your Stampin’ Up!® Demonstrator. All the Stampin’ Up! supplies used to make my card are available in my online store. Simply click any of the product photos below!

Product List

Happy Stamping!

Hand Penned Memories & More

The Hand Penned Memories & More Card Pack, and the Hand Penned Memories & More Cards & Envelopes make creating cards for any occasion quick and easy. If you need a simple and pretty card, these products are perfect!

I decided to use just a few elements of this card that I selected form the Hand Penned Memories & More Card Pack and do as little stamping as possible. I fussy cut sentiment and used the Layering Circle Dies to cut the circle. To add in a bit of color I cut a Fresh Freesia scalloped circle from the 2021-2023 Designer Series Paper Assortment.

Next, I used the Tailor Made Tags to cut out the tag from Pale Papaya Cardstock. I stamped the flowers on the tag from the Hand Penned Petals stamps in Pale Papaya for tone on tone look. To put my card together I layered the scalloped circle on the Memories & More Card base, then the tag and the smaller circle with Multipurpose Liquid Glue. I added the sentiment with Stampin’ Dimensionals.

The bow on the tag was tied with Basic White Bakers Twine. Finally, I added the 2021-2023 In Color Jewels for the center of a few of the flowers. I really like the layers on this card and how easy it was to make, so I created a second card using the What A Year Memories & More Card Pack.

What A Year Card

For this second card I wanted to use Polished Pink (pink is my favorite color). I started with a piece of the Polished Pink 2021-2023 In Color Designer Series paper on a piece of Basic White Cardstock for the card base. I used a card from the What A Year Memories & More Card Pack to die cut the tag using the Tailor Made Tags and fussy cut the Polished Pink Flower. Using the Layering Circles Dies I cut a Basic Gray circle.

The sentiment is the stamped element on this card. I stamped the Many Messages Stamp on Basic White cardstock in Tuxedo Black Memento Ink. Then I die cut the labels with the Messages Die. These Many Messages stamp and Messages dies are great, now I’ve got lots of stamped labels ready to go. To finish this card I added a piece of Gray Granite Shimmer Ribbon tied with Basic White Bakers Twine and of course a few 2021 – 2023 In Color Jewels.

What A Year Card Measurements:

  • Basic White Card Base: 5-1/2″ x 8-1/2″, fold in half
  • In Color DSP Assortment: 4″ x 5-1/2″

Thank you so much for stopping by my blog today. I’d love to be your Stampin’ Up! Demonstrator. All the Stampin’ Up! supplies used to make my cards are available in my online store. Simply click any of the product photos below!

Product List

Happy Stamping!


Gorgeous Leaves

I have a bad habit of waiting until the last moment to make cards for special occasions. My husbands birthday earlier this month is a perfect example. I made this card the evening before his birthday, so I wanted to create a card quickly and without a lot of fuss. The Gorgeous Leaves stamp set was the perfect choice. The stamps are great on their own if you don’t want to use the Intricate Leaves Dies.

Once I decided on which stamp set to use it was time to decide on the colors to use. I love the colors of the leaves as they change in the fall. The tree right outside my window has a variation of red, orange and yellow leaves, so that was my inspiration for the color choice.

To start, I used the stamp with the splotches from the Gorgeous Leaves stamp set in Crumb Cake. Next, I stamped the leaves on top of the splotches. I started with the leaf in the center in Merry Merlot, then added the leaf in Pumpkin Pie and Bumblebee.

The Happy Birthday sentiment is from Peaceful Moments stamp set, I love the fonts in this set. Using the Message die, I die cut a set of blank labels with the Stampin’ Cut & Emboss machine on Very Vanilla cardstock, so that I have multiple blank labels to use later. I picked a label that would fit the sentiment and stamped it in Merry Merlot. Putting the card together i used Stampin’ Dimensionals for all the layers.

I’d love to be your Stampin’ Up! Demonstrator. All the Stampin’ Up! supplies used to make my card are available in my online store. Simply click any of the product photos below!

Gorgeous Leaves Card Measurements:

  • Very Vanilla Card Base: 5-1/2″ x 8-1/2″, scored in half at 4-1/4″
  • Very Vanilla layer: 4″ x 5-1/4″

Happy Stamping!

Ornate Thanks/November 2021 Demonstrator Training Program Blog Hop

Thank you for joining us for our Stampin’ Up!® Demonstrator Training Program Monthly Blog Hop! We are so happy that you could join us today for this blog hop for ideas and creative inspiration. We are a group of Stampin’ Up!® Demonstrators from around the world that are taking part in training that is helping us to build a successful Stampin’ Up!® business and reach some goals we have set. We really appreciate your support.
You may be starting here or have come from another blog – either way you can find the link list at the bottom of this post so that you can see every blog post and idea today.

For my card I wanted to create a Thank You card that is easily duplicated so that you can make multiples at one time. These will be great to give as thank you’s during the holiday’s. The Whimsy & Wonder DSP is stunning with the iridescent foil accents in the patterns.

I used my Stamparatus to stamp the “Thanks” from the Biggest Wish Stamp Set in Mint Macaron. Then I stamped the “just wanted to say” from the Ornate Thanks Stamp Set in Tuxedo Black ink. I really like the effect of stamping it over the “Thanks”. I layered Whimsy & Wonder DSP on a strip of Mint Macaron cardstock, cut to 1″ x 5-1/2″. Then I adhered the DSP to the card base under the sentiment.

I tied a piece of Glittered Organdy Ribbon around the top of the card over the Mint Macaron cardstock, a fun way to give the ribbon a pop of color. To finish the card I added a few of the Mint Macaron Genial Gems.

Ornate Thanks Card Measurements

  • Basic White Thick Cardstock: 8-1/2″ x 5-1/2″, score in half 4-1/4″
  • Mint Macaron Cardstock: 5-1/2″ x 1″
  • Whimsy & Wonder DSP: 5-1/2″ x 2-1/2″

As mentioned at the top, this is a blog hop so make sure you ‘hop’ around to all the amazing projects on this hop! Click on the links below to visit them.

Thanks for stopping by today!

Scroll to Top