Inspirations In Ink Blog Hop-Season of Chic

Welcome to the Inspirations In Ink Blog Hop! Thank you so much for hopping along with us! This month we are featuring Stampin’ Up!’s Season of Chic Bundle. Once you are done with each post, scroll down to the Blog Hop List participants, you can click on their name to go to their post. We hope you find some inspiration and enjoy all of our Season of Chic Bundle Projects!

The the Textured Chic Suite has so many beautiful products in the suite. The Season of Chic Stamp Set has images for all seasons and the Chic Dies to cut them out, the gold foil in the Textured Chic Designer Series Paper and Distressed Gold Specialty paper. And don’t miss the matching Textured Chic Memories and More Cards, and the Textured Chic Memories and More Cards & Envelopes. So many possibilities!
Let me show you how I created this pretty card. I started with a Textured Chic card base and created a Z-fold by scoring the front panel of the card base at 2-1/2″and folding it back.

I cut 2 strips of Textured Chic DSP and adhered them to each of the inside sections of the folded panel. Then I adhered another piece of Textured Chic DSP on the inside on the right. With so many beautiful patterns in this DSP pack, I chose to use 3 different patterns.

Next, I stamped the sentiment in Evening Evergreen on Basic White cardstock and die cut it with a square from the Stylish Shapes dies. Then adhered it to with Stampin’ Dimensionals to one of the Textured Chic Memories and More cards.
I die cut a few leaves with the Distressed Gold Specialty Paper that I thought would go well with the leaf images in the Memories and More Card, and adhered them to the corners of the square. I adhered the Memories and More card to the folded front panel. Remember when adding this to your card to put adhesive on just one side of the card back so your card will open properly.
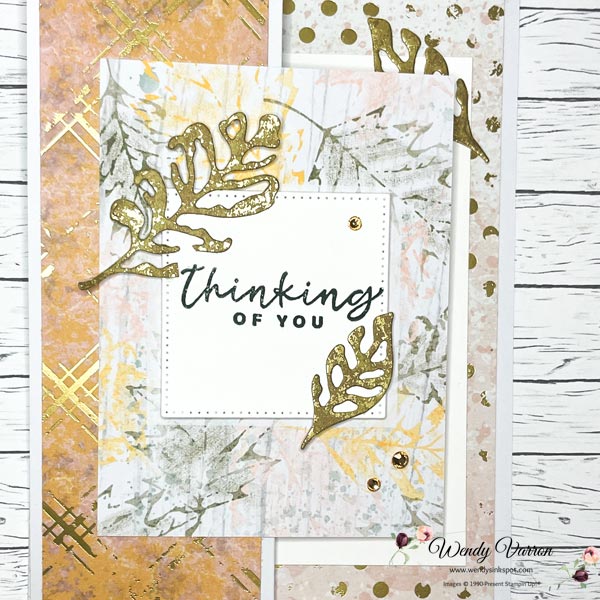

On the inside of the card I wanted the Basic White pane to show just a bit like a frame for Memories and More card on the font. To do this I cut the a piece of Basic White cardstock to 3-1/2″ x4-1/2″, which is just a bit bigger than the Memories and More Card and adhered to the inside of the card. It worked out perfectly, then I added a few of the leaves I cut earlier. Finally, I added a few Champaign Rhinestone Basic Jewels to bring out the gold foil of the Designer Series Paper.

Blog Hop List
I hope you enjoyed my Season of Chic Thinking of You card. As mentioned at the top, this is a blog hop so make sure you ‘hop’ around to all the amazing projects on this hop! Click on the links below to visit them.
- Wendy Varron – USA **You Are Here
- Christy Gridley – USA
- Deirdre Croal – USA
- Julie Golding – Canada
- Robbie Rubala – USA
- Theresa McEntee – USA
- Vicky Wright – Australia
Season of Chic Card Measurements:
- Textured of Chic card base from Memories & More Cards & Envelopes
- Textured Chic card from Memories and More Card pack: 2″ x 4″
- Textured Chic DSP: (2) 1-7/8″ x 6″, 4″ x 6″
- Basic White Cardstock 3-1/2″ x 4-1/2″
I’d love to be your Stampin’ Up!® Demonstrator. All the Stampin’ Up! supplies used to make my card are available in my online store. Simply click any of the product photos below!
Happy Stamping!