Color Challenge Inspiration

Today’s card was inspired by the Global Design Project for this week.

Confession: Orange or any shade of orange is not something I use regularly. I tend to use it only in the fall with pumpkins or leaves so this was a bit of challenge for me. I didn’t pay close enough attention to the colors in the challenge, I kind of glanced at them quickly and thought the Pale Papaya was So Saffron. I created the card below and then realized that I’d used the wrong color when I started this post. OOPS!

While I was designing this card I decided on a clean and simple layout using just stamps, ink and paper with a touch of bling. To create my cards I used Evening Evergreen for my card base and for the sentiment which is from the Create With Friends stamp set. The flowers are stamped on Basic White card stock with images from the Art Gallery Stamp set. I stamped the stems of my flowers in Soft Succulent first, then added the blossoms in Pale Papaya.

Once the blossoms were stamped I added in the Sentiment. Photopolymer stamps make placement very easy. I decided to rotate the card stock to fit the sentiment on the way I wanted it.

The Basic White card layer was attached to the base using Stampin’ Dimensionals. I use them on almost every project to add dimension. I added the new 2021-2023 In Color Jewels as the final touch to give this card just a little sparkle.

I hope this color challenge inspires you too!

Happy Stamping!

Product List

Dragonfly Garden Fun Fold Card

Today I’m sharing a fun fold card I made with the Dragonfly Garden stamp set and the Dandy Garden Designer Series paper which are available now it the January – June 2021 Mini Catalog. 
The card base is a piece of Misty Moonlight card stock cut to 4 1/4″ x 5 1/2″, with the DSP layer cut to 4″ x 5 1/4″.
 
 
 The Bumblebee card stock is cut to 8 1/2″ x 2 1/2″ scored at 4 1/4″. This layer is where the card opens, and I placed it on the base of the card sightly off center. 


The banner is a piece of Whisper White card stock cut to 2 1/2” x 4 1/4”.  I snipped out a small triangle off one end of the with Paper Snips to create the banner. 


The dragonflies are sponged with a touch of color. I did one with Bumblebee in the middle and Misty Moonlight on the outside, then I altered the colors on a second dragonfly and punched them out with the Dragonfly punch.  


Before I stamped the sentiment, I placed the punched out dragonflies where I wanted them with out adhesive, then I was able to stamp the sentiment in Misty Moonlight. I added the dragonflies with Dimensionals to pop them up and brushed them with a Wink of Stella. Last but not least, I added the Opal Rounds which give it just the perfect touch. 
 
 
I hope you enjoyed today’s card. 


Product List

Happy Stamping,

Tag Buffet

Today I want to share with you how I used a few of the tags from the Tag Buffet Kit in the August-December 2020 Mini Catalog.

 Not only do I make Christmas cards to send out but I also make all the gift tags that we use each year. 

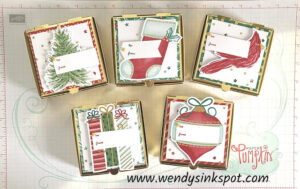
As I was making the tags from the kit, I decided to use them to dress up a few gift boxes. 


The Gold Mini Pizza boxes are the perfect size for some tasty treats or a small gift. They are also the perfect size for the tags in the Tag Buffet Kit with just a bit of trimming. 


The base layer of the tag is 3 1/4″, exactly what I needed for the Pizza Box. I trimmed bit off the top of the tag so that it measures 3 1/4″x 3 1/4″. The white layer is 3″ wide, so I trimmed a bit off the top again so that it measures 3″ x 3″.   


Once they were trimmed to the perfect size I layered them with some Multi Purpose glue and used Stampin’ Dimensionals to pop the tree up. 


Using the small tag from the Tag Buffet Kit I stamped the “To” & “From” using a stamp from the Little Treats Stamp set. I wanted this little tag to be a little off center, so I added Stampin’ Dimensionals on the end to keep it popped up with the tree and some Multipurpose Glue to make sure it adhered to the tree. 

To dress it up a bit I added a few little yellow stars from the All The Trimming embellishments. Then the Tag was attached to the Pizza box with a bit of glue. I love how they turned out.

The Tag Buffet Kit  and All The Trimmings Embellishments are on sale now during the Year-End Close Out, now is the perfect time to snatch them up for next year! 


Thanks so much for stopping by today! 

Happy Stamping,

Welcome to my blog!

Welcome and thank you for visiting my blog! I am excited to share my love of stamping with you. I was introduced to Stampin’ Up! in 2009 and I was hooked after I made my first card. I love that Stampin’Up! products color coordinate from the cardstock to the Designer Series paper to ink and embellishments. 

You’re just in time to see a few sneak peaks of some really cute and amazing products coming in January in the January – June 2021 Mini Catalog. So without further ado…..


This monochromatic card was made with a the Dandy Laser Cut Paper. I layered the card front on a piece of Whisper White Cardstock. Using a Blender Brush I added some Mint Macaron ink to create a stencil look. The bristles on the Blender Brush very soft which makes them easy to use on a the delicate laser cut card front without bending or tearing it. I’ll be able to use it again.


First I inked the cardstock, then, I trimmed away the white border. 
To put the card together, I adhered the inked card stock with Stampin’ Seal on to another piece of Whisper White cut about a 1/2″ larger for a framed look. Then, I add a piece of Silver Metallic Edge ribbon, attaching it to the back of the Whisper White layer before adhering it to the card base. 
 
The sentiment, from the Enjoy the Moment Stamp set, is stamped in Mint Macaron and die cut with the Stitched So Sweetly dies. I popped it up with my favorite adhesive Stampin’ Dimensionals.  This was an easy card to make with just a few supplies. 


Product List

Happy Stamping,

Scroll to Top