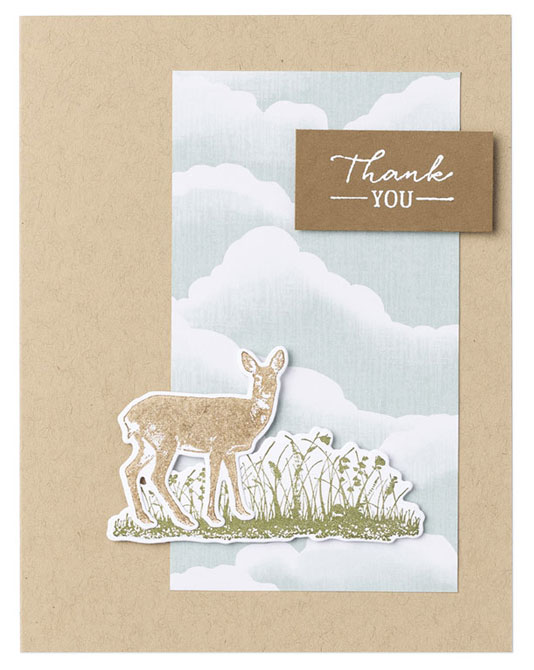
If you like versatility in your papercrafting, you’ll love the Grassy Grove Bundle! This stamp and die bundle features nature-inspired images that are perfect for all types of occasions. The Grassy Grove Bundle makes crafting ornate, artistic cards with perfectly framed nature scenes—such as a lone deer or a colorful sunset peeking out from behind a grove of die-cut trees.
The Grassy Grove images pair as well with sentiments from other stamp sets as it does with the four all-occasion greetings that come with the bundle. That means you get even more mileage out of the stamp sets you already have in your collection just by adding this bundle!
The book & tea lover in me immediately added the Every Chapter Cling Stamp to my Jan-June 2022 Mini Catalog must have shopping list. There are so many possibilities for coloring in this great stamp. I chose to color the image for this card with Watercolor Pencils.
I wanted my card to have lots of bright color so I picked this pretty heart pattern from the Pattern Party DSP that is available as a host reward in the Annual Catalog. I love how it looks on the Granny Apple Green card base.
I wanted to add some dimension to the book images when adding them to my card so I snipped them apart after I colored them.
To add the book pieces to my card, I put Stampin’ Dimensionals on the end of the images with the pages, and a Mini Glue Dot on the other end. This allowed them to be a bit popped up on my card front as if they were actually stacked at an angle. I used Mini Glue Dots to adhere the cup and glasses to top of the stack. I brushed the glasses with a Wink of Stella to give them a shimmery look.
I’d love to be your Stampin’ Up!® Demonstrator. All the Stampin’ Up! supplies used to make my card are available in my online store. Simply click any of the product photos below!
Today’s post is all about the Color & Contour Bundle available in the Annual Catalog. This great bundle includes the Color & Contour Photopolymer Stamp set and the Scallop Contours Dies. The stamps and dies pair perfectly together to create card fronts, sentiment labels and more. Bundles are a great value, when you purchase a bundle you save 10%!
The Color & Contour Photopolymer Stamp Set includes sentiments & Two-Step floral image stamps. The open floral images give you options to keep it simple or fill them in however you choose. Use the coordinating filler stamps for an elegant watercolor design or try something new and watercolor freehand using Water Painters or Stampin’ Blends®. Use ink and sponge daubers on the filler stamps to blend an ombre effect. The fonts of the sentiment stamps make them easy to pair with the floral images in the stamp set or other stamps.
The Scallop Contour Dies are one of my favorite dies in the annual catalog. The six scalloped border dies can be used alone or with the Color & Contour Stamp Set or any other stamp set. From cute card fronts to embellished tags to artistic sentiment labels. And don’t stop at just cards! Create scalloped frames for photos, fun borders for scrapbooks, and whatever else you can think of. Pair these dies with the Color & Contour Stamp Set, or see what sentiments from other stamp sets fit perfectly inside each rectangle.
Keep scrolling for inspiration. These are just a few of the amazing projects that you can make with the Color & Contour bundle.
How does the Color & Contour Bundle inspire you? Let me know in a comment below!
My son’s birthday was this past Sunday. He is our youngest and has just turned 20! Where did that time go? Masculine cards are always challenging for me but I think this one turn out quite nice. The inspiration for this card came from the Annual Catalog. The colors, Granny Apple Green, Coastal Cabana, Bermuda Bay and Pacific Point, caught my eye as I was flipping though for inspiration.
Putting it all together
Once I pulled the ink pads out I decided to use the same colors in the Brights 6x 6″ Designer Series Paper Assortment. I cut strips of each color and adhered them to a piece of Basic White Cardstock. Then using my mini paper trimmer I trimmed up the strips to fit on my card.
I stamped Happy, from the Biggest Wish Stamp set, in alternating colors of Granny Apple Green, Coastal Cabana and Bermuda Bay on a strip of Basic White Cardstock. Photopolymer stamps make stamping this sentiment multiple times very easy. Once I placed the stip on the cardstock layer where I liked it, I added the Birthday sentiment in Pacific Point. I attached the carstock layer with the DSP strips to a Basic White Cardbase. Then I attached the sentiment strip with Stampin’ Dimensionals to my card and trimmed it down to fit my card.
To finish off my card, I of course had to add some bling. I used Stampin’ Blends to add a bit of color to a few Silver & Clear Epoxy Essentials to add to my card.
I’d love to be your Stampin’ Up!® Demonstrator. All the Stampin’ Up! supplies used to make my card are available in my online store. Simply click any of the product photos below!
I decided to use just a few elements of this card that I selected form the Hand Penned Memories & More Card Pack and do as little stamping as possible. I fussy cut sentiment and used the Layering Circle Dies to cut the circle. To add in a bit of color I cut a Fresh Freesia scalloped circle from the 2021-2023 Designer Series Paper Assortment.
Next, I used the Tailor Made Tags to cut out the tag from Pale Papaya Cardstock. I stamped the flowers on the tag from the Hand Penned Petals stamps in Pale Papaya for tone on tone look. To put my card together I layered the scalloped circle on the Memories & More Card base, then the tag and the smaller circle with Multipurpose Liquid Glue. I added the sentiment with Stampin’ Dimensionals.
The bow on the tag was tied with Basic White Bakers Twine. Finally, I added the 2021-2023 In Color Jewels for the center of a few of the flowers. I really like the layers on this card and how easy it was to make, so I created a second card using the What A Year Memories & More Card Pack.
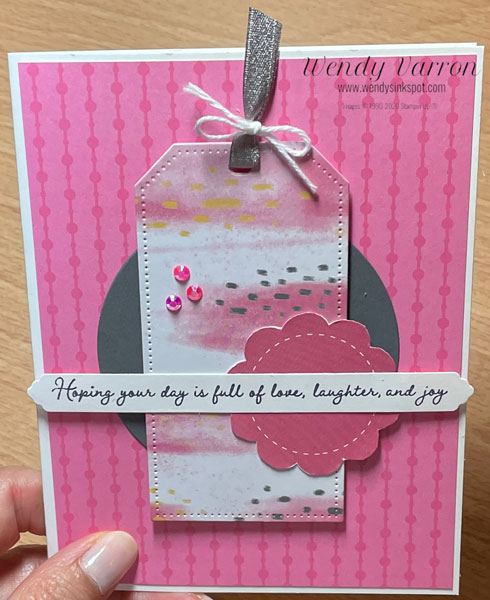
What A Year Card
For this second card I wanted to use Polished Pink (pink is my favorite color). I started with a piece of the Polished Pink 2021-2023 In Color Designer Series paper on a piece of Basic White Cardstock for the card base. I used a card from the What A Year Memories & More Card Pack to die cut the tag using the Tailor Made Tags and fussy cut the Polished Pink Flower. Using the Layering Circles Dies I cut a Basic Gray circle.
The sentiment is the stamped element on this card. I stamped the Many Messages Stamp on Basic White cardstock in Tuxedo Black Memento Ink. Then I die cut the labels with the Messages Die. These Many Messages stamp and Messages dies are great, now I’ve got lots of stamped labels ready to go. To finish this card I added a piece of Gray Granite Shimmer Ribbon tied with Basic White Bakers Twine and of course a few 2021 – 2023 In Color Jewels.
What A Year Card Measurements:
Basic White Card Base: 5-1/2″ x 8-1/2″, fold in half
In Color DSP Assortment: 4″ x 5-1/2″
Thank you so much for stopping by my blog today. I’d love to be your Stampin’ Up! Demonstrator. All the Stampin’ Up! supplies used to make my cards are available in my online store. Simply click any of the product photos below!
To begin, with the Mini Paper Pumpkin box laying flat, I used some painters tape to hold the Decorative Mask in place. Using a Blending Brush and Poppy Parade ink pad, I brushed the ink on the top of the box, the front edge and the back edges. I love the candy cane stripe background that the mask gives for the layers I added on the top of the box.
Next, I fussy cut the star from on the Memories & More Cards Pack and using the Scalloped Contours Dies, die cut the rectangle in Poppy Parade cardstock. I adhered the Poppy Parade rectangle to the Mini Paper Pumpkin box with Liquid Glue, then added the Star with Stampin’ Dimensionals. The little snowflakes are stickers from the Memories & More Cards pack. I added some Subtle Shimmer Sequins to give it a little sparkle.
Thank you for stopping by today, I hope you enjoyed my project!
I’d love to be your Stampin’ Up! Demonstrator. All the Stampin’ Up! supplies used to make my project are available in my online store. Simply click any of the product photos below!


 Host Designer Series Paper")


")
 Designer Series Paper")


 Designer Series Paper")


 Shimmer Ribbon")


