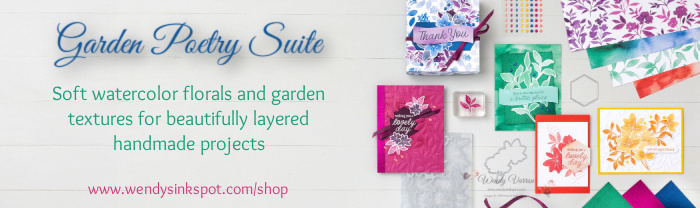
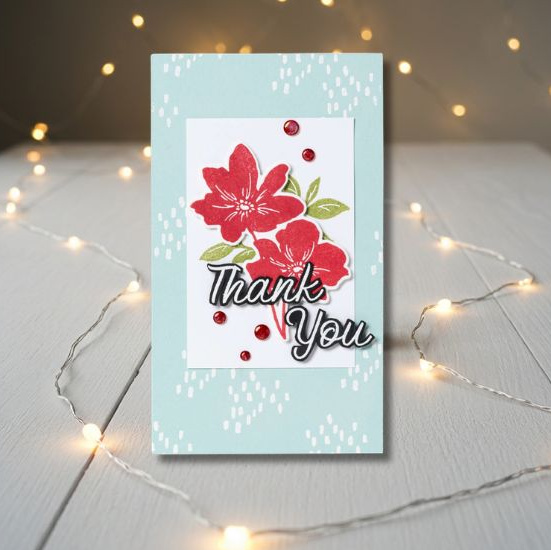
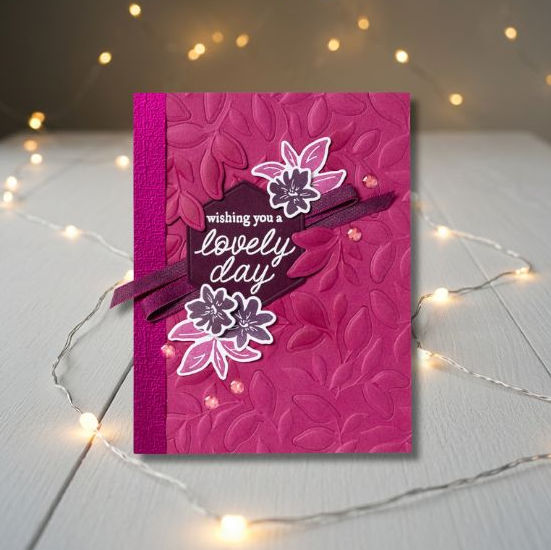
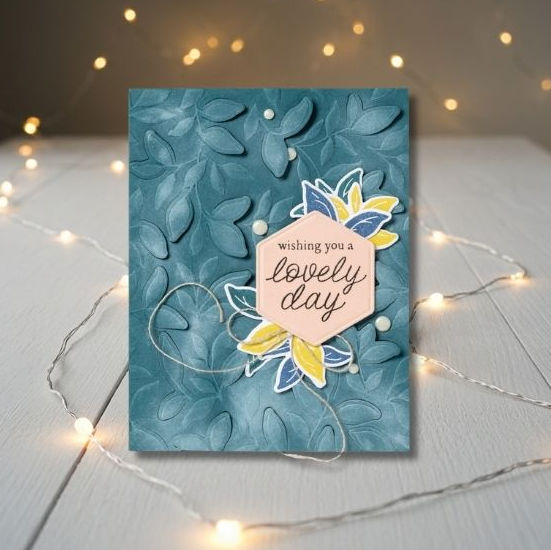
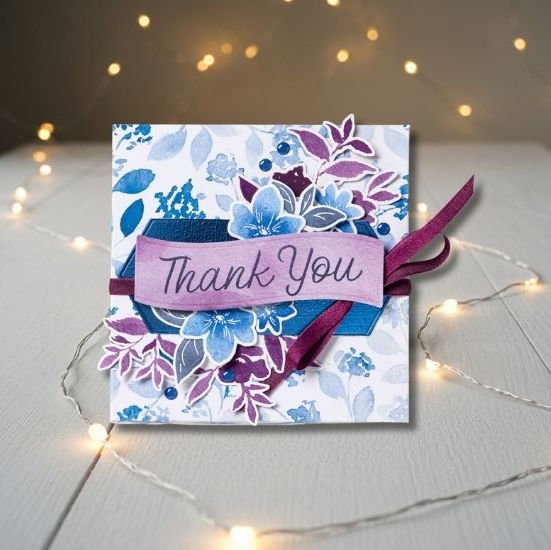
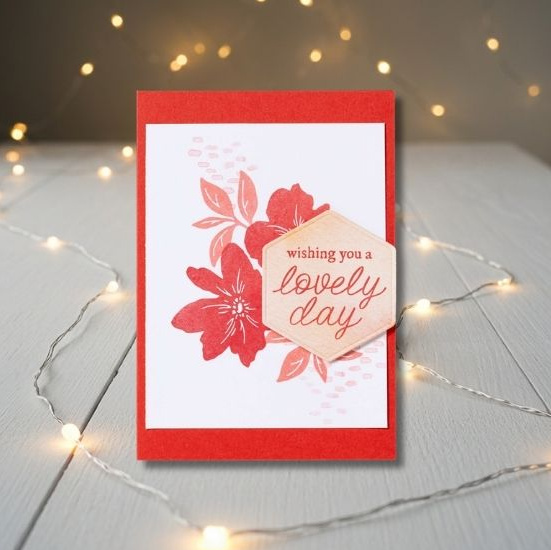
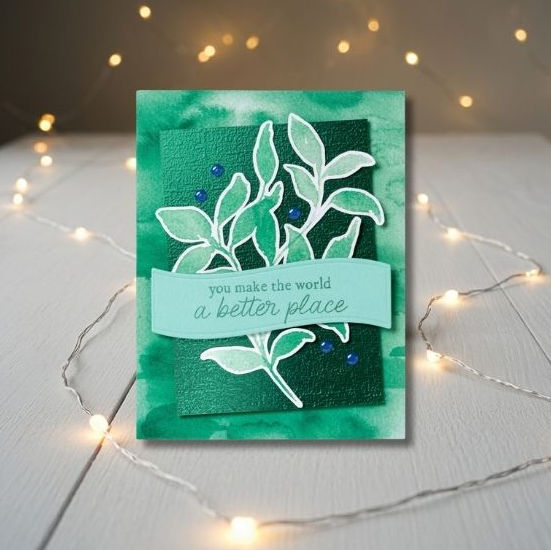
The Garden Poetry Suite is one of Stampin’ Up!’s newest Online Exclusives featuring soft watercolor florals and airy layers. The pretty colors, gentle florals, and little garden touches that make you want to sit down and create something beautiful. Today I’m sharing a few of Stampin’ Up!’s sample projects, they show off this suite’s charm beautifully and are sure to spark ideas for your next crafty moment.
Stampin’ Up! created some truly lovely samples for this suite, and I couldn’t resist sharing them with you today. Each one shows off a different side of the Garden Poetry Suite – soft watercolor layers, delicate florals, and those sweet little garden touches that make this suite feel so peaceful.
What I love most about Garden Poetry is how easy it is to create something soft and beautiful without overthinking it — the suite does so much of the work for you.
Aren’t these samples wonderful? I love how they capture that soft, watercolor charm. I’m so glad you popped in to take a peek with me. If something caught your eye, you’ll find the Garden Poetry products featured below.
I love to use sketches for inspiration, they are a fantastic way to kickstart the creative process. Sketches provide a blueprint that sparks ideas and guides the design of a project. I like to save sketches to my Pinterest Board to use for inspiration. If you’d like to check out my Pinterest board for more inspiration, click Here.
Today, I’m excited to share two cards I created using a sketch as my inspiration. Below is the simple sketch that inspired these designs.
For my first card, I chose to work with the Bright & Beautiful Designer Series Paper. This 6×6 Designer Series Paper collection is full of vibrant colors and lively patterns. I selected the star patterns for the primary design element. To add a unique twist, I switched the top two panels of the Designer Series Paper from the sketch. Paired with Lemon Lolly card base and Azure Afternoon cardstock Layer really makes the colors in the Designer Series Paper pop!
I created the sentiment using the Heartfelt Hexagon and Irresistible Blooms stamp sets. First, I stamped the border in Azure Afternoon, next the Thank You in Berry Burst Ink. Then I punched it out with the Heartfelt Hexagon Punch. For the finishing touch, I added the new Rainbow Adhesive Backed Dots.
I followed the sketch closely for this card, which showcases the wonderful synergy of the patterns in the Designer Series Paper, including the die cut coffee cup! The fun coordinating Adhesive Backed Swirl Dots add a perfect finishing touch.
I hope these cards inspire you to create your own designs using sketches. They are a versatile tool that can bring fresh ideas and new perspectives to your creative projects.
Sketch Measurements:
Card base: 4-1/4″ x 5-1/2″ Card stock Layer: 3-1/4″ x 4-1/2″ Card stock Layer: 3-1/8″ x 4-3/8″ Designer Series Paper: 1 x 2-3/8″ Designer Series Paper: 1-7/8″ x 2-3/8″ Designer Series Paper: 1-3/4″ x 3″ Sentiment size: Your Choice
I love to read your comments! To leave me a comment please CLICK HERE
Happy Stamping!
I’d love to be your Stampin’ Up!® Demonstrator. All the Stampin’ Up! supplies used to make my cards are available in my online store. Simply click any of the product photos below!
Let your paper crafts bloom with the Wildly Flowering Suite Collection! This hand-designed collection of products is perfect for a variety of crafting occasions, whether you’re making cards, scrapbook pages, or other paper projects. With its versatile floral themes and coordinated tools, you’ll find it easy to create stunning designs that impress and delight.
A Bouquet of Crafting Possibilities
The Wildly Flowering Suite Collection is more than just a set of tools—it’s a complete crafting experience. Let’s take a look at the products in this pretty floral suite:
Wildflower Designs Cling Stamp Set
Stamp the intricate floral images on your projects and watch your creativity blossom. The cling stamps ensure precise and crisp impressions every time.
8 beautifully detailed cling stamps
Suggested clear blocks (sold separately): b, d, h
Wildflower Designs Dies
Pair the stamped images with these coordinating dies to effortlessly cut out your flowers and leaves. It’s a time-saving tool that adds a professional touch to your crafts.
7 coordinating dies
Largest die: 5″ x 3-7/16″ (12.7 x 8.7 cm)
Use with a Stampin’ Cut & Emboss Machine
Wildly Flowering 12″ x 12″ (30.5 x 30.5 cm) Designer Series Paper
Mix and match these beautifully patterned papers to create layered and textured backgrounds. The double-sided designs offer even more variety and versatility.
12 sheets of double-sided patterned paper: 2 each of 6 designs
Acid free and lignin free
Dashing Designs 3D Embossing Folder
Enhance your projects with this coordinating 3D embossing folder. It adds depth and dimension, making your floral designs pop.
Size: 4-1/2″ x 6-1/4″ (11.4 x 15.9 cm)
Use with a Stampin’ Cut & Emboss Machine
Adhesive-Baked Textured Dots
Add the perfect finishing touch with these adhesive-backed embellishments. They’re easy to use and add a bit of sparkle and texture to your creations.
120 pieces in antique brass color
Sizes: 4 mm and 5 mm
Color Coordination for Cohesive Designs
The Wildly Flowering Suite Collection features a carefully curated palette of colors: Crumb Cake, Early Espresso, Misty Moonlight, Moody Mauve, Mossy Meadow, and Wild Wheat.
With the Wildly Flowering Suite Collection, the possibilities are endless. Whether you’re a seasoned crafter or just starting out, this collection provides all the tools you need to create beautiful, floral-themed projects. Stamp, cut, emboss, and embellish to your heart’s content and watch your paper crafts bloom!
Ready to let your creativity blossom? Explore the Wildly Flowering Suite Collection today and start crafting your floral masterpieces!
I’d love to be your Stampin’ Up! Demonstrator. To purchase the products in the Wildly Flowering Suite Collection or any Stampin’ Up! products, click on any of the product images below or shop my online store www.wendysinkspot.com/shop.
I love a snow day! Instead of going out and running errands as we had planned, we stayed in and had a relaxing day while we watched the snow fall. I took advantage of the day to make some cards.
I used one of my favorite things from the January-April 2024 Mini Catalog ~ Sweet Thoughts Memories & More Cards Pack. I’m loving the pretty spring color pallet and the pink foil accents of the stickers.
I paired the Cards Pack with the Sweet Thoughts Memories & More Cards and Envelopes. The coordination of the card pack and cards & envelopes make card making quick and easy.
To create this card, I cut a Basic White CS layer and punched a corner with the Very Best Trio punch. I added a small 3″ x 4″ Sweet Thoughts Memory & More card to the Basic White layer, also punching one of the corners with the Very Best Trio punch. I die cut a stitched circle with the Stylish Shapes Dies. With the inside of one of the envelopes from the Sweet Thoughts Memories & More cards & envelopes I punch a 2-1/4″ Circle, then layered it on the stitched circle. To finish the card I added the Happy Birthday stickers, a few flower stickers and some Brushed Brass Butterflies.
My second card also includes a layer of what looks like Designer Series paper but its actually the inside of the envelope I used on the first card, I love all the pretty colors and It added the perfect touch to the cards, don’t you think? The sentiment is stamped with the Heartfelt Hexagon stamp set and punched with the Hexagon punch. More Brushed Brass Butterflies complete this pretty card.
My favorite element on this third card is the butterfly. I fussy cut it from one the 4″ x 6″ Sweet Thoughts Memories & More card. I think it looks so pretty with the 3″ x 4″ card. I used my favorite Scalloped Contours Dies to add a few layers in Basic White and Pretty Peacock cardstock.
This last card was created with a layer of Pebbled Path cardstock with a layer of the Sale-A-Bration Softly Stippled Designer Series paper. On the Calypso Coral cardstock layer I stamped some flowers from the Heartfelt Hexagon stamp set in Calypso Coral ink. The final layer is another 3″ x 4″ Memories and More card with a few of the stickers with foil accents.
Have you created cards with the Sweet Thoughts Memories & More Cards yet? I hope you’ll give them a try.
I’d love to be your Stampin’ Up!® Demonstrator. All the Stampin’ Up! supplies used to make my cards are available in my online store. Simply click any of the product photos below!
I love to read your comments. Please Click Here to leave a comment
Welcome to the Luv 2 Stamp Group’s Blog Hop! are excited to share our projects with you again this year. We hope to inspire you to create beautiful new projects. Each month we will have a different theme based on the next month’s celebrations using Stampin’ Up! products.
Once you are done with each post, scroll down to the bottom and you will see a list of Blog Hop participants, you can click on their name to go to their post, or you can click the next button to go to the next post in line. Happy crafting! This month’s theme is Gift Tags!
Gift tags are one of my favorite projects to make so I was super excited for today’s Blog Hop! After a Luv 2 Stamp Group Team event earlier this month I had some left over Beary Christmas Suite products, which I used to create my gift tags.
My grandmother always used the previous years Christmas cards she receive to make her gift tags. This inspired me to use a cardbase for my tags from the Beary Christmas Memories & More Cards and Envelopes. I cut 2″ off the end of each side of the cardbase, and then cut each of these strips in half. I then cut the center of the cardbase on the long side into 3 pieces at 2″. Click here to download the PDF with the measurements.
These 3 gift tags are created using the center pieces of the cardbase with the scoreline so they open. I used the stickers from the Beary Christmas Memories & More Cards Pack, and the Adhesive Backed Glitter Sequins to decorate them. I punched a hole in the top let corner to thread in the gold Simply Elegant Trim .
These next 4 gift tags were created using the end pieces of the cardbase. I used the Very Best Trio Punch to create the tag top and added a touch of bling with the Adhesive Backed Glitter Sequins. Each of these tags were created using several different products from the Beary Christmas Suite.
I fussy cut the image for this tag from one the cards in the Beary Christmas Memories & More Card Pack, the sentiment is a sticker.
For this tag I stamped the snowflake image and tree from the Beary Christmas Bundle. I heat embossed the snow flakes and white on the tree. The sentiment is stamped in Real Red and fussy cut.
This tag is decorated with the sticker and the sentiment is stamped in Real Red ink.
I used the Spruced Up Stamp set to stamp the To: and From: in Real Red ink. This retired set is still available in the Clearance Rack for $12.50, such a great deal!
For more inspiration from the Luv 2 Stamp Group Blog Hop Team, click on the image below to visit the talented Dawn Sandner – CA Don’t forget to continue following links on each blog to see everyone’s projects!
Welcome to the Luv 2 Stamp Group’s Blog Hop! are excited to share projects with you again this year. We hope to inspire you to create beautiful new projects. Each month we will have a different theme based on the next month’s celebrations using Stampin’ Up! products.
Once you are done with each post, scroll down to the bottom and you will see a list of Blog Hop participants, you can click on their name to go to their post, or you can click the next button to go to the next post in line. Happy crafting! This month’s theme is Fun Folds!
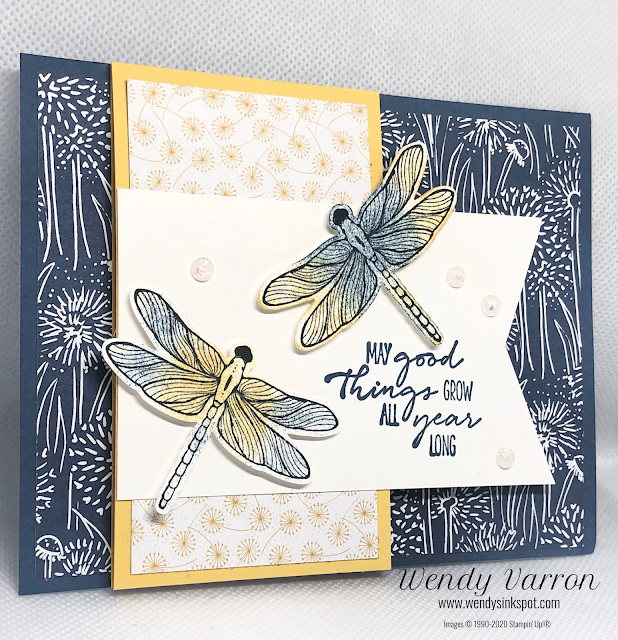
This fun fold was inspired by a card Patty Bennett shared with the Luv 2 Stamp Group at a team event several years ago. It’s one of my favorite folds which I’ve used before. Click Here to see my Dragonfly Fun Fold Card that I created using this same layout.
I used the Let’s Go Fishing Designer Series Paper on Misty Moonlight cardstock for the base of my card. I thought this pattern looked like water and would go well with the image from the In the Moment stamp set. I used the Basics 3D Embossing folders to emboss the BoHo Blue cardstock which I layered on Basic White Cardstock to add some texture to the card. With a piece of Basic White stock I used paper snips to cut the flag on one end of the cardstock. The “Warm Hello” sentiment from the Circle Sayings stamp set in Tuxedo Black ink. then adhered the flag to the BoHo Blue cardstock layer.
Next, I stamped and colored the image from In the Moment stamp set with Stampin’ Blends, punched it out with a 2-3/8″ Circle Punch. I attached it to the flag with Stampin’ Dimensionals. Inside my card I added another strip of the same Designer Series Paper. To finish the card I’ve added a few 2023-2025 In Color Dots.
Here are both my cards side by side. The same layout but with different elements and stamp sets.
For more inspiration from the Luv 2 Stamp Group Blog Hop Team, click on the image below to visit the talented Jo Anne Hewins Don’t forget to continue following links on each blog to see everyone’s projects!
Misty Moonlight card base: 4-1/4″ x 5-1/2″ Let’s Go Fishing DSP: 4″ x 5-1/4″ Let’s Go Fishing DSP: 1/2″ x 2-1/2″ for card inside Basic White Thick cardstock: 2-1/2″ x 8-1/2″ scored at 4 1/4″ Basic White Thick cardstock: 2-1/2″ x 4-1/4″ Boho Blue cardstock: 2-1/4″ x 4″ Basic White Thick cardstock scrap to stamp In the Moment Image
I love to read your comments! To leave me a comment please CLICK HERE
Happy Stamping!
I’d love to be your Stampin’ Up!® Demonstrator. All the Stampin’ Up! supplies used to make my card are available in my online store. Simply click any of the product photos below!