Card

Holly Jolly Wishes

I usually prefer traditional colors of red, green and white for Christmas cards but just couldn’t resist making a card with the Holly Jolly Wishes Cling Stamp set & the Whimsy & Wonder DSP. I love the colors in this DSP, and the iridescent foil in the patterns give it the perfect touch of bling!

I started with a Mint Macaron card base and added a layer of the Whimsy & Wonder DSP. I love the packages in this pattern. In keeping with the pattern of the DSP, I added the Glittered Organdy Ribbon wrapped around the top of the card like a package.

I added one of the Wonderful Snowflakes, which are part of the Whimsy & Wonder Suite Collection. It coordinates beautifully with the Whimsy & Wonder DSP. Then I stamped the sentiment in Misty Moonlight on Basic White cardstock. Using the Layering Circles Dies, I die cut the sentiment and layered it on a scallop circle that I die cut from the Whimsy & Wonder DSP. I really like the subtle look of the pattern on the DSP showing.

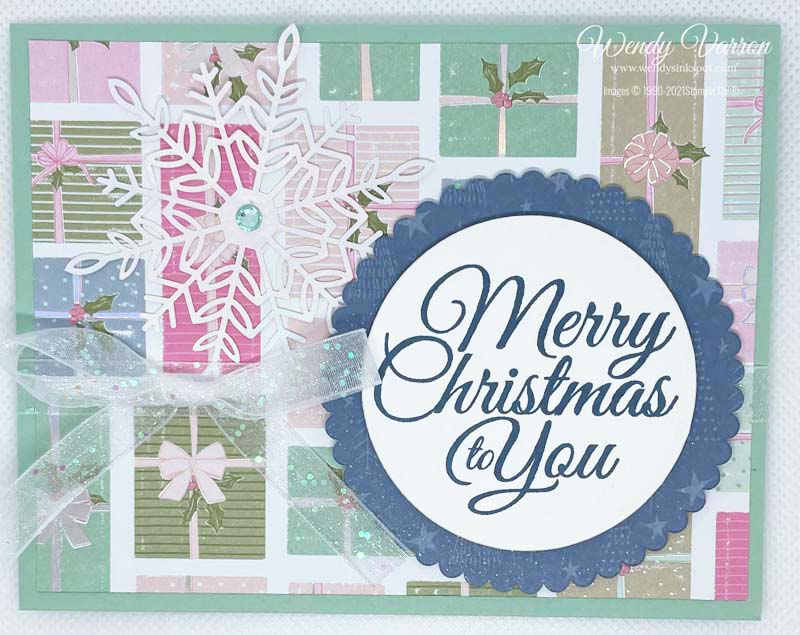
To finish my card I added an In Color Jewel to the Snowflake and tied the ribbon bow and attached it to the card with a glue dot. And last but not least, I brushed a Wink of Stella on the Misty Moonlight scalloped circle.

I hope you enjoyed my card today. Thanks so much for stopping by!

Card Measurements:

  • Card base: 5-1/2″x 8-1/2″, score in half at 4-1/4″
  • DSP layer: 4′ x 5-1/4″

Happy Stamping!

Candy Canes

I love candy canes at Christmas. During the holidays I keep them on my desk at work, I put them on the Christmas tree and we alway have extras so I’m usually still enjoying them after Christmas.

Of course I had to have the new Candy Cane background stamp available in the July – August Mini Catalog. It’s the perfect stamp for simple stamping with just ink, stamps and paper. I have found that the best way for me to get a clear image when using a background stamp is to use my Stamparatus. It allows me to stamp multiple times without fear of not lining up the image correctly. It was so easy I decided to make one with Real Red and one with Garden Green.

The sentiment I choose for these cards is from the Frosted Gingerbread stamp set, with pairs perfectly with this background stamp. To dress the card up a bit I used a bit of Gold Foil Specialty paper with the sentiment layer. It was quick and easy to put these simple, cute cards together.

Candy Cane Card Measurements:

  • Real Red Card Base: 5 ½ x 8 ¼”, score at 4 ¼”
  • Basic White Cardstock: 4 x 5 ¼”, 1 ½ x 2″
  • Real Red Cardstock: 1 ¾ x 2 ¼”
  • Gold Foil: 1 5/8 x 2 1/8″

Product List

Happy Stamping,

Sale-a-bration Penguin Playmates DSP

My card today features the new Penguin Playmates DSP, available during Sale-a-bration with a qualifying order. All you need to create this simple and cute card is the Penguin Playmates DSP, a sentiment, some coordinating cardstock and ink.

The card base is a piece of Just Jade cardstock cut to 4 1/4 x 11″, scored in half at 5 1/2″. I cut the Designer Series Paper layer to 4 x 5 1/4″ and adhered it to the cardbase with Multipurpose Liquid Glue. Next, I stamped the sentiment using the Holly Jolly Wishes stamps set in Just Jade on a piece of Basic White cardstock cut to 2 x 3 1/4″, little to the left of center to allow room for the Polar Bear image. I used Stampin’ Dimensionals to layer the sentiment layer on a 2 1/4 x 3 1/2″ piece of Just Jade cardstock. Then I attached it to the dsp layer with Multipurpose Liquid Glue.

I fussy cut the animals from a piece of the Penguin Playmates DSP. To attach the Penguin and the Fox I used both Glue Dots for the sections that attached to the Basic White cardstock. I used Stampin’ Dimensionals where they are hanging off the Basic White cardstock to give them the same dimension as the Basic White layer. I used Glue Dots for the Polar Bear.

I hope you enjoyed this cute card. It was quick and easy to make.

What will you create with the Penguin Playmates Designer Series Paper?

Happy Stamping!

Product List

Kits Collection by Stampin’ Up!

I’m excited to share with you a new line of creative products called the Kits Collection by Stampin’ Up! Stampin’ Up! has taken the guess work out of creativity and done the hard parts, and you get to do the fun stuff: craft! Each kit is all-inclusive and includes the predesigned projects, preprinted pieces, step-by-step instructions and even the adhesives you need to complete the projects.

There’s a wide variety of kits for all different occasions, and new kits are being added regularly. You can shop the current selection at www.stampinup.com/kits. But hurry! Kits are available only while supplies last! 

Pick the kit that’s right for you.

Happy Stamping!

Give It a Whirl with a Stellar Birthday

This fun bright colored card was inspired by a sample in the the Annual Catalog, using the Give It A Whirl Dies and the Stellar Birthday stamp set.

To start I created a template for the wheel to help place the stamped the images. I cut the wheel out of a piece of Vellum Cardstock, then traced the cut out shape from the wheel dies on the Vellum. Then I die cut out the window shape from the wheel. The window shape die is the same size as the cut out on the wheel. Now I have a handy template to stamp images on the wheel.

Once I had the template it was super easy to stamp the images I wanted to use on the wheel. I fussy cut out the little astronaut and die cut the top layer of the card. I use Stampin’ Blends to color in the astronaut and the images on the wheel. On the top layer of the card I heat embossed the stars with White Embossing powder and then brushed on Misty Moonlight ink with a Blending Brush.

For the card Base I used Pumpkin Pie cardstock cut to 5 1/2″ x 8 1/4″, I stamped the stars and planet images along the edges in Pumpkin Pie. I die cut the stars in Silver Foil Cardstock.

Product List

Happy Stamping!

Sweet Strawberry Bundle

The Sweet Strawberry Bundle is one of my favorite Stamp & Punch bundles. The stamp set has great all-occasion sentiments, and two-step images that can be separately or together. The Strawberry Builder Punch makes stamping and cutting out the berries, flowers and leaves quickly.

Before we get to making the card I wanted to share with you a tip for using a punches that cut multiple stamped images at the same time, like the Strawberry Builder punch. To easy punch out the images together I made a template. I took a piece of scrap card stock to punch out the images. When I’m ready to stamp the images I placed them in the temple then placed the glass block non the stamps. I inked up the stamps with Stampin’ Spots. Then I can easily punch out the images at the same time.

Now on to a few tips for creating my card. Some of the images in the set are two-step stamps, which makes adding shading to the images very easy, or they can be used seperately. For my card I stamped the outline of the strawberries and leaves and then used the solid image stamps to add shading to them before punching them out. On the cardbase I stamped the outline of the strawberries, then randomly stamped in a few of the strawberries with the shaded image.

I stamped the sentiment on the Basic White card stock and adhered it to the base off center to the right, then added the Strawberries on the Basic White card stock with Stampin’ Dimensionals. The final touch was the addition of the Genial Gems. There you have it, a cute card that is quick and easy to create.

Product List

I hope you enjoyed today’s card and that you will visit again!

Happy Stamping!

Scroll to Top