We invite you to say thank you to the people who make your day, every day with Saying Thanks all-inclusive card kit! This month’s kit has everything you need to show appreciation to family and friends who light up your life! Make nine bright, colorful cards in no time to say thank you, recognize friends, and share your gratitude with a bright watercolor wash that won’t go unnoticed! You’ll never miss an opportunity to express gratitude with this colorful kit! You’ll be able to purchase this new kit beginning January 5th!
Kit Details:
Enough supplies to create 9 cards—3 each of 3 designs—and 9 coordinating envelopes.
Printed die-cut words in Dutch, English, French and German
Printed precut pieces, and enough adhesive to complete projects.
White baker’s twine and iridescent diamond sequins.
Finished card size: 5-1/2″ x 4-1/4″ (14 x 10.8 cm).
Welcome to the Demonstrator Training Program Blog Hop!
We are so happy that you could join us today for this blog hop for ideas and creative inspiration. We are a group of Stampin’ Up!® Demonstrators from around the world that are taking part in training that is helping us to build a successful Stampin’ Up!® business and reach some goals we have set. We really appreciate your support.
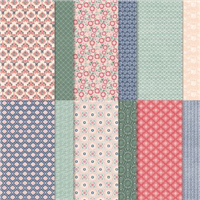
For this months Customer Thank You cards I wanted to highlight the Hues of Happiness Designer Series Paper. This is one of my favorite Designer Series Paper Packs in the Annual Catalog. I love all the beautiful colors and flowers so I used a few different patterns of this DSP to create my thank you cards.
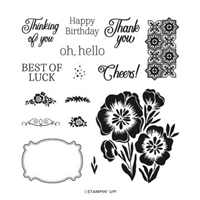
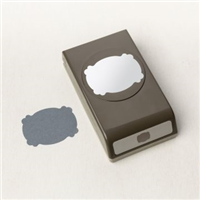
To create my cards, I selected the patterns of DSP first then the colors of cardstock and ink to complement the pretty paper. I love how they turned out. I cut all the cardstock for the card bases, the cardstock layer and the DSP and adhered the layers together. Then I stamped the Thank You sentiment using the Go To Greetings stamp set and die cut them with the label from the Natural Prints dies. The contrasting cardstock behind the labels was created using a circle and banner from the Stylish Shapes Dies.
I adhered the sentiment to the circle, then adhered the circle to the banner. I used Stampin’ Dimensionals to adhere the labels to the card. I added a few Glossy Dots to give it a little sparkle.
I used Masking Paper to create the image for the inside of the card. I stamped a flower from the Happiness Abounds Stamp set on Basic White Cardstock. Stamped the same image on masking paper and fussy cut it out. I put it over my stamped flower image and then stamped the leaves. I used Sponge Daubers to add some color to the flowers and leaves.
You may be starting here or have come from another blog – either way you can find the link list at the bottom of this post so that you can see every blog post today.
Customer Thank You Card Measurements:
Cardbase: 5-1/2″ x 8-1/2″, score and fold in half at 4-1/4″
Cardstock Layer: 3-3/4″ x 5″
Hues of Happiness DSP: 3-1/2″ x 4-3/4″
Basic White Inside Layer: 4″ x 5-1/4″
I’d love to be your Stampin’ Up!® Demonstrator. All the Stampin’ Up! supplies used to make my card are available in my online store. Simply click any of the product photos below!
Thank you for joining us for our Stampin’ Up!® Demonstrator Training Program Monthly Blog Hop! We are so happy that you could join us today for this blog hop for ideas and creative inspiration. We are a group of Stampin’ Up!® Demonstrators from around the world that are taking part in training that is helping us to build a successful Stampin’ Up!® business and reach some goals we have set. We really appreciate your support.
You may be starting here or have come from another blog – either way you can find the link list at the bottom of this post so that you can see every blog post and idea today.
This month my Customer Thank You cards feature the Sweetest Cherries Bundle. It’s a fun bundle to create with, and add in the Full basket dies for more fun!
I started with a piece of Parakeet Party cardstock and using Parakeet Party ink stamped the leaf image from the Sweetest Cherries bundle. Then, adhered it to a piece of Basic White cardstock and then added it to the Starry Sky cardbase.
I punched the cherries in Sweet Sorbet cardstock, and the stems in Early Espresso cardstock. The leaves are punched with Parakeet Party cardstock, then I stamped the leaf pattern in Parakeet Party and set them all aside.
Using the Full Basket dies, I die cut the basket in Crumb Cake cardstock and the cloth triangle in Basic White cardstock. I used Mini Glue dots to adhere the cloth triangle to the basket. Before adhering the basket to the card, I placed it where I wanted it to be on the card and used the Mini Glue Dots to add the cherries. leaves and stems. Then I added Mini Glue Dots to the basket to adhere it to the card.
I added an Adhesive Sheet on a scrap of Basic White and Starry Sky cardstock, then die cut the “Thanks” with the Amazing Thanks Dies. Adhesive Sheets make it was easy to add the Starry Sky “Thanks” the basic White base and then to card.
If you haven’t tried Adhesive Sheets I highly recommend them for die cutting especially intricate dies. It’s so much easier to add them to your project when you don’t have to try to put glue on the back to adhere them.
On the inside of card I stamped a cherry, leaf and stem.
I created a second card in Tahitian Tide with the “Thanks” at the bottom of the card, I couldn’t decide which way I liked it better, what do you think?
As mentioned at the top, this is a blog hop so make sure you ‘hop’ around to all the amazing projects on this hop! Click on the links below to visit them.
Sweetest Cherries Thank You Card Measurements:
Starry Sky cardbase: 4-1/4″ x 11″, score in half at 5-1/2″
Basic White layer: 2-1/2″ x 4-1/4″
Parakeet Party layer: 2-1/4″ x 4-1/4″
I’d love to be your Stampin’ Up!® Demonstrator. All the Stampin’ Up! supplies used to make my card are available in my online store. Simply click any of the product photos below!
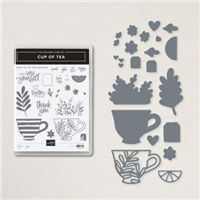
The Cup of Tea Bundle is one of my favorite Bundles n the new Annual Catalog! As a lover of Tea this was at the top of my shopping list!
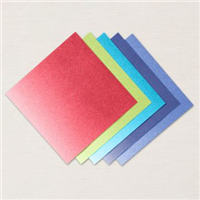
My card also features the 2022-2024 In Color 6’x6″ Glimmer Paper. If you haven’t tried it, Glimmer Paper is amazing! I love the shimmer it adds to my projects and its mess free! No traces of glitter all over my craft room!
To create this card I cut (2) 1/2″x 5-1/2″ strips of Starry Sky Glimmer Paper, and (2) 1/2″x5-1/2″ Parakeet Party Glimmer Paper. I adhered them to the Basic White cardbase with Multipurpose Liquid Glue.
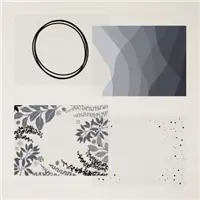
I die cut a stitched circle in Vellum with the Stylish Shapes Dies. Using Tear & Tape I added a strip of White glittered Organdy Ribbon. I added another strip of Tear & Tape over the ribbon to add it to my cardbase.
Then using an Adhesive Sheet added to the back of some Parakeet Party Glimmer Paper, I die cut the leaf tea cup. I die cut the sold Tea Cup in Starry Sky Glimmer Paper. This made adding the Parakeet Party Tea Cup to the Starry Sky tea cup super quick and easy. I attached the tea cup to the Vellum Circle with Foam Adhesive Sheet cut to fit the cup.
To finish my card, I stamped 2 tea tags in Starry Sky and Parakeet Party and die cut them. I tied some Basic White Bakers Twine to my card and left 2 long tales at the top. Using Glue dots I attached the tags to them. I added these cute die cut hearts to the back of the tags with another glue dot.
Cup of Tea with Glimmer Card Measurements:
Basic White Thick Cardstock Base: 5-1/2″ x 8-1/2″, score in half at 4-1/4″
Starry Sky Glimmer Paper Strip: (2) 1/2″ x 5-1/2″
Parakeet Party Glimmer Paper Strip: (2) 1/2″ x 5-1/2″
I’d love to be your Stampin’ Up!® Demonstrator. All the Stampin’ Up! supplies used to make my card are available in my online store. Simply click any of the product photos below!
Thank you for joining us for our Stampin’ Up!® Demonstrator Training Program Monthly Blog Hop! We are so happy that you could join us today for this blog hop for ideas and creative inspiration. We are a group of Stampin’ Up!® Demonstrators from around the world that are taking part in training that is helping us to build a successful Stampin’ Up!® business and reach some goals we have set. We really appreciate your support.
You may be starting here or have come from another blog – either way you can find the link list at the bottom of this post so that you can see every blog post and idea today.
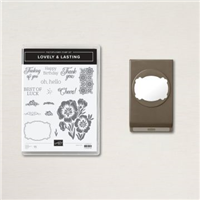
I’m featuring a few of the products from the Lovely in Linen Suite for my Customer Thank You Cards this month! The Lovely & Lasting Bundle & Lovely In Linen Designer Series Paper. I love that the Lasting Label punch coordinates perfectly with the Lovely & Lasting Stamps and all the pretty colors in the Designer Series Paper.
To create these lovely cards, I prepped all the elements needed before I put them all together. I’ve listed all the measurements below. Don’t forget, before cutting your Lovely In Linen DSP, pay attention to the direction of the pattern.
To put the card front together, start with adhering the DSP strips to the card base. I started with the strip on the bottom right, then worked my way around.
To create the center layer I stamped the flower image in Night of Navy Ink on the 1-3/4″ x 3″ Basic White CS. Then adhered it to the 1-7/8″ x 3-1/8″ Payle Papaya CS layer, before adding it to the card.
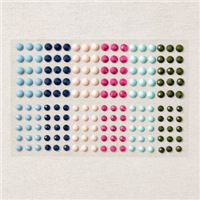
Next I stamped the label in Payle Papaya and punch it out with the Lasting Label punch. Using Stampin’ Dimensionals I added it to the front of my card. Then I added a few of the shiny new Solid Faceted Gems.
Don’t forget to dress up the inside of your card!
I cut a 3/4″ x 5-1/4″ strip of DSP and adhere it to the Basic White Cardstock, then stamped the fancy swirl in Night of Navy.
Thanks so much for stopping by today! As mentioned at the top, this is a blog hop so make sure you ‘hop’ around to all the amazing projects on this hop! Click on the links below to visit them.
Do you need any of the products used on my project? See the product list below, simply check any of the images to shop.
Lovely & Lasting Thank You Card Measurements:
Cardbase: 5-1/2″ x 8-1/2″, score in half at 4-1/4″
DSP: (2) 1″ x 3″ (pay attention to the direction of the DSP when cutting)
DSP: (2) 1″ x 4-1/4″ (pay attention to the direction of the DSP when cutting)
Whisper White CS for Center: 1-3/4″ x 3″
Color CS for Center: 1-7/8″ x 3-1/8″
Whisper White CS for Inside: 4″ x 5-1/4″
DSP for Inside: 3/4″ x 5-1/4″
All the Stampin’ Up! supplies used to make my card are available in my online store. Simply click any of the product photos below!
Welcome to the Luv 2 Stamp Group’s 2022 Blog Hop! We are excited to share projects with you again this year. We hope to inspire you to create beautiful new projects. Each month we will have a different theme based on the next month’s celebrations using Stampin’ Up! products.
Once you are done with each post, scroll down to the bottom and you will see a list of Blog Hop participants, you can click on their name to go to their post, or you can click the next button to go to the next post in line. Happy crafting! This month’s theme is Teacher Appreciation.
To celebrate all the wonderful Teachers who inspired us to learn, I wanted to make a fun fold card using the vibrant new 2022-2024 In Colors.
I’ve been using some new products coming on May 3 in the new Annual Catalog and wanted to incorporate those into my card as well. To start, I chose Orchid Oasis cardstock for the card base, cut to 4-1/4″x 11″, scored at 2-3/4″ & 8-1/4″.
I embossed 2 panels of Orchid Oasis cardstock with the Thanks Embossing Folder from the Thanks & Hello Embossing Folders. Each one was adhered to the card base with Multipurpose Liquid Glue.
To create the rainbow, I used new 2022-2024 6×6 DSP Assortment and the Brilliant Rainbow Dies. I stamped the sentiment in Orchid Oasis with a stamp from the new Happiness Abounds Stamp set. I love this sentiments and mixed fonts in this set, and I will be using it a lot!
Before adding the sentiment to my card, I cut the same DSP used to create the rainbow, to create the layers under the sentiment. To adhere the sentiment layers to the front of my card, I used the Multipurpose Liquid Glue and carefully added it to top edge of the sentiment layer, then adding ti to the top flap so that the card would still open. You can see the picture on the right below when the card is open you can see the back of Sentiment layer. I added a few Iridescent Rhinestone Basic Jewels for a bit of sparkle.
On the inside Basic White Cardstock layer, I adhered a strip of Orchid Oasis DSP. Using the Rainbow of Happiness Bundle created the inside sentiment. I colored the smaller rainbow with Stampin Blends, using the Light Sweet Sorbet, Light Parakeet Party, Light Tahitian Tide and Light Orchid Oasis.
For more inspiration from the Luv 2 Stamp Group Blog Hop Team, click on the image below to visit the talented Kurstan del Rosario. Don’t forget to continue following links on each blog to see everyone’s projects!
The Stampin’ Up! supplies used to make my card are available in my online store. Simply click any of the product photos below! The new 2022-2024 In Color Ink, Cardstock, DSP and the Happiness Abounds Stamp set will be available on May 3, 2022. I’ll update the supply list below once they are available.


")


