Bundle Savings

Father’s Day – Luv 2 Stamp Group Blog Hop

Welcome to the Luv 2 Stamp Group Blog Hop! We hope you enjoy our Father’s Day Theme!

Welcome to the Luv 2 Stamp Group’s 2022 Blog Hop! We are excited to share projects with you again this year. We hope to inspire you to create beautiful new projects. Each month we will have a different theme based on the next month’s celebrations using Stampin’ Up! products. This month our Theme is Father’s Day.

Once you are done with each post, scroll down to the bottom and you will see a list of Blog Hop participants, you can click on their name to go to their post, or you can click the next button to go to the next post in line. Happy crafting!

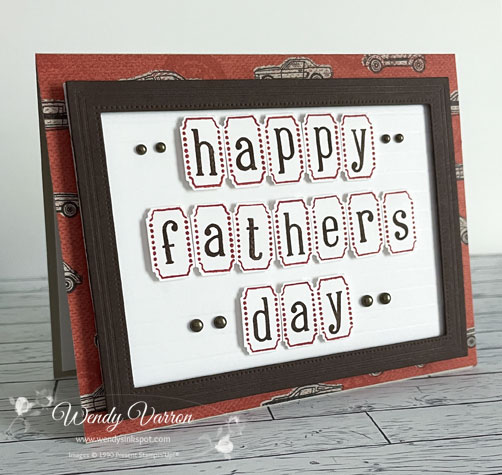
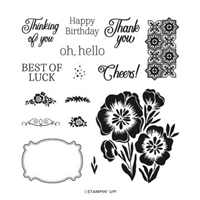
My Father’s Day card features the Alphabest Bundle. It’s a great stamp set for creating that perfect sentiment. I wanted this Father’s Day card to have the look of a message board.

To create this fun and quick card, I started with a piece Sahara Sand cardstock for the cardbase. I cut a piece of He’s the Man DSP and adhered to the cardbase.

To create the message board I scored a piece of Basic White Cardstock on the short side every 1/4″. Next, I used the Fabulous Frames Dies and Early Espresso cardstock to create the frame for the message board. I used Stampin Dimensionals to adhere the frame to the Basic White cardstock, then trimmed it to the size of the frame. To give it a little more stability before adding the letters, I cut a piece of Foam Adhesive sheet and attached it to the back of the Basic White cardstock.

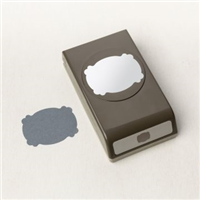
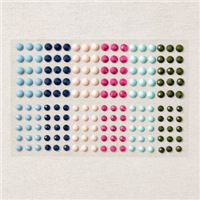
I stamped the letters in Early Espresso and Cajun Craze and punched them out with the Best Label punch. Using a bone folder I gently cured the ends of the letters and attached them with Stampin’ Dimensionals. I also added a few Rustic Metallic Adhesive Backed Dots. Then I peeled the backing off of the Foam Adhesive sheet to attach it to the cardbase.

On the inside of the card I added a piece of Basic White Cardstock and stamped this fun image from the He’s All That stamp set. I used a piece of Masking Paper to cover up part of the sentiment before stamping it. I’m so happy that Stampin’ Up! added Masking Paper to the tools in the new Annual Catalog! I will definitely be using it a lot.

Alphabest Stamp Case Tip:

I shared this tip on Instagram and thought it was worth sharing here for everyone. The graphic in the stamp case is confusing for me. I was mixing up some of the letters and numbers.

To fix this, I cut a shipping label to 5″ x 6-7/8″. I put as many of the stamps as I could fit, in the order that I wanted, on the largest clear block and stamped the label. Put the few remaining stamps on a clear block and stamped them.

Then with the backing still on the label slipped it into the case over the graphic of chaos. When I put the stamps in the case they are backward but it’s much easier for me to find the letter or number I’m looking for.

I hope you enjoyed my project and the Tip for the Alphabest stamp case today! For more inspiration from the Luv 2 Stamp Group Blog Hop Team, click on the image below to visit the talented Patty Bennett! Don’t forget to continue following links on each blog to see everyone’s projects!

Father’s Day Card Measurements:

  • Sahara Sand Cardbase: 5-1/2″ x 8-1/2″, score at 4-1/4″
  • He’s The Man DSP: 4-1/4″ x 5-1/2″
  • Basic White Cardstock: 4″ x 5-1/4″, score on the short side at 1/4″, 1/2″, 3/4″, 1′, 1-1/4″, 1-1/2″, 1-3/4″, 2″, 2-1/4″, 2-1/2″, 2-3/4″, 3″, 3-1/4″, 3-1/2″, 3-3/4″
  • Basic White Cardstock (inside): 4″ x 5-1/4″

I’d love to be your Stampin’ Up!® Demonstrator. All the Stampin’ Up! supplies used to make my card are available in my online store. Simply click any of the product photos below!

Happy Stamping!

A Cup of Tea with Glimmer

The Cup of Tea Bundle is one of my favorite Bundles n the new Annual Catalog! As a lover of Tea this was at the top of my shopping list!

My card also features the 2022-2024 In Color 6’x6″ Glimmer Paper. If you haven’t tried it, Glimmer Paper is amazing! I love the shimmer it adds to my projects and its mess free! No traces of glitter all over my craft room!

To create this card I cut (2) 1/2″x 5-1/2″ strips of Starry Sky Glimmer Paper, and (2) 1/2″x5-1/2″ Parakeet Party Glimmer Paper. I adhered them to the Basic White cardbase with Multipurpose Liquid Glue.

I die cut a stitched circle in Vellum with the Stylish Shapes Dies. Using Tear & Tape I added a strip of White glittered Organdy Ribbon. I added another strip of Tear & Tape over the ribbon to add it to my cardbase.

Then using an Adhesive Sheet added to the back of some Parakeet Party Glimmer Paper, I die cut the leaf tea cup. I die cut the sold Tea Cup in Starry Sky Glimmer Paper. This made adding the Parakeet Party Tea Cup to the Starry Sky tea cup super quick and easy. I attached the tea cup to the Vellum Circle with Foam Adhesive Sheet cut to fit the cup.

To finish my card, I stamped 2 tea tags in Starry Sky and Parakeet Party and die cut them. I tied some Basic White Bakers Twine to my card and left 2 long tales at the top. Using Glue dots I attached the tags to them. I added these cute die cut hearts to the back of the tags with another glue dot.

Cup of Tea with Glimmer Card Measurements:

  • Basic White Thick Cardstock Base: 5-1/2″ x 8-1/2″, score in half at 4-1/4″
  • Starry Sky Glimmer Paper Strip: (2) 1/2″ x 5-1/2″
  • Parakeet Party Glimmer Paper Strip: (2) 1/2″ x 5-1/2″

I’d love to be your Stampin’ Up!® Demonstrator. All the Stampin’ Up! supplies used to make my card are available in my online store. Simply click any of the product photos below!

Happy Stamping!

Demonstrator Training Program Blog Hop May 2022-Lovely and Lasting

Thank you for joining us for our Stampin’ Up!® Demonstrator Training Program Monthly Blog Hop! We are so happy that you could join us today for this blog hop for ideas and creative inspiration. We are a group of Stampin’ Up!® Demonstrators from around the world that are taking part in training that is helping us to build a successful Stampin’ Up!® business and reach some goals we have set. We really appreciate your support.

You may be starting here or have come from another blog – either way you can find the link list at the bottom of this post so that you can see every blog post and idea today.

I’m featuring a few of the products from the Lovely in Linen Suite for my Customer Thank You Cards this month! The Lovely & Lasting Bundle & Lovely In Linen Designer Series Paper. I love that the Lasting Label punch coordinates perfectly with the Lovely & Lasting Stamps and all the pretty colors in the Designer Series Paper.

To create these lovely cards, I prepped all the elements needed before I put them all together. I’ve listed all the measurements below. Don’t forget, before cutting your Lovely In Linen DSP, pay attention to the direction of the pattern.

To put the card front together, start with adhering the DSP strips to the card base. I started with the strip on the bottom right, then worked my way around.

To create the center layer I stamped the flower image in Night of Navy Ink on the 1-3/4″ x 3″ Basic White CS. Then adhered it to the 1-7/8″ x 3-1/8″ Payle Papaya CS layer, before adding it to the card.

Next I stamped the label in Payle Papaya and punch it out with the Lasting Label punch. Using Stampin’ Dimensionals I added it to the front of my card. Then I added a few of the shiny new Solid Faceted Gems.

Don’t forget to dress up the inside of your card!

I cut a 3/4″ x 5-1/4″ strip of DSP and adhere it to the Basic White Cardstock, then stamped the fancy swirl in Night of Navy.

Thanks so much for stopping by today!
As mentioned at the top, this is a blog hop so make sure you ‘hop’ around to all the amazing projects on this hop! Click on the links below to visit them.

Do you need any of the products used on my project? See the product list below, simply check any of the images to shop.

Lovely & Lasting Thank You Card Measurements:

  • Cardbase: 5-1/2″ x 8-1/2″, score in half at 4-1/4″
  • DSP: (2) 1″ x 3″ (pay attention to the direction of the DSP when cutting)
  • DSP: (2) 1″ x 4-1/4″ (pay attention to the direction of the DSP when cutting)
  • Whisper White CS for Center: 1-3/4″ x 3″
  • Color CS for Center: 1-7/8″ x 3-1/8″
  • Whisper White CS for Inside: 4″ x 5-1/4″
  • DSP for Inside: 3/4″ x 5-1/4″

All the Stampin’ Up! supplies used to make my card are available in my online store. Simply click any of the product photos below!

Happy Stamping!

Masculine Theme – Across the Waves Blog Hop

Welcome to the monthly Across the Waves Blog Hop! This month’s theme is all about Masculine projects. Thanks so much for joining us, I hope you enjoy all our Masculine Blog Hop Projects!

I have been crafting with pre-order products and this months Masculine theme was the perfect opportunity to use more of the new products coming on May 3 that I hadn’t used yet. My card features the He’s The Man Designer Series Paper, and Stylish Shapes Dies.

This card was super quick to make and required no stamping! Crazy right?! So, let me show you how I put this together.

The card base is 2 layers. The first layer is Sahara Sand cardstock, cut to 4-1/4″ x 5-1/2″ and a piece of the He’s The Man DSP cut to 4″ x 5-1/4″. The second cardbase layer is another piece of Sahara Sand cardstock cut to 3-1/2″ x 8-1/2″, and scored at 4-1/4″ and a piece of He’s The Man DSP cut to 3-1/4″ x 4″. I adhered the second layer of the card base to the first layer.

To Decorate the front of my card, using the Die Cut Sheets from the He’s The Man DSP Paper, I punched out the Scalloped Circle and the Crushed Curry Stars. Then using the Stylish Shapes Dies, I die cut a Circle from the He’s The Man DSP, and two of the flagged labels one in Crushed Curry cardstock and and one in Vellum.

I layered the smaller Crushed Curry Label on the Vellum Label with Mini Glue Dots, making sure that the adhesive wouldn’t be visible. Attached them to the card with Mini Glue Dots, again making sure the adhesive wouldn’t be visible through the Vellum.

I layered the Die Cut Circles together with Stampin’ Dimensionals. Then added them to the card with more Stampin’ Dimensionals overlapping the very top of the labels just a bit. The finishing touch on the card front was to add the Crushed Curry Stars on either side of the card and a few Matte Round Dots to the label.

To complete the card, I added a layer of Basic White cardstock and a strip of the He’s All That DSP to the inside. That’s it, quick and easy to put together and it looks fabulous!

For more inspiration from the Across The Waves Blog Hop Team, click on the Blog Roll Names below to see everyone’s projects!

Blog Roll

Cheers to All Your Years Card Measurements:

  • Cardbase Layer 1:
    • Sahara Sand Cardstock Base: 4-1/4″ x 5-1/2″
    • He’s the Man DSP: 4″ x 5-1/4″
  • Cardbase Layer 2:
    • Sahara Sand Cardstock Base: 3-1/2″ x 8-1/2, score at 4-1/4″
    • He’s the Man DSP: 3-1/4″ x 4″
  • Inside Card Layer:
    • Basic White Cardstock: 3-1/4″ x 4″

I’d love to be your Stampin’ Up!® Demonstrator. All the Stampin’ Up! supplies used to make my card are available in my online store. Simply click any of the product photos below! (New Products coming May 3, will be added below on May 3)

Happy Stamping!

Happiness Abounds – Luv 2 Stamp Group Blog Hop

Welcome to the Luv 2 Stamp Group’s 2022 Blog Hop! We are excited to share projects with you again this year. We hope to inspire you to create beautiful new projects. Each month we will have a different theme based on the next month’s celebrations using Stampin’ Up! products.

Once you are done with each post, scroll down to the bottom and you will see a list of Blog Hop participants, you can click on their name to go to their post, or you can click the next button to go to the next post in line. Happy crafting! This month’s theme is Teacher Appreciation.

To celebrate all the wonderful Teachers who inspired us to learn, I wanted to make a fun fold card using the vibrant new 2022-2024 In Colors.

I’ve been using some new products coming on May 3 in the new Annual Catalog and wanted to incorporate those into my card as well. To start, I chose Orchid Oasis cardstock for the card base, cut to 4-1/4″x 11″, scored at 2-3/4″ & 8-1/4″.

I embossed 2 panels of Orchid Oasis cardstock with the Thanks Embossing Folder from the Thanks & Hello Embossing Folders. Each one was adhered to the card base with Multipurpose Liquid Glue.

To create the rainbow, I used new 2022-2024 6×6 DSP Assortment and the Brilliant Rainbow Dies. I stamped the sentiment in Orchid Oasis with a stamp from the new Happiness Abounds Stamp set. I love this sentiments and mixed fonts in this set, and I will be using it a lot!

Before adding the sentiment to my card, I cut the same DSP used to create the rainbow, to create the layers under the sentiment. To adhere the sentiment layers to the front of my card, I used the Multipurpose Liquid Glue and carefully added it to top edge of the sentiment layer, then adding ti to the top flap so that the card would still open. You can see the picture on the right below when the card is open you can see the back of Sentiment layer. I added a few Iridescent Rhinestone Basic Jewels for a bit of sparkle.

On the inside Basic White Cardstock layer, I adhered a strip of Orchid Oasis DSP. Using the Rainbow of Happiness Bundle created the inside sentiment. I colored the smaller rainbow with Stampin Blends, using the Light Sweet Sorbet, Light Parakeet Party, Light Tahitian Tide and Light Orchid Oasis.

For more inspiration from the Luv 2 Stamp Group Blog Hop Team, click on the image below to visit the talented Kurstan del Rosario. Don’t forget to continue following links on each blog to see everyone’s projects!

The Stampin’ Up! supplies used to make my card are available in my online store. Simply click any of the product photos below! The new 2022-2024 In Color Ink, Cardstock, DSP and the Happiness Abounds Stamp set will be available on May 3, 2022. I’ll update the supply list below once they are available.

Product List

Happy Stamping!

Tea Boutique – It’s Time for Tea

I am so happy to share with you a card I made with one of my favorite new Suites the Tea Boutique Suite!! It will be available beginning on May 3 in the new 2022-2023 Annual Catalog!

I love all things tea! I was beyond excited when I saw that this suite is part of a group of select products that Demonstrators were able to pre-order on April 1st. So, what’s available in this suite you may be asking? The Cup of Tea Bundle, Tea Boutique 6 x6 DSP, and Tea Boutique Cards & Envelopes. I love everything about this great suite, from the images in the stamp set to the bright colors and pretty flowers in the DSP and Cards & Envelopes.

To create my card, I used the Starry Sky Card base from the Tea Boutique Cards & Envelopes pack and layered a piece of Vellum with some Stampin’ Seal. I put the adhesive in the middle where it would be hidden by the additional card layers. I added a square of Basic White cardstock first, then added the slightly smaller squares of the Tea Boutique DSP.

Next, I die cut the tea cup base from the Tea Boutique DSP. Then using Starry Sky Cardstock and an adhesive sheet, I die cut the designed layer of the teacup. With the Adhesive sheet on the back of my cardstock, I was able to quickly add the top layer of the tea cut with no fuss. On the back of the teacup I used a little Stampin’ Seal and adhered a piece of the Gold Simply Elegant Trim. Using a piece of Foam Adhesive sheet I added the teacup to the center of the Squares. I love the look of the Gold added to the teacup, to give it a little eye catching bling like steam coming from the cup.

I wasn’t sure what sentiment to use or where to put it. In the end I decided on adding the cute little tea tag with the sentiment layered on the lemon wedge in the bottom right of the card. I’m really happy with the way it turned out.

The Tea Boutique Suite and the new 2022-2024 In Colors, including Starry Sky which I used on my card today, will be available beginning May 3, 2022. I hope you enjoyed this sneak peek at some of the new products coming soon!

Happy Stamping!!

Scroll to Top