Simple Stamping

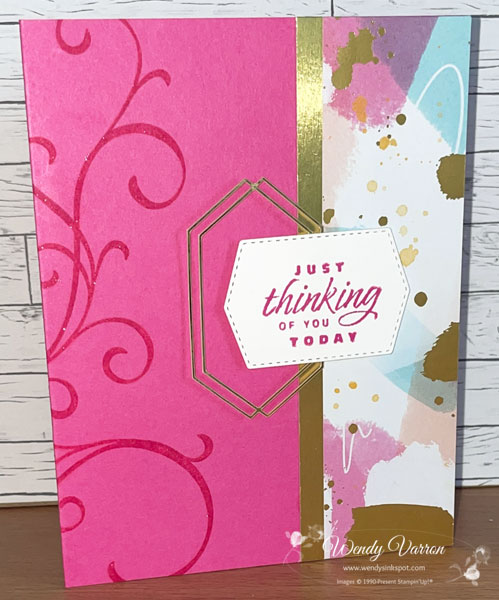
A Cup of Tea with Glimmer

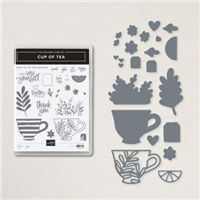
The Cup of Tea Bundle is one of my favorite Bundles n the new Annual Catalog! As a lover of Tea this was at the top of my shopping list!

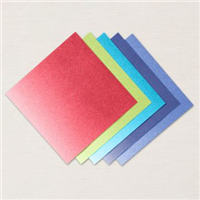
My card also features the 2022-2024 In Color 6’x6″ Glimmer Paper. If you haven’t tried it, Glimmer Paper is amazing! I love the shimmer it adds to my projects and its mess free! No traces of glitter all over my craft room!

To create this card I cut (2) 1/2″x 5-1/2″ strips of Starry Sky Glimmer Paper, and (2) 1/2″x5-1/2″ Parakeet Party Glimmer Paper. I adhered them to the Basic White cardbase with Multipurpose Liquid Glue.

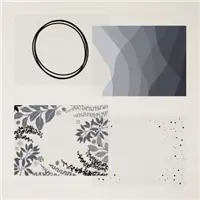
I die cut a stitched circle in Vellum with the Stylish Shapes Dies. Using Tear & Tape I added a strip of White glittered Organdy Ribbon. I added another strip of Tear & Tape over the ribbon to add it to my cardbase.

Then using an Adhesive Sheet added to the back of some Parakeet Party Glimmer Paper, I die cut the leaf tea cup. I die cut the sold Tea Cup in Starry Sky Glimmer Paper. This made adding the Parakeet Party Tea Cup to the Starry Sky tea cup super quick and easy. I attached the tea cup to the Vellum Circle with Foam Adhesive Sheet cut to fit the cup.

To finish my card, I stamped 2 tea tags in Starry Sky and Parakeet Party and die cut them. I tied some Basic White Bakers Twine to my card and left 2 long tales at the top. Using Glue dots I attached the tags to them. I added these cute die cut hearts to the back of the tags with another glue dot.

Cup of Tea with Glimmer Card Measurements:

  • Basic White Thick Cardstock Base: 5-1/2″ x 8-1/2″, score in half at 4-1/4″
  • Starry Sky Glimmer Paper Strip: (2) 1/2″ x 5-1/2″
  • Parakeet Party Glimmer Paper Strip: (2) 1/2″ x 5-1/2″

I’d love to be your Stampin’ Up!® Demonstrator. All the Stampin’ Up! supplies used to make my card are available in my online store. Simply click any of the product photos below!

Happy Stamping!

Fun with Lighthearted Lines

I’ve had the Lighthearted Lines stamp set sitting on my stamp shelf for almost a year. it was high time I made some cards with this fun stamp set. The Sweet Symmetry DSP with its bright pretty colors is the perfect fun choice to go with the sentiments in the Lighthearted Lines stamp set.

Using the Basic Border Dies, I die cut multiple pieces of the Dsp. Selecting the patterns to mix and match was lots of fun. Once I had them adhered together I trimmed them down to fit the card bases.

To make this sentiment just a bit more fun, I wanted to easily stamp “Forever” inside on this card. I snipped apart the bottom half of this sentiment, now I can easily use a few of the words individually. I stamped the sentiment in Flirty Flamingo on Basic White. I die cut the sentiment for the front of my card using the Stitched So Sweetly Dies and adhered it to a Night of Navy label. Foam adhesive sheets are fast becoming my new favorite adhesive to give my cards dimension. I love that I can quickly cut them to fit and give just a bit more stability.

I used a number of dies to create all the different labels for my cards. The finishing touch on these bright color cards are the Brushed Brass Butterflies. I had a lot of fun putting these cards together.

You’re Stuck With Me Card Measurements

  • Bumblebee Cardstock Base: 5-1/2″ x 8-1/2″, score in half at 4-1/4″
  • Sweet Symmetry DSP: 6′ x6′, then trimmed to fit card front

I hope you found some inspiration from these fun cards. All the Stampin’ Up! supplies used to make my card are available in my online store. Simply click any of the product photos below!

Product List

Happy Stamping!

March Customer Thank You Cards

This month my Customer Thank You Cards are inspired by the Annual Catalog. If you are ever looking for inspiration the Annual Catalog is a great place to start, it’s a treasure trove of amazing creations. I took the inspiration from page 68, the Simply Elegant Suite card. I love the elements in this card, it showcases Designer Series Paper and stamping directly on to the cardstock card base.

To make my card I started with stamping the beautiful swirl from the Sentimental Swirl stamp set on the left side of the cardbase. I love stamping tone on tone, it really makes the already pretty colors so much richer. I also stamped some of the swirls on the inside of my cards.

Next, I cut strips of the Abstract Beauty DSP and Gold Foil paper. I adhered the DSP to the Gold Foil Strip, then using Multipurpose Liquid Glue, added them to the right side of the card base.

I stamped the sentiment from the Flowering Tulips stamp set in Magenta Madness on the label. Before adding the label to my card, I adhered a gold foil element from the Expressions in Ink Ephemera Pack to the back of the lable with some Stampin’ Seal. I cut a piece of Foam Adhesive sheet which I added to the back of the label over the Gold Foil element. Doing this keeps the Gold Foil element lifted off the card but firmly in place on the back of the label.

I wanted to use all the 2020-2022 In Colors and the Abstract Beauty DSP was perfect to pair with these pretty colors. Once I started taking photos of my cards, I had some inspiration to add just a touch of bling, I brushed a little Wink of Stella on the swirls. I love the look, but it was hard to photograph.

Just Thinking of You Today Card Measurements:

  • Cardbase: 5-1/2″ x 8-1/2″, score in half at 4-1/4″
  • Abstract Beauty DSP: 1-1/2″ x 5-1/2″
  • Gold Foil: 3/4″ x 5-1/2″

I’d love to be your Stampin’ Up!® Demonstrator. All the Stampin’ Up! supplies used to make my card are available in my online store. Simply click any of the product photos below!

Product List

Happy Stamping!

Special Moments – Last Day of Sale-A-Bration

Sale-A-Bration is coming to an end, today is the last day. Don’t miss out on on the free gifts from Stampin’ Up! with a purchase.

My slim line cards today are inspired by Patty Bennett. She shared a cute ladybug card with this same layout, which is perfect to showcase Designer Series Paper. I wanted to share one last card for Sale-A-bration with the Simply Marbleous DSP and Special Moments Stamp set, both available during Sale-A-Bration.

When I am making several cards at one time, I like to prep all my elements first and put them together in an assembly line fashion. I cut the card stock and Simply Marbleous DSP, then adhered the DSP and Basic White cardstock with Multipurpose Glue to the larger card stock layers.

The daisies were punched in Basic White and matching color card stock. Using a bone folder I gently curled the white petals up, and the color petals down. I love the different direction of the petals and it made lining up the flowers easy when I adhered them together with Mini Glue Dots.

Next, I colored some White Glittered Organdy Ribbon with Stampin’ Write Markers to match the DSP for each card. Then created knots for each card. I adhered a strip of the ribbon to the card then using a smaller piece of ribbon tied a knot.

I adhered the daisies with Stampin’ Dimensionals and added a few of my favorite embellishments, Iridescent Rhinestone Basic Jewels. They are the perfect bling to add to any project.

I’d love to be your Stampin’ Up!® Demonstrator. All the Stampin’ Up! supplies used to make my card are available in my online store. Simply click any of the product photos below!

Product List

Happy Stamping!

Many Happenings – Luv 2 Stamp Group Blog Hop

Welcome to the Luv 2 Stamp Group’s 2022 Blog Hop! We are excited to share projects with you. We hope to inspire you to create beautiful new projects. Each month we will have a different theme based on the next month’s celebrations using Stampin’ Up! products.

Once you are done with each post, scroll down to the bottom and you will see a list of Blog Hop participants, you can click on their name to go to their post, or you can click the next button to go to the next post in line. Happy crafting! This month’s theme is Celebrating Women.

I’ve been creating with Kits from the Kits Collection this week. I love the Kerchief Card Kit with its pretty floral images and the Coastal Cabana & Poppy Parade colors. The gold foil elements in the kit give these cards an elegant touch so I thought this would be the perfect kit to Celebrate Women.

Many Happenings and Many Messages along with the Message die were the perfect choice to create sentiments to fit this months theme. There are so many greetings for so many occasions and die cuts them all out at once, it’s easy to always have lots of sentiments on hand.

The Stamparatus is the perfect tool to use when stamping with a large stamp. This made it easier to make sure that all the sentiments stamped clearly.

I stamped and die cut each stamp in both Night of Navy and Poppy Parade. I love how many sentiments I now have that are ready to be used.

Putting it All Together

I punched out all the die cuts included in the kit. I love the colors and gold foil accents in this pretty kit.

When using the Vellum layer in the kit, remember to use adhesive on the vellum where it will be covered with the next layer you add to your card. For the card above, I knew I was going to place the flower layer in the left corner so that’s where I placed some Stampin’ Seal.

To create the layers for my flower, I cut these leaves in half, and adhered them along with the gold foil leaves to the back of the flowers with Mini Glue Dots. Then using Stampin’ Dimensionals adhered the flower image to the Night of Navy oval die cut.

To finish my card i added the final flower to the card with Stampin’ Seal. Then added the the sentiment with Stampin’ Dimensionals.

With the Kerchief Kit, Many Happenings and Many Messages stamps, Messages die and a few other of my favorite label dies, I was able to create a whole set of cards to celebrate the wonderful women in my life.

For more inspiration from the Luv 2 Stamp Group Blog Hop Team, click on the image below to visit the talented Patty Bennett. Don’t forget to continue following links on each blog to see everyone’s projects and show a little love by commenting on each post.

Thank you so much for hopping by today! I hope you enjoyed my cards and are inspired to create some cards with the Kits Collection. All the Stampin’ Up! supplies used to make my card are available in my online store. Simply click any of the product photos below!

Product List

Happy Stamping!

Blessings of Home Cards to Color

Love to color? This set of cards to color is just what you need. I find coloring is relaxing and helps me unwind, these are going to be fun to color. The inspiration for my project came from Chris Ann Tomasso, I absolutely loved her set of cards that she created. The pretty floral images are stamped with the Blessings of Home and Hand Penned Petals stamp sets. I love how well they go together.

To create the Image on the front of the box and each of the cards inside, I die cut the largest scalloped rectangle with the Scallop Contour Dies on Basic White card stock. The pretty flower images are stamped in Memento ink and Stampin’ Blends to color the card for the front of the box. I stamped 2 of each of the flower images for the cards inside.

Now, lets decorate the box. I added a piece of Heart & Home DSP to a 4-1/4″ x 5-1/2″ Acetate Card box. Leaving the box flat I put a piece of Tear & Tape along the edge of the DSP to adhere to the box and wrapped it around, finishing with Tear & Tape on the other edge.

I added a some Fresh Freesia Open Weave Ribbon with Tear & Tape. To adhere the card front to the box I cut a few strips of a Foam Adhesive Sheet to give the card some stability when I attached it.

To finish the box, I tied a bow and attached it off to the side of the card with a Mini Glue Dot. Then added a few of my favorite Iridescent Rhinestone Basic Jewels. I love how they catch the light and shimmer.

I hope this inspires you to create some cards to color as well. All the Stampin’ Up! supplies used to make my project are available in my online store. Simply click any of the product photos below!

Product List

Happy Stamping!

Scroll to Top