Simple Stamping

Demonstrator Training Program Blog Hop – September Customer Thank You

Welcome to our Stampin’ Up!® Demonstrator Training Program Monthly Blog Hop!

We are so happy that you could join us today for this blog hop for ideas and creative inspiration. Our blog hop focuses on the Thank You cards we are sending to our customers.

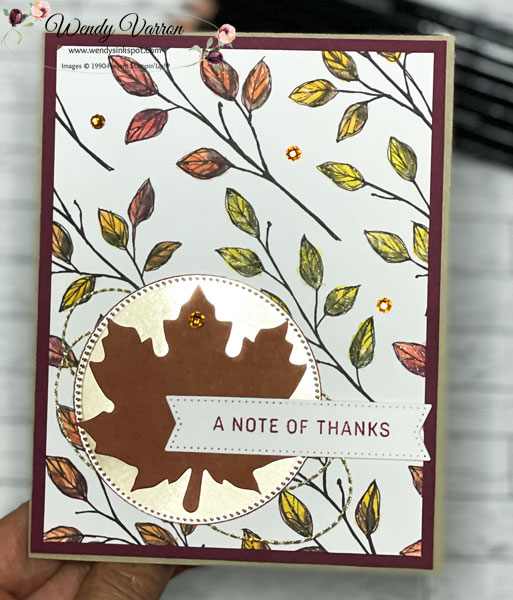
I wanted to feature a Fall theme to my thank you cards. The Leaf Labels & Amber Gems Combo Pack are perfect for this quick and easy card. I colored in a piece of Perfectly Penciled DSP with Watercolor Pencils and brushed on a Wink of Stella over the leaves, which not only give a bit of sparkle to the DSP but also helped to blend in the colors of the Watercolor Pencils. Then I adhered the DSP to a piece of Merry Merlot Cardstock. I used Stampin’ Dimensionals to adhere the Layers to the Crumb Cake Cardstock base.

I die cut the stitched circle with the Stylish Shapes Dies and a piece of Brushed Metallic Cardstock. Then with a bit of Stampin’ Seal+ on the back, I added some of the gold trim from the Simply Elegant Trim, then added it to the lower left corner of of my card.

I brushed a little Merry Merlot, and Pumpkin Pie ink with a Blending Brush on a Leaf Label, to give it a bit of color, and added it to the Brushed Metallic Circle with Stampin’ Dimensionals.

The Sending Smiles “A Note of Thanks” sentiment is stamped Merry Merlot on Basic White Cardstock. Then die cut with the Stylish Shapes Dies. I added it to the card over the leaf and a few of the Amber Gems to complete the card.

A Note of Thanks Card Measurements

  • Crumb Cake Cardstock Base: 5-1/2″ x 8-1/2″, score and fold in half at 4-1/4″
  • Merry Merlot Cardstock: 4-1/8″ x 5-3/8″
  • Perfectly Penciled DSP: 3-7/8″ x 5-1/8″
  • Scrap of Basic White Cardstock for the label
  • Scrap of Brushed Metallic Cardstock for circle

I’d love to be your Stampin’ Up!® Demonstrator. All the Stampin’ Up! supplies used to make my card are available in my online store. Simply click any of the product photos below!

Happy Stamping!

August Customer Thank you Cards

Welcome to our Stampin’ Up!® Demonstrator Training Program Monthly Blog Hop!

We are so happy that you could join us today for this blog hop for ideas and creative inspiration. Our blog hop focuses on the Thank You cards we are sending to our customers.

You may be starting here or have come from another blog – either way you can find the link list at the bottom of this post so that you can see every blog post today.

For this months Customer cards I decided to use the Splendid Day Designer Series Paper and the Beautiful Shapes Dies, to create a clean and simple card. I love how they turned out!

To create my card I cut card bases in both Soft Sea Foam and Fresh Freesia CardStock. Then I used the Beautiful Shapes Dies to die cut several hexagons from the Splendid Day Designer Series Paper. I adhered the 2 largest hexagons with multipurpose liquid glue, and the smallest hexagon with Mini Stampin’ Dimensionals on Basic White cardstock. I stamped several images from the Hello Beautiful Stamp set to add a bit of texture to the card, then attached the Basic White layer to the card base.

The sentiment is from the Pansy Patch stamp set, stamped in Tuxedo Black Ink, on a strip of Basic White cardstock. Then punched each side with the Lovely Labels Pick a Punch and added it to the card front with Stampin’ Dimensionals. I added a few of the 2021-2023 In Color Opal Rounds because I just couldn’t resist adding a little more sparkle to the cards.

For the inside of my card I stamped the Bee and foliage images from the Splendid Thoughts Stamp set on Basic White cardstock, then adhered it to the inside of the card.

Hello From Me to You Card Measurements:

  • Cardbase: 5-1/2″ x 8-1/2″, score at 4-1/4″
  • Basic White Layer: 4″ x 5-1/4″
  • Basic White Inside: 4′ x 5-1/4″
  • Basic White Strip for Sentiment: 1/2″ x 4″

I’d love to be your Stampin’ Up!® Demonstrator. All the Stampin’ Up! supplies used to make my card are available in my online store. Simply click any of the product photos below!

Happy Stamping!

Merriest Moments – Inspirations In Ink Blog Hop

Welcome to the Inspirations in Ink Blog Hop!

Thank you for hopping along with the Inspirations In Ink Blog Hop! This month’s theme is Christmas In July. You may be starting here or have come from another blog – either way you can find the link list at the bottom of this post so that you can see every blog post and idea today. I hope you enjoy all our Christmas in July Projects!

My Christmas in July card was created with just a few simple products that I had on hand. It was very easy and quick to create. It’s the perfect card if you send out lots of Holiday cards and you want to create multiples of a simple elegant card.

First I started with a Real Red cardstock cardbase, cut to 5-1/2″ x 8-1/2″, scored in half and folded at 4-1/4″. Next, using a piece of the Silver and Gold DSP from Sale-a-bration, I die cut the scalloped rectangle from the Scalloped Contours Dies and adhered it to my cardbase. Then using the next smallest scalloped rectangle die, I die cut a piece of the Gold Foil sheets and adhered it to the Gold DSP Layer.

I die cut the next smallest scalloped rectangle die cut from a piece of Real Red cardstock and using a Mini Glue Dot adhered a the snowflake from the Wonderful Snowflakes to the Red Scalloped rectangle. I stamped the sentiment from the Merriest Moments stamp set in Real Red Ink on a scrap of Basic White cardstock, then die cut it with a label from the Stylish Shapes Dies. I adhered it to the Red Scalloped rectangle, overlapping the snowflake a bit, with Stampin’ Dimensionals. Finally, I used Stampin’ Dimensionals to add the Red Scalloped rectangle to the Gold Foil layer on my card, and added a few Red Rhinestone Basic Jewels. Voila, a pretty Christmas card all ready to go!

As mentioned at the top, this is a blog hop so make sure you ‘hop’ around to all the amazing projects on this hop! Click on the links below to visit them.

I’d love to be your Stampin’ Up!® Demonstrator. All the Stampin’ Up! supplies used to make my card are available in my online store. Simply click any of the product photos below!

Happy Stamping!

Rainbow of Happiness – Inspirations In Ink Blog Hop

Welcome to the monthly Inspirations In Ink Blog Hop! This month’s theme is all about In Colors. You may be starting here or have come from another blog – either way you can find the link list at the bottom of this post so that you can see every blog post and idea today. I hope you enjoy all our In Color Blog Hop Projects!

Sweet Sorbet and Starry Sky are one of my favorite In Color combinations and are featured in my project. Rainbow of Happiness is one of the Bundles in the Jan-June Mini Catalog that I will miss so I wanted to use it in my project before it retires on June 30th.

To create my card I started with the Sweet Sorbet cardbase from the Tea Boutique Cards & Envelopes. I die cut several of the rainbow stripes in Sweet Sorbet and Starry Sky 6″x 6″ DSP Assortment. Then, I adhered them to a piece of Basic White cardstock and die cut the cardstock with the 2nd largest rectangle in the Deckled Rectangles Dies.

I used the Cloud Punch to punch out a Basic White Cloud and a Vellum Cloud. Then snipped the Vellum Cloud in half and adhered it to the back of the Basic White Cloud with Mini Glue Dots. I used Stampin’ Dimensionals to attach it to the rainbow.

The label is die cut with the Tailor Made Tags dies. I used Masking Paper to cover up “World” and stamped the sentiment in Sweet Sorbet. Then masking the stamp again stamped “World” in Starry Sky.

I tied a piece of Starry Sky Metallic Woven Ribbon to the top of the tag and then attached it to the Basic White layer with Mini Glue Dots.

To put all the layers together, I adhered a piece of the Lovely Layers Vellum with Multipurpose glue to the cardbase. Then added the Basic White layer with Stampin’ Dimensionals. I added a few of the Iridescent Jewels to the front of the card and stamped some hearts to the inside of the card.

As mentioned at the top, this is a blog hop so make sure you ‘hop’ around to all the amazing projects on this hop! Click on the links below to visit them.

Rainbow of Happiness In Color Card Measurements:

  • Tea Boutique Cards & Envelopes Cardbase 5-1/2″ x 8-1/2″ score in half at 4-1/4″
  • Lovely Layers Vellum 3-3/4″ x 5″

I’d love to be your Stampin’ Up!® Demonstrator. All the Stampin’ Up! supplies used to make my card are available in my online store. Simply click any of the product photos below!

Happy Stamping!

Speedy Recovery – Luv 2 Stamp Group Blog Hop

Welcome to the Luv 2 Stamp Group’s 2022 Blog Hop!

We hope you enjoy our New Annual Catalog Theme!

We are excited to share projects with you again this year. We hope to inspire you to create beautiful new projects using Stampin’ Up! products.

Once you are done with each post, scroll down to the bottom and you will see a list of Blog Hop participants, you can click on their name to go to their post, or you can click the next button to go to the next post in line. Happy crafting!

My project features the Speedy Recover Stamp set. I love how the flower stamp works so well with the Awash In Beauty DSP. This easy fun fold starts with a note card from the Note Card & Envelopes. Score the front panel of the card at 1-3/4″ and fold it back.

Cut 2 pieces of Awash In Beauty DSP to 1-1/2″ x 4-3/4″ and adhere to the the front panel and the inside of the front panel. Cut another piece of Awash In Beauty DSP to 3-1/4″ x 4-3/4″ and adhere to the inside of the cardbase. I used the same pattern for both of the 1-1/2″ x 4-3/4″ pieces of DSP but you could choose 3 different patterns to show of the pretty paper.

Next, I die cut 2 of the largest circles from the Basic Shapes Dies. For the front label I stamped the flower image with Tuxedo Black Memento Ink and colored in the image with Stampin’ Blends. Then I stamped the greeting. To create the wrap around the flowers, I stamped the same flower image a second time on a scrap of Basic White Cardstock in Rich Razzleberry. Then, I snipped out just the wrap and adhered it over top of the stamped image on my label.

Be sure when adhering the label to the front of the card you only want to add adhesive to one side of the label so the card will open. You don’t want to make a mistake and put adhesive on the entire label or your card won’t open.

Adhere the second circle to the inside of the card right behind the front label so when the card is closed you don’t see it. To finish up my card I added a few Iridescent Pearl Basic Jewels to my card. Below are a few other variations of my card.

For more inspiration from the Luv 2 Stamp Group Blog Hop Team, click on the image below to visit the talented Patty Bennett. Don’t forget to continue following links on each blog to see everyone’s projects!

Sending Well Wishes Card Measurements:

  • Basic White Cardbase: Use a Note Card from the Note Cards & Envelopes pack which measures 5″ x 7″, scored in half at 3-1/2″
  • Awash In Beauty DSP: (2) 1-1/2″ x 4-3/4″
  • Awash In Beauty DSP: 3-1/4″ x 4-3/4″
  • Basic White Cardstock Scrap for Labels

I hope you enjoyed my project. I’d love to be your Stampin’ Up!® Demonstrator! All the Stampin’ Up! supplies used to make my card are available in my online store. Simply click any of the product photos below!

Happy Stamping!

You Are Wonderful with Happiness Abounds

Does my card look familiar? I CASED a card in the Stampin’ Up! Annual Catalog for inspiration and slightly changed the label. Case-ing means Copy And Share Everything, and is a great source for inspiration. The cards made with the Hues of Happiness Suite catch my eye every time I’m looking through the catalog. This pretty card was quick to make and is perfect for any occasion.

I started with a piece of Fresh Freesia card stock for the card base. I trimmed and adhered a piece of the Hues of Happiness DSP to add to the base.

Using Stylish Shapes dies I die cut a Granny Apple Green Label. Then I cut a piece of the Hues of Happiness DSP to 3/4’x 3″ and punched one end with the Banners Pick A Punch and adhered it to the Granny Apple Green label. I trimmed the end of the Granny Apple Green Label so it would be flush with the end of the card. Then I cut a piece of Basic White Cardstock to 3/4″ x 2-1/4″ and stamped the sentiment in Gorgeous Grape and adhered it to the label.

I used Stampin’ Dimensionals to add the label to the card. I added a little sparkle with a few Gorgeous Grape Glassy Dots to finish my card.

Hues of Happiness You Are Wonderful Card Measurements:

  • Fresh Freesia Card base: 5-1/2″ x 8-1/2″, score at 4-1/4″
  • Hues of Happiness DSP: 3-3/4″ x 5-1/2″
  • Hues of Happiness DSP Strip for Label: 3/4″ x 3″
  • Basic White Cardstock for Label: 3/4″x 2-1/4″

I’d love to be your Stampin’ Up!® Demonstrator. All the Stampin’ Up! supplies used to make my card are available in my online store. Simply click any of the product photos below!

Happy Stamping!

Scroll to Top