The Inspirations In Ink Team has created 7 projects for you this month featuring the Season of Chic Bundle! We love this bundle which includes beautiful seasonal images and sentiments that can be used all year round.
The projects featured in this bundle are Exclusive and we’ve included both imperial and metric measurements so no matter where you live you’ll be able to recreate our project.
There are several ways to receive a copy of the PDF Tutorial Bundle.
Receive a copy of this Bundle for FREE when you purchase $35 or more through my online store using my October Host Code: XCGB7PFA
Receive as a FREE Gift from me each month, when you purchase the Starter Kit and become a member of my Ink, Stamp & Share Team.
Need to purchase The Season of Chic bundle so you can create the projects in the Tutorial Bundle. The Season of Chic Bundle is available in my online store along with other coordinating products from the Textured Chic Suite. Simply click any of the product photos below to purchase.
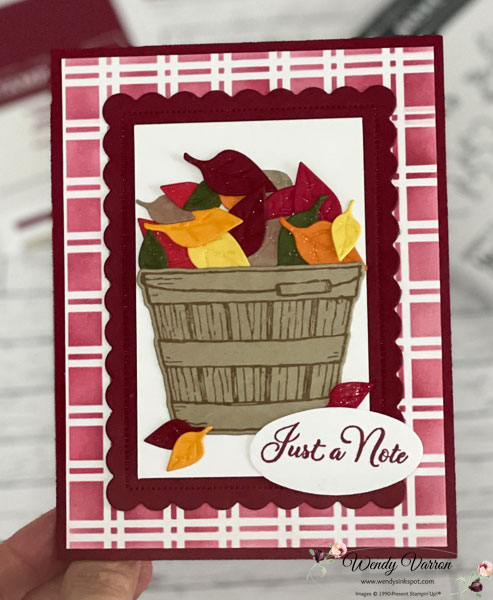
Welcome to the Inspirations In Ink Blog Hop! Thank you so much for hopping along with us! This month we are featuring Stampin’ Up!’s Cheerful Basket Bundle. Once you are done with each post, scroll down to the Blog Hop List participants, you can click on their name to go to their post. We hope you find some inspiration and enjoy all our Cheerful Basket Bundle Projects!
The cooler temperatures and changing colors of the leaves here in Maryland were the inspiration for my card. A basket full of colorful leaves in the Autumn seemed the perfect way to showcase the Cheerful Basket Bundle.
To create my card I started with the Artistic Mix Decorative Masks and a Blending Brush. I brushed Cherry Cobbler Ink on a piece of Basic White Cardstock to create a patterned layer, which I then adhered to a Cherry Cobbler card base. I used the Scalloped Contours Dies to die cut the 2nd largest rectangle from Cherry Cobbler cardstock and adhered it to my cardbase.
The leaves are die cut from the Full Basket dies. I love how these dies make the impression on the leaves. I die cut the in Cherry Cobbler, Real Red, Poppy Parade, Mango Melody, Pumpkin Pie, Daffodil Delight, Mossy Meadow and Crumb Cake cardstock.
I added them to a piece of Basic White Cardstock, cut to 2-1/2″” x 3-3/4″, with glue dots one at a time. Once I had the leaves added, I stamped the basket on some Crumb Cake cardstock in Crumb Cake Ink and die cut it and added it just below the leaves. Then I adhered this layer to my card.
I stamped the sentiment from the Go To Greeting stamp set in Cherry Cobbler. Punching it out with the Double Oval Punch and adding it to the card. I also added a few leaves at the base of the basket. Wink of Stella brushed on the leaves added the final touch. For the inside of my card, I added a few leaves brushed with a Wink of Stella as well.
Blog Hop List
I hope you enjoyed my Cheerful Basket Just a Note card. As mentioned at the top, this is a blog hop so make sure you ‘hop’ around to all the amazing projects on this hop! Click on the links below to visit them.
Cherry Cobbler Cardstock card base: 5-1/2″ x 8-1/2″, score in half at 4-1/4″
Basic White Cardstock : (2) 4″ x 5-1/4″
Basic White Cardstock: 2-1/2″” x 3-3/4″
I’d love to be your Stampin’ Up!® Demonstrator. All the Stampin’ Up! supplies used to make my card are available in my online store. Simply click any of the product photos below!
We are excited to share projects with you again this year. We hope to inspire you to create beautiful new projects using Stampin’ Up! products. Once you are done with each post, scroll down to the bottom and you will see a list of Blog Hop participants, you can click on their name to go to their post, or you can click the next button to go to the next post. Happy Crafting!
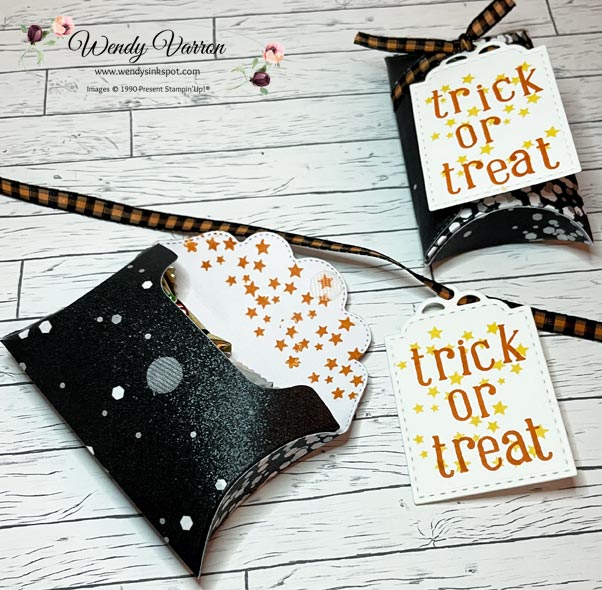
The kid in me thinks of candy, candy and candy at Halloween. I remember as a kid, sleeping with my candy bag so that my favorite candy, gum, snickers, rolos and twizzlers…. wouldn’t mysteriously disappear in the night. With candy in mind, I decided to feature treat packaging for Halloween with the Mini Pocket Envelope Dies and the Pretty Pillow Box Dies.
I die cut the Mini Pocket Envelope and Pillow Box using the Metallic & Shimmer Specialty Paper. I just love how shimmery this paper is and its perfect for Halloween. I used the star stamp from the Alphabest Stamp set and Pumpkin Pie ink to decorate the inside of the envelope and box.
I used the Designer Tags Dies and Basic White cardstock to create the tags for the treats. Using the stars again, I stamped them in So Saffron on the tag, then stamped the Trick Or Treat in Pumpkin Pie ink. Before I made these tags I did a few tests on some scrap cardstock with different colors and lining up the letters. I really liked the effect of not linking up the letters and leaving some of them a little crooked.
Stampin’ Blends are great for adding color to ribbon, embellishments as well as coloring images. I used the Pie Stampin’ Blends to add color the super cute Black & White Gingham Ribbon.
For more inspiration from the Luv 2 Stamp Group Blog Hop Team, click on the image below to visit the talented Kurstan del Rosario. Don’t forget to continue following links on each blog to see everyone’s projects!
I hope you enjoyed my project. I’d love to be your Stampin’ Up!® Demonstrator! All the Stampin’ Up! supplies used to make my card are available in my online store. Simply click any of the product photos below!
Welcome to our Stampin’ Up!® Demonstrator Training Program Monthly Blog Hop!
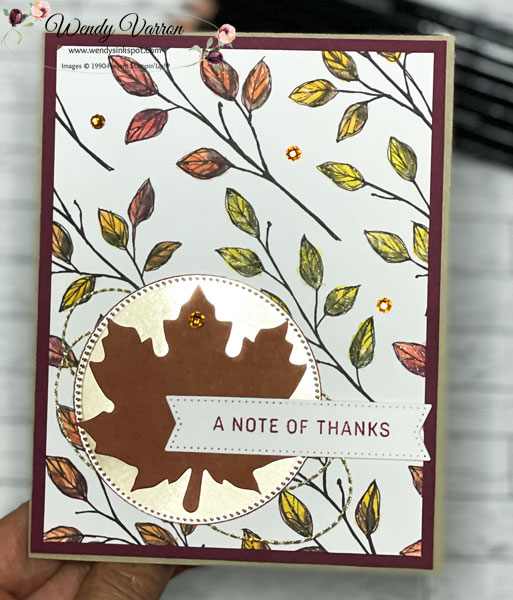
We are so happy that you could join us today for this blog hop for ideas and creative inspiration. Our blog hop focuses on the Thank You cards we are sending to our customers.
I wanted to feature a Fall theme to my thank you cards. The Leaf Labels & Amber Gems Combo Pack are perfect for this quick and easy card. I colored in a piece of Perfectly Penciled DSP with Watercolor Pencils and brushed on a Wink of Stella over the leaves, which not only give a bit of sparkle to the DSP but also helped to blend in the colors of the Watercolor Pencils. Then I adhered the DSP to a piece of Merry Merlot Cardstock. I used Stampin’ Dimensionals to adhere the Layers to the Crumb Cake Cardstock base.
I die cut the stitched circle with the Stylish Shapes Dies and a piece of Brushed Metallic Cardstock. Then with a bit of Stampin’ Seal+ on the back, I added some of the gold trim from the Simply Elegant Trim, then added it to the lower left corner of of my card.
I brushed a little Merry Merlot, and Pumpkin Pie ink with a Blending Brush on a Leaf Label, to give it a bit of color, and added it to the Brushed Metallic Circle with Stampin’ Dimensionals.
The Sending Smiles “A Note of Thanks” sentiment is stamped Merry Merlot on Basic White Cardstock. Then die cut with the Stylish Shapes Dies. I added it to the card over the leaf and a few of the Amber Gems to complete the card.
A Note of Thanks Card Measurements
Crumb Cake Cardstock Base: 5-1/2″ x 8-1/2″, score and fold in half at 4-1/4″
Merry Merlot Cardstock: 4-1/8″ x 5-3/8″
Perfectly Penciled DSP: 3-7/8″ x 5-1/8″
Scrap of Basic White Cardstock for the label
Scrap of Brushed Metallic Cardstock for circle
I’d love to be your Stampin’ Up!® Demonstrator. All the Stampin’ Up! supplies used to make my card are available in my online store. Simply click any of the product photos below!
The pretty Splendid Day Suite is one of my favorite suites in the July – December 2022 Mini Catalog. I created this Sending Hugs card for a Luv 2 Stamp Group Team challenge, to create a project using at least 3 products from one suite. I used all 4 products from the suite on this simple and pretty card.
To create my card I cut a piece of Splendid Day Specialty DSP to 3-1/4″ x 4-1/2″, and adhered it to a 3-1/2″ x 4-3/4″ piece of Night of Navy Cardstock. Next I die cut the label in Whisper White cardstock with the Stylish shapes Dies. I stamped the sentiment in Night of Navy in the lower right corner of the label and adhered it to the Splendid Day layer.
Then i added the layers to an piece of Splendid Day Specialty DSP cut to 4″ x 5-1/4″. Before adding all the layers to the card base, I cut a piece of Soft Sea Foam Seam Binding Ribbon to 6″ and threaded it through the eyelet of one of the Open Leaf Trinkets. I wrapped the ribbon around the layers, adhered to the back of the Splendid Day Specialty DSP with Stampin’ Seal +. To keep the Open Leaf Trinket in place, I added a glue dot behind the eyelet of the trinket.
To complete the card I adhered the layers to a Night of Navy cardbase and and added a few Iridescent Basic Jewels Rhinestones.
Sending Hugs Card Measurements:
Night of Navy Cardbase: 4-1/4″ x11″, scored in half at 5-1/2″
Splendid Day Specialty DSP: 4″x 5-1/4″, 3-1/4″ x 4-1/2″
Night of Navy: 3-1/2″ x 4-3/4″
Basic White Scrap for label
I hope you enjoyed my card today and are inspire to create one as well. I’d love to be your Stampin’ Up!® Demonstrator. All the Stampin’ Up! supplies used to make my card are available in my online store. Simply click any of the product photos below!
The Inspirations In Ink Team has a new Tutorial Bundle! This month our focus is the Cheerful Basket Bundle. We’ve put together 7 tutorials, including both Imperial and Metric measurements, step by step directions and photos.
How to obtain your copy FREE from me
Receive a copy of this Bundle for FREE when you purchase $35 or more through my online store using my September Host Code: RY4E6JSA
Receive as a FREE Gift from me monthly when you purchase the Starter Kit and become a Team Member of mine.