Bundles

Eden’s Garden – Dear Friend
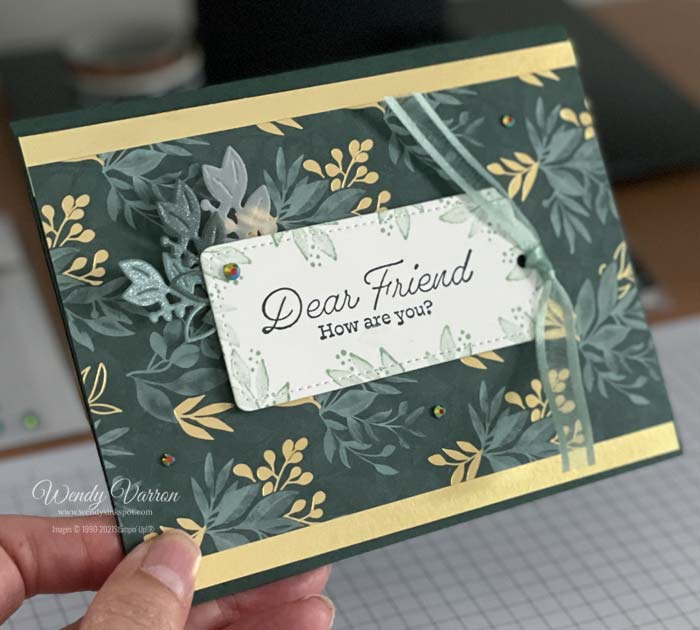
This pretty card was created with the Eden’s Garden Collection. I love the shades of green and the gold foil accents in the Ever Eden Designer Series Paper. It coordinates perfectly with the Soft Succulent & Evening Evergreen sheets of the 2021-2023 In Color Shimmer Vellum, and the Soft Succulent & Evening Evergreen Open Weave Ribbons. That’s one of the things I love about Stampin’ Up! products, the perfect color coordination across all their products. Color coordination makes me happy!

Creating the Card

To create the layers of my card I started with a piece Evening Evergreen cardstock for the base of my card. Then I cut a piece of the Ever Eden DSP to 3-1/2″ x 5-1/2, and 2 strips of Gold Foil Specialty Paper to 1/2″ x 5-1/2″. I adhered the DSP to the Gold Foil on the long edges and attached the DSP to the cardbase. You can see, in the image above,I cut the Gold Foil a touch longer than 5-1/2″. Not to worry, I just snipped the ends off with my Paper Snips.

The label was die cut with the Tailor Made Tags on Basic White cardstock. Using the Eden’s Garden Stamp set, I stamped the leaves in Soft Succulent around the edges of the tag. Next, I stamped the sentiment in Evening Evergreen. I die cut a few of the leaf stems from the Eden Dies in Vellum and the Soft Succulent and Evening Evergreen Shimmer Vellum. I attached them to the bottom of the label using a few glue dots. I tied a piece of the Soft Succulent Open Weave Ribbon before attaching the label to my card with some Stampin’ Dimensionals.

To finish my card I added a few of the Garden Gems. I’m sure by now you know I can’t resist adding a bit of bling whenever I can. I love the look of this card. I hope you do as well, leave a comment below and let me know what you think of my card.

Eden’s Garden Dear Friend Card Measurements

  • Evening Evergreen Cardstock card base: 5-1/2″ x 8-1/2″, score in half at 4-1/4″
  • Ever Eden DSP: 3-1/2″ x5-1/2″
  • Gold Foil Specialty Paper: (2) 1/2″ x 5-1/2″

I’d love to be your Stampin’ Up! Demonstrator. All the Stampin’ Up! supplies used to make my card are available in my online store. Simply click any of the product photos below!

Happy Stamping!

Eden’s Garden – Dear Friend Read More »

Tidings & Trimmings Treat Box

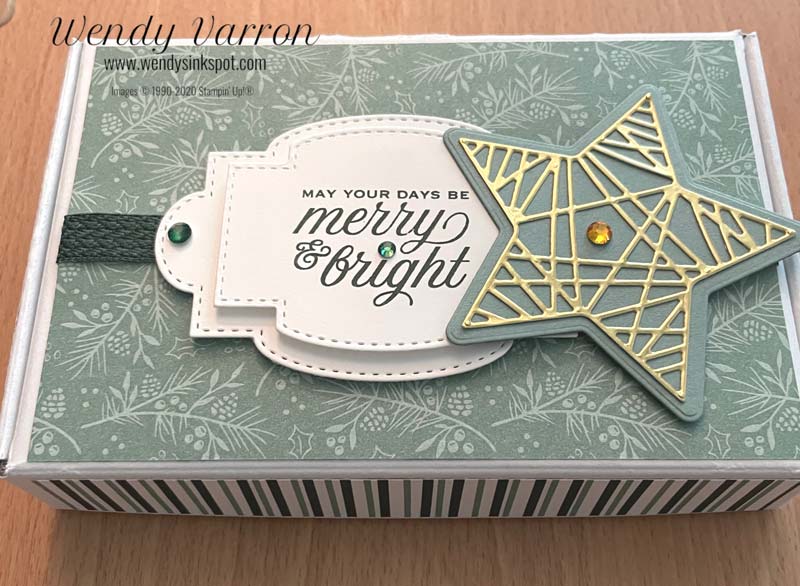
I dressed up this Mini Paper Pumpkin box with the Tidings of Christmas Suite, available in the 2021-2022 Annual Catalog. It is one of my favorite Christmas suites. I love the fonts of the sentiments, the classic colors and images for Christmas. The suite includes the Tidings & Trimmings Stamps, Christmas Trimmings Dies, Tidings of Christmas Designer Series Paper, and the Evening Evergreen 3/8″ Chevron Weave Ribbon. Click the image below to order yours!


Before decorating the Mini Paper Pumpkin box, I cut the Tidings of Christmas DSP for the box and took the picture below for reference on where to place all the pieces. You will need to cut:

  • (1) 3 5/8 x 5 3/8”, for the Top of the box
  • (2) 7/8 x 5 3/8”, for the Front and Back edges of the box
  • (2) 7/8 x 3 3/8”, for the Left and Right edges of the box

Let’s Decorate the Box

First, cut a 6 1⁄2” piece of Evening Evergreen Chevron Weave Ribbon and adhered it to the 3-5/8″ x 5-3/8″ DSP, then adhered the DSP to the top of the box. Next, I adhered the 7/8″ x 5-3/8″ DSP on the Front and Back edges, and the 7/8″ x 3-3/8″ DSP to the left and right edges. I used Multipurpose Liquid Glue to adhere all the DSP pieces, with liquid glue you have a few moments to make sure that the DSP is right where you want it.

The sentiment is stamped in Evening Evergreen Ink on Basic White cardstock and die cut with the Stitched So Sweetly labels. I die cut a second label and used Stampin’ Dimensionals to layer the sentiment on the larger label. I positioned it over the ribbon slightly to the left to ensure room to add the star.

I die cut the base of the star in Soft Succulent cardstock. Using adhesive sheets with gold foil, I die cut the detailed star layer. The adhesive sheet made it very easy to adhere it to the Soft Succulent cardstock star. If you haven’t tried adhesive sheets yet, I highly recommend them for detailed die cutting. I attached the star using Stampin’ Dimensionals. The Holiday Rhinestone Basic Jewels were the finishing touch.

I hope you enjoyed today’s project! I’d love to be your Demonstrator. If you’d like to purchase any of the supplies I used for this project, Click on the link(s) the below.

Happy Stamping!


Don’t forget about the Starter Kit Promotion

Start with Savings Starter Kit promotion will provide you with an excellent opportunity to purchase your Starter Kit at a great deal!  Instead of the standard $99 Starter Kit—which is already a great deal—you can pick up a completely custom Starter Kit for only $75!!!  That’s an amazing value!!

PROMOTION DETAILS:

  • Promotion Period:  November 4-30, 2021
  • When a new demonstrator orders their custom Starter Kit, they will be able to redeem $125 of qualifying products for only $75 (normally $99).
  • New demonstrators who submit their Independent Demonstrator Agreement (IDA) before November 4 or after November 30 will not be eligible for this promotion.  Starter Kit orders must be placed between November 4 and 30 to receive the discount.
  • Joining Deadline:  November 30, 2021; 11:50 PM (MT)

Tidings & Trimmings Treat Box Read More »

Sweet Strawberry Bundle

The Sweet Strawberry Bundle is one of my favorite Stamp & Punch bundles. The stamp set has great all-occasion sentiments, and two-step images that can be separately or together. The Strawberry Builder Punch makes stamping and cutting out the berries, flowers and leaves quickly.

Before we get to making the card I wanted to share with you a tip for using a punches that cut multiple stamped images at the same time, like the Strawberry Builder punch. To easy punch out the images together I made a template. I took a piece of scrap card stock to punch out the images. When I’m ready to stamp the images I placed them in the temple then placed the glass block non the stamps. I inked up the stamps with Stampin’ Spots. Then I can easily punch out the images at the same time.

Now on to a few tips for creating my card. Some of the images in the set are two-step stamps, which makes adding shading to the images very easy, or they can be used seperately. For my card I stamped the outline of the strawberries and leaves and then used the solid image stamps to add shading to them before punching them out. On the cardbase I stamped the outline of the strawberries, then randomly stamped in a few of the strawberries with the shaded image.

I stamped the sentiment on the Basic White card stock and adhered it to the base off center to the right, then added the Strawberries on the Basic White card stock with Stampin’ Dimensionals. The final touch was the addition of the Genial Gems. There you have it, a cute card that is quick and easy to create.

Product List

I hope you enjoyed today’s card and that you will visit again!

Happy Stamping!

Sweet Strawberry Bundle Read More »

Dragonfly Garden Fun Fold Card

Today I’m sharing a fun fold card I made with the Dragonfly Garden stamp set and the Dandy Garden Designer Series paper which are available now it the January – June 2021 Mini Catalog. 
The card base is a piece of Misty Moonlight card stock cut to 4 1/4″ x 5 1/2″, with the DSP layer cut to 4″ x 5 1/4″.
 
 
 The Bumblebee card stock is cut to 8 1/2″ x 2 1/2″ scored at 4 1/4″. This layer is where the card opens, and I placed it on the base of the card sightly off center. 


The banner is a piece of Whisper White card stock cut to 2 1/2” x 4 1/4”.  I snipped out a small triangle off one end of the with Paper Snips to create the banner. 


The dragonflies are sponged with a touch of color. I did one with Bumblebee in the middle and Misty Moonlight on the outside, then I altered the colors on a second dragonfly and punched them out with the Dragonfly punch.  


Before I stamped the sentiment, I placed the punched out dragonflies where I wanted them with out adhesive, then I was able to stamp the sentiment in Misty Moonlight. I added the dragonflies with Dimensionals to pop them up and brushed them with a Wink of Stella. Last but not least, I added the Opal Rounds which give it just the perfect touch. 
 
 
I hope you enjoyed today’s card. 


Product List

Happy Stamping,

Dragonfly Garden Fun Fold Card Read More »

Scroll to Top