Stampin’ Cut & Emboss Machine

Luv 2 Stamp Group Blog Hop – Fun Fold

Welcome to the Luv 2 Stamp Group’s Blog Hop! are excited to share projects with you again this year. We hope to inspire you to create beautiful new projects. Each month we will have a different theme based on the next month’s celebrations using Stampin’ Up! products.

Once you are done with each post, scroll down to the bottom and you will see a list of Blog Hop participants, you can click on their name to go to their post, or you can click the next button to go to the next post in line. Happy crafting! This month’s theme is Fun Folds!

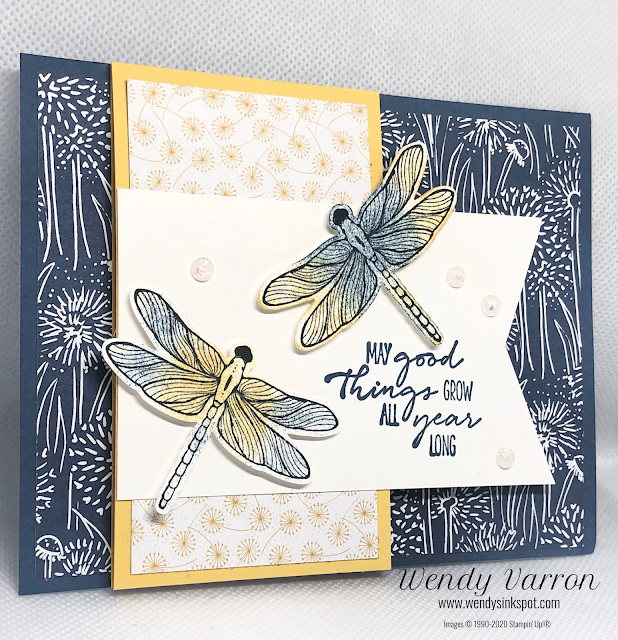
This fun fold was inspired by a card Patty Bennett shared with the Luv 2 Stamp Group at a team event several years ago. It’s one of my favorite folds which I’ve used before. Click Here to see my Dragonfly Fun Fold Card that I created using this same layout.

I used the Let’s Go Fishing Designer Series Paper on Misty Moonlight cardstock for the base of my card. I thought this pattern looked like water and would go well with the image from the In the Moment stamp set. I used the Basics 3D Embossing folders to emboss the BoHo Blue cardstock which I layered on Basic White Cardstock to add some texture to the card. With a piece of Basic White stock I used paper snips to cut the flag on one end of the cardstock. The “Warm Hello” sentiment from the Circle Sayings stamp set in Tuxedo Black ink. then adhered the flag to the BoHo Blue cardstock layer.

Next, I stamped and colored the image from In the Moment stamp set with Stampin’ Blends, punched it out with a 2-3/8″ Circle Punch. I attached it to the flag with Stampin’ Dimensionals. Inside my card I added another strip of the same Designer Series Paper. To finish the card I’ve added a few 2023-2025 In Color Dots.

Here are both my cards side by side. The same layout but with different elements and stamp sets.

For more inspiration from the Luv 2 Stamp Group Blog Hop Team, click on the image below to visit the talented Jo Anne Hewins Don’t forget to continue following links on each blog to see everyone’s projects!

Jo Anne Hewins – NC
Laurie Bradshaw – CA
Sharon Lim – CA
Teri West – AK
Wendy Varron – MD *You Are Here

Warm Hello Card Measurements:

Misty Moonlight card base: 4-1/4″ x 5-1/2″
Let’s Go Fishing DSP: 4″ x 5-1/4″
Let’s Go Fishing DSP: 1/2″ x 2-1/2″ for card inside
Basic White Thick cardstock: 2-1/2″ x 8-1/2″ scored at 4 1/4″
Basic White Thick cardstock: 2-1/2″ x 4-1/4″
Boho Blue cardstock: 2-1/4″ x 4″
Basic White Thick cardstock scrap to stamp In the Moment Image

I love to read your comments! To leave me a comment please CLICK HERE

Happy Stamping!

I’d love to be your Stampin’ Up!® Demonstrator. All the Stampin’ Up! supplies used to make my card are available in my online store. Simply click any of the product photos below!

Want to leave a comment? Please CLICK HERE

Luv 2 Stamp Group Blog Hop – Fun Fold Read More »

Luv 2 Stamp Group Blog Hop Featuring Ribbon

Welcome to the

Luv 2 Stamp Group Blog Hop!!

Our theme this month is Ribbon!!

We are excited to sharing our projects with you! We hope to inspire you to create beautiful new projects. Each month we will have a different theme based on the next month’s celebrations using Stampin’ Up! products. Once you are done with each post, scroll down to the bottom and you will see a list of Blog Hop participants. You can click on their names to go to their post, or you can click the next button to go to the next post in line. We hope you enjoy all our projects featuring Ribbon!

The ribbon I have chosen to use on my card is the Boho Blue Textured Ribbon. It is so soft and easy to work with. I love the texture of this ribbon, it gives the ribbon a bit of shimmer effect in the light. I have always tied knots when using ribbon on my cards in the past because I struggle with tying bows. I always seemed to have a hard time holding the knot tight while tying the loops of the bow. I have a bow tying tip if you struggle like I did.

Thanks to the tweezers in the Embossing Additions Tool Kit, it’s easier for me to tie a bow. Here’s how I do it. You can see in the photo below, once I have tied the knot I used tweezers pinch the knot tight, then I’m able to finished tying the bow. The tweezers easily slip out of the bow and the I tighten the bow.

I die cut the Boho Blue Cardstock with the scallop die in the Scallop Contours Dies. When I’m die cutting I use washi tape to hold the die in place.

I stamped the ladybugs from the Hello Ladybug Stamp set in Tuxedo Black Memento Ink and Lemon Lolly Ink. I brushed the ladybug spots with a wink of stella. To stamp the sentiment I used Stampin’ Up! Masking Paper to stamp the words bug me in Boho Blue and the rest of the sentiment in Tuxedo Black Memento Ink. Then I die cut it out with the label from the Stylish Shapes Dies, which I added to my card with Stampin’ Dimensionals.

Lemon Lolly is such a light pretty color I decided not to add a piece of Basic White inside my card but I did stamp a little ladybug inside.

For more inspiration from the Luv 2 Stamp Group Blog Hop Team, click on the image below to visit the talented Kurstan del Rosario. Don’t forget to continue following links on each blog to see everyone’s projects!

Jo Anne Hewins-NC

Wendy Varron- MD *You are here

Kurstan del Rosario-CA

Laurie Bradshaw-CA

Taleena Koch-WA

Sharon Lim-CA

Hello Ladybug Card Measurements:

Lemon Lolly Cardbase: 4-1/4″ x 11″, score and fold in half at 5-1/2″

I hope you enjoyed my card featuring ribbon! I’d love to be your Stampin’ Up!® Demonstrator. All the Stampin’ Up! supplies used to make my card are available in my online store. Simply click any of the product photos below!

I love to read your comments!  To leave a comment Please CLICK HERE.

Happy Stamping!

Want to leave a comment? Please Click Here

Luv 2 Stamp Group Blog Hop Featuring Ribbon Read More »

Luv 2 Stamp Group Blog Hop – Halloween Treat

Welcome to the Luv 2 Stamp Group Blog Hop!

We hope you enjoy our Halloween Theme!

We are excited to share projects with you again this year. We hope to inspire you to create beautiful new projects using Stampin’ Up! products. Once you are done with each post, scroll down to the bottom and you will see a list of Blog Hop participants, you can click on their name to go to their post, or you can click the next button to go to the next post. Happy Crafting!

The kid in me thinks of candy, candy and candy at Halloween. I remember as a kid, sleeping with my candy bag so that my favorite candy, gum, snickers, rolos and twizzlers…. wouldn’t mysteriously disappear in the night. With candy in mind, I decided to feature treat packaging for Halloween with the Mini Pocket Envelope Dies and the Pretty Pillow Box Dies.

I die cut the Mini Pocket Envelope and Pillow Box using the Metallic & Shimmer Specialty Paper. I just love how shimmery this paper is and its perfect for Halloween. I used the star stamp from the Alphabest Stamp set and Pumpkin Pie ink to decorate the inside of the envelope and box.

I used the Designer Tags Dies and Basic White cardstock to create the tags for the treats. Using the stars again, I stamped them in So Saffron on the tag, then stamped the Trick Or Treat in Pumpkin Pie ink. Before I made these tags I did a few tests on some scrap cardstock with different colors and lining up the letters. I really liked the effect of not linking up the letters and leaving some of them a little crooked.

Stampin’ Blends are great for adding color to ribbon, embellishments as well as coloring images. I used the Pie Stampin’ Blends to add color the super cute Black & White Gingham Ribbon.

For more inspiration from the Luv 2 Stamp Group Blog Hop Team, click on the image below to visit the talented Kurstan del Rosario. Don’t forget to continue following links on each blog to see everyone’s projects!

I hope you enjoyed my project. I’d love to be your Stampin’ Up!® Demonstrator! All the Stampin’ Up! supplies used to make my card are available in my online store. Simply click any of the product photos below!

Happy Stamping!

Luv 2 Stamp Group Blog Hop – Halloween Treat Read More »

Merriest Moments – Inspirations In Ink Blog Hop

Welcome to the Inspirations in Ink Blog Hop!

Thank you for hopping along with the Inspirations In Ink Blog Hop! This month’s theme is Christmas In July. You may be starting here or have come from another blog – either way you can find the link list at the bottom of this post so that you can see every blog post and idea today. I hope you enjoy all our Christmas in July Projects!

My Christmas in July card was created with just a few simple products that I had on hand. It was very easy and quick to create. It’s the perfect card if you send out lots of Holiday cards and you want to create multiples of a simple elegant card.

First I started with a Real Red cardstock cardbase, cut to 5-1/2″ x 8-1/2″, scored in half and folded at 4-1/4″. Next, using a piece of the Silver and Gold DSP from Sale-a-bration, I die cut the scalloped rectangle from the Scalloped Contours Dies and adhered it to my cardbase. Then using the next smallest scalloped rectangle die, I die cut a piece of the Gold Foil sheets and adhered it to the Gold DSP Layer.

I die cut the next smallest scalloped rectangle die cut from a piece of Real Red cardstock and using a Mini Glue Dot adhered a the snowflake from the Wonderful Snowflakes to the Red Scalloped rectangle. I stamped the sentiment from the Merriest Moments stamp set in Real Red Ink on a scrap of Basic White cardstock, then die cut it with a label from the Stylish Shapes Dies. I adhered it to the Red Scalloped rectangle, overlapping the snowflake a bit, with Stampin’ Dimensionals. Finally, I used Stampin’ Dimensionals to add the Red Scalloped rectangle to the Gold Foil layer on my card, and added a few Red Rhinestone Basic Jewels. Voila, a pretty Christmas card all ready to go!

As mentioned at the top, this is a blog hop so make sure you ‘hop’ around to all the amazing projects on this hop! Click on the links below to visit them.

I’d love to be your Stampin’ Up!® Demonstrator. All the Stampin’ Up! supplies used to make my card are available in my online store. Simply click any of the product photos below!

Happy Stamping!

Merriest Moments – Inspirations In Ink Blog Hop Read More »

Scroll to Top