’Tis the season to start your holiday crafting! It’s so simple with this all-inclusive kit. With the Festive Tags Kit you’ll have handmade tags in minutes!
The cute wreath, snowman, holly, ornament, and Christmas tree will bring instant holiday spirit to your gift-giving. The kit includes printed die cuts, embellishments, and twine—no stamps or ink needed, so you can assemble these almost anywhere in almost no time. Just adhere the die cuts and embellishments and finish with a twine tie. You’ll have handmade tags for the holidays in minutes! Bonus: The kit includes sentiment stickers in English, French, German, and Dutch, so you can gift in multiple languages!
Festive Tags Kit Contents:
*Predesigned projects * Step-by-step instructions * Precut pieces (No prep work! Get right to crafting) * Makes 15 tags: 3 each of 5 designs * Enough adhesive to complete projects * Die cut stickers and accents * Peel-and-stick gold dots * Baker’s twine
Product colors: Basic Black, Flirty Flamingo, Garden Green, Lost Lagoon, Pool Party, Real Red
Watch the unboxing video below. Stampin’ Up! CEO Sara Douglass will show you step-by-step how to put this fun kit together.
I’d love to be your Stampin’ Up!® Demonstrator. To shop for the Festive Tags Kit click the product photos below! To shop the entire Kit Collection Click Here.
Welcome to the Luv 2 Stamp Group’s 2023 Blog Hop! We are excited to share projects with you again for the third year. This year we are shaking things up and bringing you all new monthly themes to inspire your next project!
Once you are done with each post, scroll down to the bottom and you will see a list of Blog Hop participants, you can click on their name to go to their post, or you can click the next button to go to the next post in line. Happy crafting!
Our first Blog Hop Theme of 2023 is Sweet Treats!
My festive St. Patrick’s Day Treats were inspired by the Jan-June 2023 Mini Catalog. Page 8 of the mini catalog I noticed these cute treats created with the Country Floral Lane Suite. These cute treats can be recreated for any occasion and they are quick to make.
I have been waiting for a St. Patrick’s Day stamp set, the Luck Clover Bundle first bundle I put on my mini catalog shopping list. It was perfect for creating these treat holders for St. Patrick’s Day or to just wish someone good luck!
To create the wrappers I started with a piece of Granny Apple Green Cardstock cut to 5-1/2″ x 6-3/4″. On the long side score the cardstock at 2″, 2-1/4″, 4-1/2″, 4-3/4″. Then I stamped the clovers in Granny Apple Green along the top and bottom edges. I used Tear & Tape to adhere the wrapper closed. The Dandy Designs DSP layer of the wrapper is cut to 4-1/2″ x 6-3/4″, for this layer of the wrapper I didn’t make any score lines, I just wrapped it around the cardstock layer and adhered again with Tear & Tape.
To decorate the font of the wrappers I used Basic White Cardstock and die cut the scalloped circle with the All That Dies and stamped clovers on them in Granny Apple Green. I stamped each of the sentiments in Granny Apple Green and snipped them out with my paper snips. I adhered them with Mini Glue Dots.
I stamped the large clovers in Granny Apple Green using the Stamparatus. I prefer to stamp with Stamparatus on larger solid images works better for me than using a clear block, this way I can re-ink and stamp the image if it’s not clear. I punched them out with the Lucky Clover Punch and added them to the wrapper with Mini Glue Dots.
I can’t resist adding a little bling to my projects and for these fun treats I added a few Iridescent Pastel Gems. Before slipping in the chocolate bar I wrapped a piece of the Burlap Ribbon from the Real Red & Burlap Ribbon Combo pack around the bar. Then tied them at the top with a piece of White Crinkle Seam binding colored with Soft Sea Foam Stampin’ Blends.
Be sure to Hop along with all of our Blog Hop participants and see all their amazing projects! Just click on their name in the list below to go to their post, or you can click the next button to go to the next post in line.
Granny Apple Green Cardstock – 5-1/2″ x 6-3/4″, score on the long edge at 2″, 2-1/4″, 4-1/2″, 4-3/4″
Dandy Designs DSP – 4-1/2″ x 6-3/4″
I hope you enjoyed my Sweet Treat project! All the Stampin’ Up! supplies used to make my treat sleeves are available in my online store. Simply click any of the product photos below!
I love to make handmade gift tags as well as handmade cards! Although I never seem to make enough of them and this time of year I usually need to make more. These are some of my favorite tags I’ve made. The Very Best Trio Punch and Lights Aglow Specialty DSP with the gold foil accents made these pretty tags come together quickly.
Even thought the Lights Aglow DSP is no longer available(sorry I didn’t get these posted before it sold out) you can make these tags with any DSP for any occasion.
I started by cutting some Basic White Cardstock to 3″x3″ and punching the corners then the tag for the ribbon with the Very Best Trio Punch. Using the Christmas Lights stamp set I stamped the stars across the bottom of the tags in Cherry Cobbler and Evening Evergreen ink.
Next, I cut the Lights Aglow DSP and punched the corners and tags. Using the Stylish shapes Dies I die cut some stitched squares and circles. Then, I stamped the sentiments in Cherry Cobbler and Evening Evergreen Ink from the Brightest Glow & Framed & Festive stamp sets.
To finish the tags I added some White Glittered Organdy Ribbon and Soft Succulent Open Weave Ribbon.
I hope you enjoyed my gift tags. You can purchase the stamp sets, punch, cardstock and ink along with other supplies to create your own tags in my online store.
How cute is this brightly colored card? It was very quick and easy to make, and if you’ve been following me for any length of time you know I love a quick and simple card and bling. This card is no exception. The Celebrate Everything DSP has patterns for any occasion and this one is my favorite with all the bright colors! The Granny Apple Green card base is a perfect to match.
To create the label, I used the Deckled Rectangle Dies to die cut Sweet Sorbet and Basic White cardstock and adhered them together with Multipurpose Liquid Glue. The Alphabest Bundle was the perfect choice to add merry in the same bright colors in the Celebrate Everything DSP. I punched them out with the Best Label punch and adhered them to the Basic White rectangle with Stampin’ Dimensionals. These layers were adhered to the card with Stampin’ Dimensionals.
Inside I added a small piece of the Celebrate everything DSP the Basic White cardstock. As the final touch, I colored a few Opal Rounds with the Poppy Parade, Granny Apple Green and Sweet Sorbet Stampin’ Blends and added them to the front of the card.
Alphabest Merry Card Measurements:
Granny Apple Green Card Base: 5-1/2″ x 8-1/2″, score in half at 4-1/4″
Celebrate Everything DSP Layer: 3-7/8″ x 5-1/2″
Basic White Cardstock Inside Card: 4″ x 5-1/4″
Celebrate Everything Inside Card: 1/2″ x 4″
I’d love to be your Stampin’ Up!® Demonstrator. All the Stampin’ Up! supplies used to make my card are available in my online store. Simply click any of the product photos below!
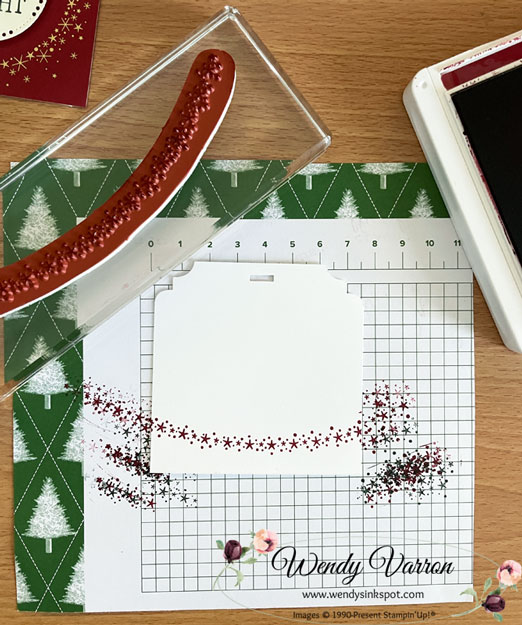
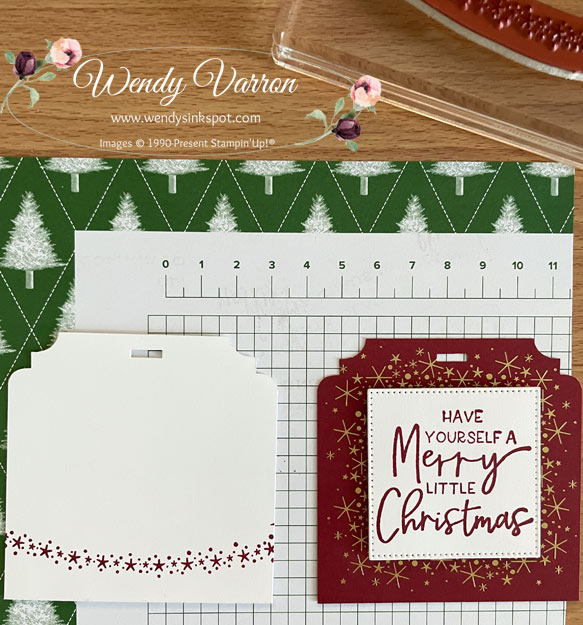
Celebrate the season with a card kit that has everything you need to wish those you love a merry Christmas and a joyous New Year. Get your all-inclusive kit and make quick multiples everyone will love! Available while supplies last!
Click image to download the Instructional PDF
Watch the Unboxing Video with Sara
I’d love to be your Stampin’ Up!® Demonstrator. The new Cozy & Bright Kit is available now in my online store, while supplies last. Simply click the product photo below to order!
To begin, with the Mini Paper Pumpkin box laying flat, I used some painters tape to hold the Decorative Mask in place. Using a Blending Brush and Poppy Parade ink pad, I brushed the ink on the top of the box, the front edge and the back edges. I love the candy cane stripe background that the mask gives for the layers I added on the top of the box.
Next, I fussy cut the star from on the Memories & More Cards Pack and using the Scalloped Contours Dies, die cut the rectangle in Poppy Parade cardstock. I adhered the Poppy Parade rectangle to the Mini Paper Pumpkin box with Liquid Glue, then added the Star with Stampin’ Dimensionals. The little snowflakes are stickers from the Memories & More Cards pack. I added some Subtle Shimmer Sequins to give it a little sparkle.
Thank you for stopping by today, I hope you enjoyed my project!
I’d love to be your Stampin’ Up! Demonstrator. All the Stampin’ Up! supplies used to make my project are available in my online store. Simply click any of the product photos below!