Mini Catalog

Quick Gift Tags with the Very Best Trio Punch

I love to make handmade gift tags as well as handmade cards! Although I never seem to make enough of them and this time of year I usually need to make more. These are some of my favorite tags I’ve made. The Very Best Trio Punch and Lights Aglow Specialty DSP with the gold foil accents made these pretty tags come together quickly.

Even thought the Lights Aglow DSP is no longer available(sorry I didn’t get these posted before it sold out) you can make these tags with any DSP for any occasion.

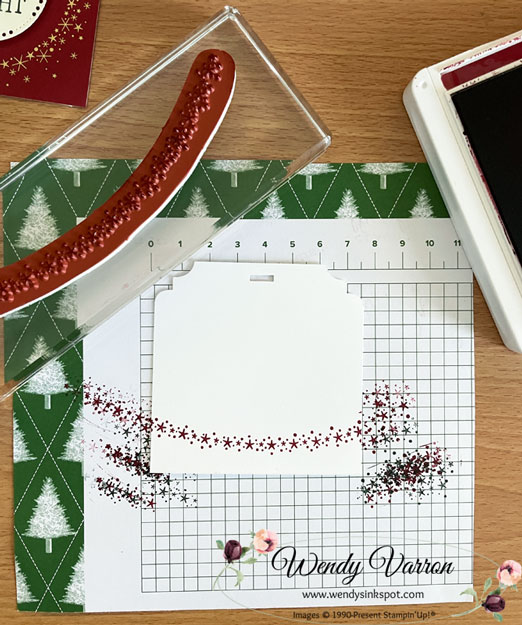
I started by cutting some Basic White Cardstock to 3″x3″ and punching the corners then the tag for the ribbon with the Very Best Trio Punch. Using the Christmas Lights stamp set I stamped the stars across the bottom of the tags in Cherry Cobbler and Evening Evergreen ink.

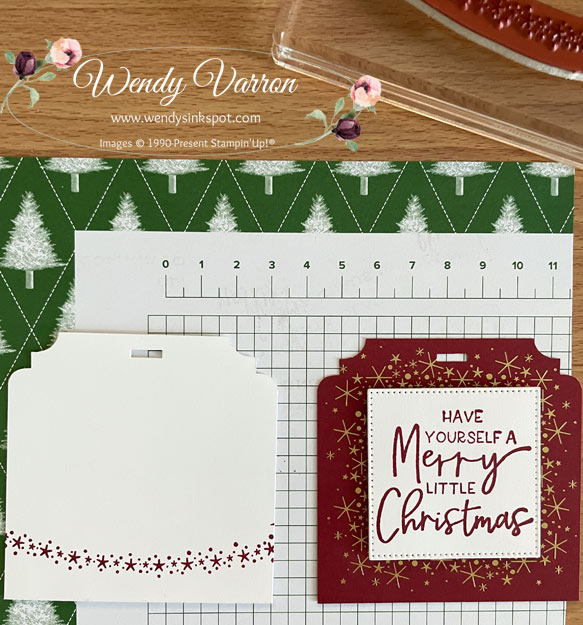
Next, I cut the Lights Aglow DSP and punched the corners and tags. Using the Stylish shapes Dies I die cut some stitched squares and circles. Then, I stamped the sentiments in Cherry Cobbler and Evening Evergreen Ink from the Brightest Glow & Framed & Festive stamp sets.

To finish the tags I added some White Glittered Organdy Ribbon and Soft Succulent Open Weave Ribbon.

I hope you enjoyed my gift tags. You can purchase the stamp sets, punch, cardstock and ink along with other supplies to create your own tags in my online store.

Happy Stamping!!

Quick Gift Tags with the Very Best Trio Punch Read More »

Colorful Merry with the Alphabest Bundle

How cute is this brightly colored card? It was very quick and easy to make, and if you’ve been following me for any length of time you know I love a quick and simple card and bling. This card is no exception. The Celebrate Everything DSP has patterns for any occasion and this one is my favorite with all the bright colors! The Granny Apple Green card base is a perfect to match.

To create the label, I used the Deckled Rectangle Dies to die cut Sweet Sorbet and Basic White cardstock and adhered them together with Multipurpose Liquid Glue. The Alphabest Bundle was the perfect choice to add merry in the same bright colors in the Celebrate Everything DSP. I punched them out with the Best Label punch and adhered them to the Basic White rectangle with Stampin’ Dimensionals. These layers were adhered to the card with Stampin’ Dimensionals.

Inside I added a small piece of the Celebrate everything DSP the Basic White cardstock. As the final touch, I colored a few Opal Rounds with the Poppy Parade, Granny Apple Green and Sweet Sorbet Stampin’ Blends and added them to the front of the card.

Alphabest Merry Card Measurements:

  • Granny Apple Green Card Base: 5-1/2″ x 8-1/2″, score in half at 4-1/4″
  • Celebrate Everything DSP Layer: 3-7/8″ x 5-1/2″
  • Basic White Cardstock Inside Card: 4″ x 5-1/4″
  • Celebrate Everything Inside Card: 1/2″ x 4″

I’d love to be your Stampin’ Up!® Demonstrator. All the Stampin’ Up! supplies used to make my card are available in my online store. Simply click any of the product photos below!

Happy Stamping!

Colorful Merry with the Alphabest Bundle Read More »

Luv 2 Stamp Group Blog Hop – Halloween Treat

Welcome to the Luv 2 Stamp Group Blog Hop!

We hope you enjoy our Halloween Theme!

We are excited to share projects with you again this year. We hope to inspire you to create beautiful new projects using Stampin’ Up! products. Once you are done with each post, scroll down to the bottom and you will see a list of Blog Hop participants, you can click on their name to go to their post, or you can click the next button to go to the next post. Happy Crafting!

The kid in me thinks of candy, candy and candy at Halloween. I remember as a kid, sleeping with my candy bag so that my favorite candy, gum, snickers, rolos and twizzlers…. wouldn’t mysteriously disappear in the night. With candy in mind, I decided to feature treat packaging for Halloween with the Mini Pocket Envelope Dies and the Pretty Pillow Box Dies.

I die cut the Mini Pocket Envelope and Pillow Box using the Metallic & Shimmer Specialty Paper. I just love how shimmery this paper is and its perfect for Halloween. I used the star stamp from the Alphabest Stamp set and Pumpkin Pie ink to decorate the inside of the envelope and box.

I used the Designer Tags Dies and Basic White cardstock to create the tags for the treats. Using the stars again, I stamped them in So Saffron on the tag, then stamped the Trick Or Treat in Pumpkin Pie ink. Before I made these tags I did a few tests on some scrap cardstock with different colors and lining up the letters. I really liked the effect of not linking up the letters and leaving some of them a little crooked.

Stampin’ Blends are great for adding color to ribbon, embellishments as well as coloring images. I used the Pie Stampin’ Blends to add color the super cute Black & White Gingham Ribbon.

For more inspiration from the Luv 2 Stamp Group Blog Hop Team, click on the image below to visit the talented Kurstan del Rosario. Don’t forget to continue following links on each blog to see everyone’s projects!

I hope you enjoyed my project. I’d love to be your Stampin’ Up!® Demonstrator! All the Stampin’ Up! supplies used to make my card are available in my online store. Simply click any of the product photos below!

Happy Stamping!

Luv 2 Stamp Group Blog Hop – Halloween Treat Read More »

Sending Hugs Card with the Splendid Day Suite

The pretty Splendid Day Suite is one of my favorite suites in the July – December 2022 Mini Catalog. I created this Sending Hugs card for a Luv 2 Stamp Group Team challenge, to create a project using at least 3 products from one suite. I used all 4 products from the suite on this simple and pretty card.

To create my card I cut a piece of Splendid Day Specialty DSP to 3-1/4″ x 4-1/2″, and adhered it to a 3-1/2″ x 4-3/4″ piece of Night of Navy Cardstock. Next I die cut the label in Whisper White cardstock with the Stylish shapes Dies. I stamped the sentiment in Night of Navy in the lower right corner of the label and adhered it to the Splendid Day layer.

Then i added the layers to an piece of Splendid Day Specialty DSP cut to 4″ x 5-1/4″. Before adding all the layers to the card base, I cut a piece of Soft Sea Foam Seam Binding Ribbon to 6″ and threaded it through the eyelet of one of the Open Leaf Trinkets. I wrapped the ribbon around the layers, adhered to the back of the Splendid Day Specialty DSP with Stampin’ Seal +. To keep the Open Leaf Trinket in place, I added a glue dot behind the eyelet of the trinket.

To complete the card I adhered the layers to a Night of Navy cardbase and and added a few Iridescent Basic Jewels Rhinestones.

Sending Hugs Card Measurements:

  • Night of Navy Cardbase: 4-1/4″ x11″, scored in half at 5-1/2″
  • Splendid Day Specialty DSP: 4″x 5-1/4″, 3-1/4″ x 4-1/2″
  • Night of Navy: 3-1/2″ x 4-3/4″
  • Basic White Scrap for label

I hope you enjoyed my card today and are inspire to create one as well. I’d love to be your Stampin’ Up!® Demonstrator. All the Stampin’ Up! supplies used to make my card are available in my online store. Simply click any of the product photos below!

Happy Stamping!

Sending Hugs Card with the Splendid Day Suite Read More »

August Customer Thank you Cards

Welcome to our Stampin’ Up!® Demonstrator Training Program Monthly Blog Hop!

We are so happy that you could join us today for this blog hop for ideas and creative inspiration. Our blog hop focuses on the Thank You cards we are sending to our customers.

You may be starting here or have come from another blog – either way you can find the link list at the bottom of this post so that you can see every blog post today.

For this months Customer cards I decided to use the Splendid Day Designer Series Paper and the Beautiful Shapes Dies, to create a clean and simple card. I love how they turned out!

To create my card I cut card bases in both Soft Sea Foam and Fresh Freesia CardStock. Then I used the Beautiful Shapes Dies to die cut several hexagons from the Splendid Day Designer Series Paper. I adhered the 2 largest hexagons with multipurpose liquid glue, and the smallest hexagon with Mini Stampin’ Dimensionals on Basic White cardstock. I stamped several images from the Hello Beautiful Stamp set to add a bit of texture to the card, then attached the Basic White layer to the card base.

The sentiment is from the Pansy Patch stamp set, stamped in Tuxedo Black Ink, on a strip of Basic White cardstock. Then punched each side with the Lovely Labels Pick a Punch and added it to the card front with Stampin’ Dimensionals. I added a few of the 2021-2023 In Color Opal Rounds because I just couldn’t resist adding a little more sparkle to the cards.

For the inside of my card I stamped the Bee and foliage images from the Splendid Thoughts Stamp set on Basic White cardstock, then adhered it to the inside of the card.

Hello From Me to You Card Measurements:

  • Cardbase: 5-1/2″ x 8-1/2″, score at 4-1/4″
  • Basic White Layer: 4″ x 5-1/4″
  • Basic White Inside: 4′ x 5-1/4″
  • Basic White Strip for Sentiment: 1/2″ x 4″

I’d love to be your Stampin’ Up!® Demonstrator. All the Stampin’ Up! supplies used to make my card are available in my online store. Simply click any of the product photos below!

Happy Stamping!

August Customer Thank you Cards Read More »

Merriest Moments – Inspirations In Ink Blog Hop

Welcome to the Inspirations in Ink Blog Hop!

Thank you for hopping along with the Inspirations In Ink Blog Hop! This month’s theme is Christmas In July. You may be starting here or have come from another blog – either way you can find the link list at the bottom of this post so that you can see every blog post and idea today. I hope you enjoy all our Christmas in July Projects!

My Christmas in July card was created with just a few simple products that I had on hand. It was very easy and quick to create. It’s the perfect card if you send out lots of Holiday cards and you want to create multiples of a simple elegant card.

First I started with a Real Red cardstock cardbase, cut to 5-1/2″ x 8-1/2″, scored in half and folded at 4-1/4″. Next, using a piece of the Silver and Gold DSP from Sale-a-bration, I die cut the scalloped rectangle from the Scalloped Contours Dies and adhered it to my cardbase. Then using the next smallest scalloped rectangle die, I die cut a piece of the Gold Foil sheets and adhered it to the Gold DSP Layer.

I die cut the next smallest scalloped rectangle die cut from a piece of Real Red cardstock and using a Mini Glue Dot adhered a the snowflake from the Wonderful Snowflakes to the Red Scalloped rectangle. I stamped the sentiment from the Merriest Moments stamp set in Real Red Ink on a scrap of Basic White cardstock, then die cut it with a label from the Stylish Shapes Dies. I adhered it to the Red Scalloped rectangle, overlapping the snowflake a bit, with Stampin’ Dimensionals. Finally, I used Stampin’ Dimensionals to add the Red Scalloped rectangle to the Gold Foil layer on my card, and added a few Red Rhinestone Basic Jewels. Voila, a pretty Christmas card all ready to go!

As mentioned at the top, this is a blog hop so make sure you ‘hop’ around to all the amazing projects on this hop! Click on the links below to visit them.

I’d love to be your Stampin’ Up!® Demonstrator. All the Stampin’ Up! supplies used to make my card are available in my online store. Simply click any of the product photos below!

Happy Stamping!

Merriest Moments – Inspirations In Ink Blog Hop Read More »

Rainbow of Happiness – Inspirations In Ink Blog Hop

Welcome to the monthly Inspirations In Ink Blog Hop! This month’s theme is all about In Colors. You may be starting here or have come from another blog – either way you can find the link list at the bottom of this post so that you can see every blog post and idea today. I hope you enjoy all our In Color Blog Hop Projects!

Sweet Sorbet and Starry Sky are one of my favorite In Color combinations and are featured in my project. Rainbow of Happiness is one of the Bundles in the Jan-June Mini Catalog that I will miss so I wanted to use it in my project before it retires on June 30th.

To create my card I started with the Sweet Sorbet cardbase from the Tea Boutique Cards & Envelopes. I die cut several of the rainbow stripes in Sweet Sorbet and Starry Sky 6″x 6″ DSP Assortment. Then, I adhered them to a piece of Basic White cardstock and die cut the cardstock with the 2nd largest rectangle in the Deckled Rectangles Dies.

I used the Cloud Punch to punch out a Basic White Cloud and a Vellum Cloud. Then snipped the Vellum Cloud in half and adhered it to the back of the Basic White Cloud with Mini Glue Dots. I used Stampin’ Dimensionals to attach it to the rainbow.

The label is die cut with the Tailor Made Tags dies. I used Masking Paper to cover up “World” and stamped the sentiment in Sweet Sorbet. Then masking the stamp again stamped “World” in Starry Sky.

I tied a piece of Starry Sky Metallic Woven Ribbon to the top of the tag and then attached it to the Basic White layer with Mini Glue Dots.

To put all the layers together, I adhered a piece of the Lovely Layers Vellum with Multipurpose glue to the cardbase. Then added the Basic White layer with Stampin’ Dimensionals. I added a few of the Iridescent Jewels to the front of the card and stamped some hearts to the inside of the card.

As mentioned at the top, this is a blog hop so make sure you ‘hop’ around to all the amazing projects on this hop! Click on the links below to visit them.

Rainbow of Happiness In Color Card Measurements:

  • Tea Boutique Cards & Envelopes Cardbase 5-1/2″ x 8-1/2″ score in half at 4-1/4″
  • Lovely Layers Vellum 3-3/4″ x 5″

I’d love to be your Stampin’ Up!® Demonstrator. All the Stampin’ Up! supplies used to make my card are available in my online store. Simply click any of the product photos below!

Happy Stamping!

Rainbow of Happiness – Inspirations In Ink Blog Hop Read More »

Scroll to Top