Mini Stampin’ Cut & Emboss Machine

Demonstrator Training Blog Hop-Fitting Florets

Welcome to our Demonstrator Training Program Blog Hop!

We are so happy that you could join us today for this blog hop of ideas and creative inspiration we have to share with you. We are a group of Stampin’ Up!® Demonstrators from around the world that are taking part in training that is helping us to build a successful Stampin’ Up!® business and reach some goals we have set. We really appreciate your support!

Today we are featuring the new Fitting Florets Suite!! As part of this beautiful suite, the Framed Florets bundle is an early release from the coming soon Jan-June 2023 Mini Catalog. Stampin’ Up! has also released several exclusive products in this suite that are available while supplies last, Gold Adhesive Backed Swirls, Fitting Florets DSP and just in time for Christmas the Framed & Festive Stamp set! Click here to shop the Fitting Florets Suite.

I chose to do a Book Binding Fun Fold for my card. It’s an easy way to add a fun fold element to a standard size card.

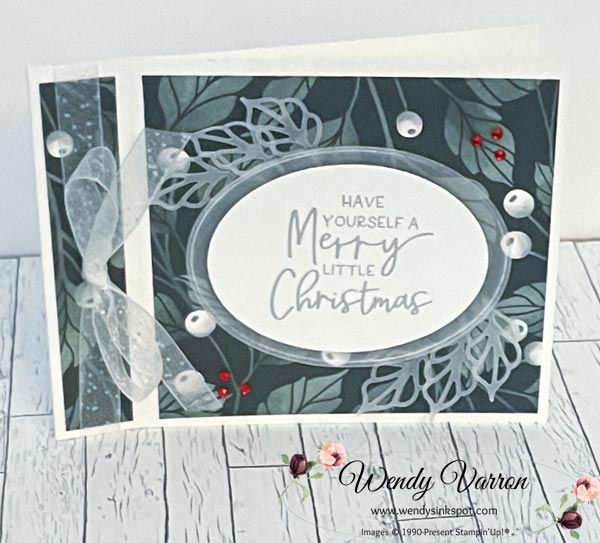
To create this card, start with a 4-1/4″ x 11″ piece of Basic White Thick cardstock. Score the cardstock, on the 11″ side, at 4-1/2″ and 5-1/2″ inches. This will create a 1 inch “book binding” section on the card. Fold the card in half on the 5-1/2″ score line.

Inside the card add a bit of glue between the two score lines to adhere this section of the card close. Once the book binding section is secure, the card front will open at the point of the second score line.

Next, I cut 2 pieces of Fitting Florets DSP, 3/4″ x 4″ and 4″ x 4-1/4″and adhered them to the front of the card.

To create the label, I heat embossed the sentiment from the Framed & Festive Stamp set with Silver Embossing Powder on basic White Thick cardstock, and die cut it with the second largest frame from the Framed Florets Dies. Then die cut the largest frame with Vellum. Using Stampin’ Dimensionals I adhered the Basic White oval to the Vellum oval, then added adhered them to the card with Mini Glue Dots. I die cut a few leaves from the Framed Florets Dies with Vellum and adhered them with Mini Glue Dots under the edges of the Vellum Oval.

To complete this pretty card, Tie a bow on the book binding with some Glittered Organdy Ribbon. I also wanted to add a pop of color so I also added a few Red Rhinestone Basic Jewels.

You may be starting here or have come from another blog – either way you click on the link list below so that you can see every blog post today.

Framed Florets Merry Little Christmas Card Measurements

  • Basic White Thick Cardstock: 4-1/4″ x 11 “, score at 5-1/2″ and 4-1/2”
  • Fitting Florets DSP: 3/4″ x 4″, 4″ x4-1/4″

I’d love to be your Stampin’ Up!® Demonstrator. All the Stampin’ Up! supplies used to make my card are available in my online store. Simply click any of the product photos below!

Happy Stamping!

Demonstrator Training Blog Hop-Fitting Florets Read More »

Inspirations In Ink Blog Hop-Season of Chic

Welcome to the Inspirations In Ink Blog Hop! Thank you so much for hopping along with us! This month we are featuring Stampin’ Up!’s Season of Chic Bundle. Once you are done with each post, scroll down to the Blog Hop List participants, you can click on their name to go to their post. We hope you find some inspiration and enjoy all of our Season of Chic Bundle Projects!

The the Textured Chic Suite has so many beautiful products in the suite. The Season of Chic Stamp Set has images for all seasons and the Chic Dies to cut them out, the gold foil in the Textured Chic Designer Series Paper and Distressed Gold Specialty paper. And don’t miss the matching Textured Chic Memories and More Cards, and the Textured Chic Memories and More Cards & Envelopes. So many possibilities!

Let me show you how I created this pretty card. I started with a Textured Chic card base and created a Z-fold by scoring the front panel of the card base at 2-1/2″and folding it back.

I cut 2 strips of Textured Chic DSP and adhered them to each of the inside sections of the folded panel. Then I adhered another piece of Textured Chic DSP on the inside on the right. With so many beautiful patterns in this DSP pack, I chose to use 3 different patterns.

Next, I stamped the sentiment in Evening Evergreen on Basic White cardstock and die cut it with a square from the Stylish Shapes dies. Then adhered it to with Stampin’ Dimensionals to one of the Textured Chic Memories and More cards.

I die cut a few leaves with the Distressed Gold Specialty Paper that I thought would go well with the leaf images in the Memories and More Card, and adhered them to the corners of the square. I adhered the Memories and More card to the folded front panel. Remember when adding this to your card to put adhesive on just one side of the card back so your card will open properly.

On the inside of the card I wanted the Basic White pane to show just a bit like a frame for Memories and More card on the font. To do this I cut the a piece of Basic White cardstock to 3-1/2″ x4-1/2″, which is just a bit bigger than the Memories and More Card and adhered to the inside of the card. It worked out perfectly, then I added a few of the leaves I cut earlier. Finally, I added a few Champaign Rhinestone Basic Jewels to bring out the gold foil of the Designer Series Paper.

Blog Hop List

I hope you enjoyed my Season of Chic Thinking of You card. As mentioned at the top, this is a blog hop so make sure you ‘hop’ around to all the amazing projects on this hop! Click on the links below to visit them.

Season of Chic Card Measurements:

  • Textured of Chic card base from Memories & More Cards & Envelopes
  • Textured Chic card from Memories and More Card pack: 2″ x 4″
  • Textured Chic DSP: (2) 1-7/8″ x 6″, 4″ x 6″
  • Basic White Cardstock 3-1/2″ x 4-1/2″

I’d love to be your Stampin’ Up!® Demonstrator. All the Stampin’ Up! supplies used to make my card are available in my online store. Simply click any of the product photos below!

Happy Stamping!

Inspirations In Ink Blog Hop-Season of Chic Read More »

Demonstrator Training Program Blog Hop- Go To Greetings

Welcome to the Demonstrator Training Program Blog Hop!

We are so happy that you could join us today for this blog hop for ideas and creative inspiration. We are a group of Stampin’ Up!® Demonstrators from around the world that are taking part in training that is helping us to build a successful Stampin’ Up!® business and reach some goals we have set. We really appreciate your support.

For this months Customer Thank You cards I wanted to highlight the Hues of Happiness Designer Series Paper. This is one of my favorite Designer Series Paper Packs in the Annual Catalog. I love all the beautiful colors and flowers so I used a few different patterns of this DSP to create my thank you cards.

To create my cards, I selected the patterns of DSP first then the colors of cardstock and ink to complement the pretty paper. I love how they turned out. I cut all the cardstock for the card bases, the cardstock layer and the DSP and adhered the layers together. Then I stamped the Thank You sentiment using the Go To Greetings stamp set and die cut them with the label from the Natural Prints dies. The contrasting cardstock behind the labels was created using a circle and banner from the Stylish Shapes Dies.

I adhered the sentiment to the circle, then adhered the circle to the banner. I used Stampin’ Dimensionals to adhere the labels to the card. I added a few Glossy Dots to give it a little sparkle.

I used Masking Paper to create the image for the inside of the card. I stamped a flower from the Happiness Abounds Stamp set on Basic White Cardstock. Stamped the same image on masking paper and fussy cut it out. I put it over my stamped flower image and then stamped the leaves. I used Sponge Daubers to add some color to the flowers and leaves.

You may be starting here or have come from another blog – either way you can find the link list at the bottom of this post so that you can see every blog post today.

Customer Thank You Card Measurements:

  • Cardbase: 5-1/2″ x 8-1/2″, score and fold in half at 4-1/4″
  • Cardstock Layer: 3-3/4″ x 5″
  • Hues of Happiness DSP: 3-1/2″ x 4-3/4″
  • Basic White Inside Layer: 4″ x 5-1/4″

I’d love to be your Stampin’ Up!® Demonstrator. All the Stampin’ Up! supplies used to make my card are available in my online store. Simply click any of the product photos below!

Happy Stamping!

Demonstrator Training Program Blog Hop- Go To Greetings Read More »

Cheerful Basket – Inspirations In Ink Blog Hop

Welcome to the Inspirations In Ink Blog Hop! Thank you so much for hopping along with us! This month we are featuring Stampin’ Up!’s Cheerful Basket Bundle. Once you are done with each post, scroll down to the Blog Hop List participants, you can click on their name to go to their post. We hope you find some inspiration and enjoy all our Cheerful Basket Bundle Projects!

The cooler temperatures and changing colors of the leaves here in Maryland were the inspiration for my card. A basket full of colorful leaves in the Autumn seemed the perfect way to showcase the Cheerful Basket Bundle.

To create my card I started with the Artistic Mix Decorative Masks and a Blending Brush. I brushed Cherry Cobbler Ink on a piece of Basic White Cardstock to create a patterned layer, which I then adhered to a Cherry Cobbler card base. I used the Scalloped Contours Dies to die cut the 2nd largest rectangle from Cherry Cobbler cardstock and adhered it to my cardbase.

The leaves are die cut from the Full Basket dies. I love how these dies make the impression on the leaves. I die cut the in Cherry Cobbler, Real Red, Poppy Parade, Mango Melody, Pumpkin Pie, Daffodil Delight, Mossy Meadow and Crumb Cake cardstock.

I added them to a piece of Basic White Cardstock, cut to 2-1/2″” x 3-3/4″, with glue dots one at a time. Once I had the leaves added, I stamped the basket on some Crumb Cake cardstock in Crumb Cake Ink and die cut it and added it just below the leaves. Then I adhered this layer to my card.

I stamped the sentiment from the Go To Greeting stamp set in Cherry Cobbler. Punching it out with the Double Oval Punch and adding it to the card. I also added a few leaves at the base of the basket. Wink of Stella brushed on the leaves added the final touch. For the inside of my card, I added a few leaves brushed with a Wink of Stella as well.

Blog Hop List

I hope you enjoyed my Cheerful Basket Just a Note card. As mentioned at the top, this is a blog hop so make sure you ‘hop’ around to all the amazing projects on this hop! Click on the links below to visit them.

Cheerful Basket Card Measurements:

  • Cherry Cobbler Cardstock card base: 5-1/2″ x 8-1/2″, score in half at 4-1/4″
  • Basic White Cardstock : (2) 4″ x 5-1/4″
  • Basic White Cardstock: 2-1/2″” x 3-3/4″

I’d love to be your Stampin’ Up!® Demonstrator. All the Stampin’ Up! supplies used to make my card are available in my online store. Simply click any of the product photos below!

Happy Stamping!

Cheerful Basket – Inspirations In Ink Blog Hop Read More »

Demonstrator Training Program Blog Hop – September Customer Thank You

Welcome to our Stampin’ Up!® Demonstrator Training Program Monthly Blog Hop!

We are so happy that you could join us today for this blog hop for ideas and creative inspiration. Our blog hop focuses on the Thank You cards we are sending to our customers.

I wanted to feature a Fall theme to my thank you cards. The Leaf Labels & Amber Gems Combo Pack are perfect for this quick and easy card. I colored in a piece of Perfectly Penciled DSP with Watercolor Pencils and brushed on a Wink of Stella over the leaves, which not only give a bit of sparkle to the DSP but also helped to blend in the colors of the Watercolor Pencils. Then I adhered the DSP to a piece of Merry Merlot Cardstock. I used Stampin’ Dimensionals to adhere the Layers to the Crumb Cake Cardstock base.

I die cut the stitched circle with the Stylish Shapes Dies and a piece of Brushed Metallic Cardstock. Then with a bit of Stampin’ Seal+ on the back, I added some of the gold trim from the Simply Elegant Trim, then added it to the lower left corner of of my card.

I brushed a little Merry Merlot, and Pumpkin Pie ink with a Blending Brush on a Leaf Label, to give it a bit of color, and added it to the Brushed Metallic Circle with Stampin’ Dimensionals.

The Sending Smiles “A Note of Thanks” sentiment is stamped Merry Merlot on Basic White Cardstock. Then die cut with the Stylish Shapes Dies. I added it to the card over the leaf and a few of the Amber Gems to complete the card.

A Note of Thanks Card Measurements

  • Crumb Cake Cardstock Base: 5-1/2″ x 8-1/2″, score and fold in half at 4-1/4″
  • Merry Merlot Cardstock: 4-1/8″ x 5-3/8″
  • Perfectly Penciled DSP: 3-7/8″ x 5-1/8″
  • Scrap of Basic White Cardstock for the label
  • Scrap of Brushed Metallic Cardstock for circle

I’d love to be your Stampin’ Up!® Demonstrator. All the Stampin’ Up! supplies used to make my card are available in my online store. Simply click any of the product photos below!

Happy Stamping!

Demonstrator Training Program Blog Hop – September Customer Thank You Read More »

August Customer Thank you Cards

Welcome to our Stampin’ Up!® Demonstrator Training Program Monthly Blog Hop!

We are so happy that you could join us today for this blog hop for ideas and creative inspiration. Our blog hop focuses on the Thank You cards we are sending to our customers.

You may be starting here or have come from another blog – either way you can find the link list at the bottom of this post so that you can see every blog post today.

For this months Customer cards I decided to use the Splendid Day Designer Series Paper and the Beautiful Shapes Dies, to create a clean and simple card. I love how they turned out!

To create my card I cut card bases in both Soft Sea Foam and Fresh Freesia CardStock. Then I used the Beautiful Shapes Dies to die cut several hexagons from the Splendid Day Designer Series Paper. I adhered the 2 largest hexagons with multipurpose liquid glue, and the smallest hexagon with Mini Stampin’ Dimensionals on Basic White cardstock. I stamped several images from the Hello Beautiful Stamp set to add a bit of texture to the card, then attached the Basic White layer to the card base.

The sentiment is from the Pansy Patch stamp set, stamped in Tuxedo Black Ink, on a strip of Basic White cardstock. Then punched each side with the Lovely Labels Pick a Punch and added it to the card front with Stampin’ Dimensionals. I added a few of the 2021-2023 In Color Opal Rounds because I just couldn’t resist adding a little more sparkle to the cards.

For the inside of my card I stamped the Bee and foliage images from the Splendid Thoughts Stamp set on Basic White cardstock, then adhered it to the inside of the card.

Hello From Me to You Card Measurements:

  • Cardbase: 5-1/2″ x 8-1/2″, score at 4-1/4″
  • Basic White Layer: 4″ x 5-1/4″
  • Basic White Inside: 4′ x 5-1/4″
  • Basic White Strip for Sentiment: 1/2″ x 4″

I’d love to be your Stampin’ Up!® Demonstrator. All the Stampin’ Up! supplies used to make my card are available in my online store. Simply click any of the product photos below!

Happy Stamping!

August Customer Thank you Cards Read More »

Speedy Recovery – Luv 2 Stamp Group Blog Hop

Welcome to the Luv 2 Stamp Group’s 2022 Blog Hop!

We hope you enjoy our New Annual Catalog Theme!

We are excited to share projects with you again this year. We hope to inspire you to create beautiful new projects using Stampin’ Up! products.

Once you are done with each post, scroll down to the bottom and you will see a list of Blog Hop participants, you can click on their name to go to their post, or you can click the next button to go to the next post in line. Happy crafting!

My project features the Speedy Recover Stamp set. I love how the flower stamp works so well with the Awash In Beauty DSP. This easy fun fold starts with a note card from the Note Card & Envelopes. Score the front panel of the card at 1-3/4″ and fold it back.

Cut 2 pieces of Awash In Beauty DSP to 1-1/2″ x 4-3/4″ and adhere to the the front panel and the inside of the front panel. Cut another piece of Awash In Beauty DSP to 3-1/4″ x 4-3/4″ and adhere to the inside of the cardbase. I used the same pattern for both of the 1-1/2″ x 4-3/4″ pieces of DSP but you could choose 3 different patterns to show of the pretty paper.

Next, I die cut 2 of the largest circles from the Basic Shapes Dies. For the front label I stamped the flower image with Tuxedo Black Memento Ink and colored in the image with Stampin’ Blends. Then I stamped the greeting. To create the wrap around the flowers, I stamped the same flower image a second time on a scrap of Basic White Cardstock in Rich Razzleberry. Then, I snipped out just the wrap and adhered it over top of the stamped image on my label.

Be sure when adhering the label to the front of the card you only want to add adhesive to one side of the label so the card will open. You don’t want to make a mistake and put adhesive on the entire label or your card won’t open.

Adhere the second circle to the inside of the card right behind the front label so when the card is closed you don’t see it. To finish up my card I added a few Iridescent Pearl Basic Jewels to my card. Below are a few other variations of my card.

For more inspiration from the Luv 2 Stamp Group Blog Hop Team, click on the image below to visit the talented Patty Bennett. Don’t forget to continue following links on each blog to see everyone’s projects!

Sending Well Wishes Card Measurements:

  • Basic White Cardbase: Use a Note Card from the Note Cards & Envelopes pack which measures 5″ x 7″, scored in half at 3-1/2″
  • Awash In Beauty DSP: (2) 1-1/2″ x 4-3/4″
  • Awash In Beauty DSP: 3-1/4″ x 4-3/4″
  • Basic White Cardstock Scrap for Labels

I hope you enjoyed my project. I’d love to be your Stampin’ Up!® Demonstrator! All the Stampin’ Up! supplies used to make my card are available in my online store. Simply click any of the product photos below!

Happy Stamping!

Speedy Recovery – Luv 2 Stamp Group Blog Hop Read More »

Scroll to Top