3-D Projects

Luv 2 Stamp Group Blog Hop Lucky Clover Treats

Welcome to the Luv 2 Stamp Group’s 2023 Blog Hop! We are excited to share projects with you again for the third year. This year we are shaking things up and bringing you all new monthly themes to inspire your next project!

Once you are done with each post, scroll down to the bottom and you will see a list of Blog Hop participants, you can click on their name to go to their post, or you can click the next button to go to the next post in line. Happy crafting!

Our first Blog Hop Theme of 2023 is Sweet Treats!

My festive St. Patrick’s Day Treats were inspired by the Jan-June 2023 Mini Catalog. Page 8 of the mini catalog I noticed these cute treats created with the Country Floral Lane Suite. These cute treats can be recreated for any occasion and they are quick to make.

I have been waiting for a St. Patrick’s Day stamp set, the Luck Clover Bundle first bundle I put on my mini catalog shopping list. It was perfect for creating these treat holders for St. Patrick’s Day or to just wish someone good luck!

To create the wrappers I started with a piece of Granny Apple Green Cardstock cut to 5-1/2″ x 6-3/4″. On the long side score the cardstock at 2″, 2-1/4″, 4-1/2″, 4-3/4″. Then I stamped the clovers in Granny Apple Green along the top and bottom edges. I used Tear & Tape to adhere the wrapper closed. The Dandy Designs DSP layer of the wrapper is cut to 4-1/2″ x 6-3/4″, for this layer of the wrapper I didn’t make any score lines, I just wrapped it around the cardstock layer and adhered again with Tear & Tape.

To decorate the font of the wrappers I used Basic White Cardstock and die cut the scalloped circle with the All That Dies and stamped clovers on them in Granny Apple Green. I stamped each of the sentiments in Granny Apple Green and snipped them out with my paper snips. I adhered them with Mini Glue Dots.

I stamped the large clovers in Granny Apple Green using the Stamparatus. I prefer to stamp with Stamparatus on larger solid images works better for me than using a clear block, this way I can re-ink and stamp the image if it’s not clear. I punched them out with the Lucky Clover Punch and added them to the wrapper with Mini Glue Dots.

I can’t resist adding a little bling to my projects and for these fun treats I added a few Iridescent Pastel Gems. Before slipping in the chocolate bar I wrapped a piece of the Burlap Ribbon from the Real Red & Burlap Ribbon Combo pack around the bar. Then tied them at the top with a piece of White Crinkle Seam binding colored with Soft Sea Foam Stampin’ Blends.

Be sure to Hop along with all of our Blog Hop participants and see all their amazing projects! Just click on their name in the list below to go to their post, or you can click the next button to go to the next post in line.

Luck Clover Sweet Treats Measurements

  • Granny Apple Green Cardstock – 5-1/2″ x 6-3/4″, score on the long edge at 2″, 2-1/4″, 4-1/2″, 4-3/4″
  • Dandy Designs DSP – 4-1/2″ x 6-3/4″

I hope you enjoyed my Sweet Treat project! All the Stampin’ Up! supplies used to make my treat sleeves are available in my online store. Simply click any of the product photos below!

Happy Stamping!

Luv 2 Stamp Group Blog Hop Lucky Clover Treats Read More »

Key to My Heart

Seal your love this season with the Key to My Heart Paper Pumpkin Kit! This month’s kit represents the tradition of locking a padlock on a bridge to symbolize unbreakable love. It comes with everything you need to make 9 darling love-themed cards. So, no matter who your dance partner or dinner date is, you can make something heartfelt for them this season.  

About the Kit

This month’s kit includes:

  • Everything you need to create 9 love-themed cards—3 each of 3 designs. It has coordinating envelopes, special padlock and key die cuts, adhesives, Vellum, and more!
  • This month’s kit also has a unique love-theme photopolymer stamp set! With special sentiments and images that represent the tradition of locking padlocks on a bridge, there are so many ways for you to express your devoted love.
  • The Key to My Heart Paper Pumpkin Kit also comes with a Fresh Freesia Classic Stampin’ Spot.
  • This kit also has a special add-on to take your crafting even further!
  • Finished card size: 4-1/4″ x 5-1/2″ (10.8 x 14 cm)
  • Coordinating Stampin’ Up! colors: Calypso Coral, Fresh Freesia, Mango Melody, Petal Pink. The designs are accented with gold foil. 

Heart Boxes Add On:

Spread even more love this season with the Key to My Heart Paper Pumpkin Heart Boxes Add-On!

The elegant pink and gold foil design makes each box an elegant and polished paper craft. These heart-shaped treat boxes are easy to put together and fill with treats, notes, or small trinkets.No matter who you are creating a treat box for, you can customize each box personally.

This add-on includes:
* 10 heart-shaped treat boxes, 10 key shaped stickers and 12 die-cut label stickers

    Add-ons are are available now, but will only be available while supplies last, so don’t wait! You must be a current Paper Pumpkin subscriber to purchase this item.

    Stampin’Up! also offers prepaid subscriptions which allow you to pay ahead or give as a gift. Just click the image below for the prepaid subscription of your choice.

    Happy Stamping!

    Key to My Heart Read More »

    New Kit!- Celebrate Today Magnet Board Kit

    There is a new Kit in the Kits Collection! This latest addition to the Kits Collection by Stampin’ Up! is definitely a fun one!

    How cute is this magnet board?! With the Celebrate Today Magnet Board Kit, you can create and customize your very own magnet board with included stickers to organize daily tasks and sentiments of positive affirmations.

    Kit Details


    • Kit includes one framed magnet board
    • Includes sticker sheets, double-sided cards, and double-sided paper to decorate with
    • Includes six magnet clips and two pocket envelopes to attach things to your board
    • Finished magnet board size (inside of frame): 12″ x 12″ (30.5 x 30.5 cm) 
    • Coordinating colors: Basic Black, Blushing Bride, Flirty Flamingo, Melon Mambo, Mint Macaron, Smoky Slate

    Watch the video below to see how to create the Celebrate Today Magnet Board.


    Love creating with kits? Stampin’ Up! has a great variety of projects, styles, and designs There are non-stamping kits (without ink or stamp) and stamping kits that include ink and Stamps. Which Kit will you

    I’d love to be your Stampin’ Up!® Demonstrator. All the Kits below are available in my online store. Simply click any of the product photos below to shop now!

    Product List

    New Kit!- Celebrate Today Magnet Board Kit Read More »

    Gingerbread & Peppermint Treat Box

    Today I have fun treat packaging idea to share with you. I dressed up a Mini Paper Pumpkin box with the Gingerbread & Peppermint Memories & More Cards Pack and the Adorning Designs Decorative Masks. The Gingerbread & Peppermint Memories & More Cards can be used for so many projects, not just cards. So, let me show you how I did it.

    Decorating the Box

    To begin, with the Mini Paper Pumpkin box laying flat, I used some painters tape to hold the Decorative Mask in place. Using a Blending Brush and Poppy Parade ink pad, I brushed the ink on the top of the box, the front edge and the back edges. I love the candy cane stripe background that the mask gives for the layers I added on the top of the box.

    Next, I fussy cut the star from on the Memories & More Cards Pack and using the Scalloped Contours Dies, die cut the rectangle in Poppy Parade cardstock. I adhered the Poppy Parade rectangle to the Mini Paper Pumpkin box with Liquid Glue, then added the Star with Stampin’ Dimensionals. The little snowflakes are stickers from the Memories & More Cards pack. I added some Subtle Shimmer Sequins to give it a little sparkle.

    Thank you for stopping by today, I hope you enjoyed my project!

    I’d love to be your Stampin’ Up! Demonstrator. All the Stampin’ Up! supplies used to make my project are available in my online store. Simply click any of the product photos below!

    Product List

    Happy Stamping!


    Gingerbread & Peppermint Treat Box Read More »

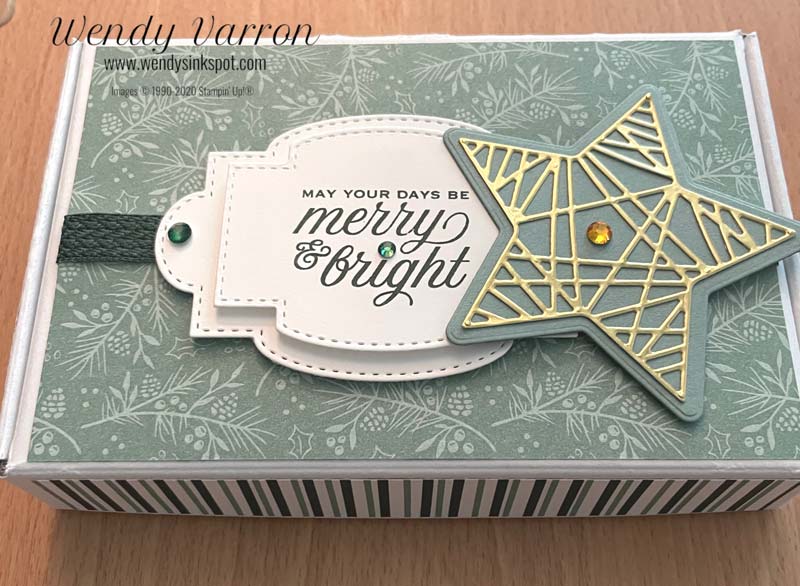
    Tidings & Trimmings Treat Box

    I dressed up this Mini Paper Pumpkin box with the Tidings of Christmas Suite, available in the 2021-2022 Annual Catalog. It is one of my favorite Christmas suites. I love the fonts of the sentiments, the classic colors and images for Christmas. The suite includes the Tidings & Trimmings Stamps, Christmas Trimmings Dies, Tidings of Christmas Designer Series Paper, and the Evening Evergreen 3/8″ Chevron Weave Ribbon. Click the image below to order yours!


    Before decorating the Mini Paper Pumpkin box, I cut the Tidings of Christmas DSP for the box and took the picture below for reference on where to place all the pieces. You will need to cut:

    • (1) 3 5/8 x 5 3/8”, for the Top of the box
    • (2) 7/8 x 5 3/8”, for the Front and Back edges of the box
    • (2) 7/8 x 3 3/8”, for the Left and Right edges of the box

    Let’s Decorate the Box

    First, cut a 6 1⁄2” piece of Evening Evergreen Chevron Weave Ribbon and adhered it to the 3-5/8″ x 5-3/8″ DSP, then adhered the DSP to the top of the box. Next, I adhered the 7/8″ x 5-3/8″ DSP on the Front and Back edges, and the 7/8″ x 3-3/8″ DSP to the left and right edges. I used Multipurpose Liquid Glue to adhere all the DSP pieces, with liquid glue you have a few moments to make sure that the DSP is right where you want it.

    The sentiment is stamped in Evening Evergreen Ink on Basic White cardstock and die cut with the Stitched So Sweetly labels. I die cut a second label and used Stampin’ Dimensionals to layer the sentiment on the larger label. I positioned it over the ribbon slightly to the left to ensure room to add the star.

    I die cut the base of the star in Soft Succulent cardstock. Using adhesive sheets with gold foil, I die cut the detailed star layer. The adhesive sheet made it very easy to adhere it to the Soft Succulent cardstock star. If you haven’t tried adhesive sheets yet, I highly recommend them for detailed die cutting. I attached the star using Stampin’ Dimensionals. The Holiday Rhinestone Basic Jewels were the finishing touch.

    I hope you enjoyed today’s project! I’d love to be your Demonstrator. If you’d like to purchase any of the supplies I used for this project, Click on the link(s) the below.

    Happy Stamping!


    Don’t forget about the Starter Kit Promotion

    Start with Savings Starter Kit promotion will provide you with an excellent opportunity to purchase your Starter Kit at a great deal!  Instead of the standard $99 Starter Kit—which is already a great deal—you can pick up a completely custom Starter Kit for only $75!!!  That’s an amazing value!!

    PROMOTION DETAILS:

    • Promotion Period:  November 4-30, 2021
    • When a new demonstrator orders their custom Starter Kit, they will be able to redeem $125 of qualifying products for only $75 (normally $99).
    • New demonstrators who submit their Independent Demonstrator Agreement (IDA) before November 4 or after November 30 will not be eligible for this promotion.  Starter Kit orders must be placed between November 4 and 30 to receive the discount.
    • Joining Deadline:  November 30, 2021; 11:50 PM (MT)

    Tidings & Trimmings Treat Box Read More »

    Pansy Petals Sticky Note Holder

    This cute Sticky Note Holder was made entirely from scraps using Pansy Petals DSP and coordinating cardstock. I participated in a Challenge during the month of October to use scraps instead of cutting a new sheet of paper.

    Confession……I’m sometimes forget to use up scraps until they start piling up. Do you regularly use up your scraps or do they sometimes pile up, like mine, before you use them?

    This is a great project to make for party favors, birthday/holiday gifts, and for craft fairs.

    Watch my video below to see how easy it is to make. Then I challenge you to use your scraps to make one too.

    Sticky Note Holder Measurements:

    • Fresh Freesia Cardstock Base: 3-1/2″ x 7-1/2″, score on the long side at 3-1/2″ & 4″
    • Basic White: 3-1/4″ x 3-1/4″
    • Pansy Petals DSP: 3″ x 3″
    Product List

    I hope you enjoyed my project today and will have fun making some Sticky Note Holders!

    Happy Stamping,

    Pansy Petals Sticky Note Holder Read More »

    Gifts Galore Paper Pumpkin Kit

    How cute it this new Paper Pumpkin Kit coming in November? I can hardly wait to start making these cute treat boxes.

    This all inclusive kit has bright, festive colors, classic Christmas sentiments, a charming snowman, and more festive designs, so you’ll have everything you need to make 9 eye-catching treat packages that are sure to spread Christmas cheer. There’s plenty of joy to share with Gifts Galore!

    November’s Gifts Galore Paper Pumpkin Kit is offering a fun holiday gift-wrapping solution! While the cellophane bags in this kit are food-safe, the packaging is sized for both treats and gifts. Have fun with the festive designs of each box. The Gifts Galore designs are adorable whether they wrap up treats or not! If treat packaging isn’t your jam this month, the components of this kit are extremely versatile, allowing you and your customers to explore another crafting opportunity of your own.

    Subscribe by November 9th to receive the Gifts Galore Paper Pumpkin!

    New to Paper Pumpkin?  Paper Pumpkin is our monthly One-Stop Box™ that offers a unique variety of paper projects for subscribers of any skill level to enjoy! These thoughtfully themed and all-inclusive craft kits include an exclusive Stamp set, an ink spot and adhesive to complete your projects each month.

    There are 2 subscription options for Paper Pumpkin. A Month to Month Subscription – pay as you go, cancel or suspend anytime. Or Purchase.a Pre-Paid subscription- available in 1, 3, 6 & 12 month subscriptions. Ready to subscribe? Just click the image below to subscribe now!

    Happy Stamping,

    Gifts Galore Paper Pumpkin Kit Read More »

    Scroll to Top