Tidings & Trimmings Treat Box
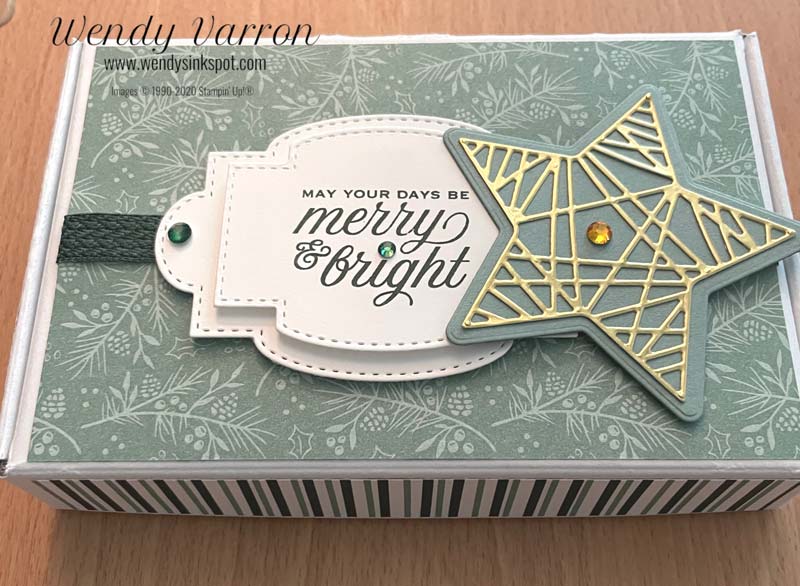
I dressed up this Mini Paper Pumpkin box with the Tidings of Christmas Suite, available in the 2021-2022 Annual Catalog. It is one of my favorite Christmas suites. I love the fonts of the sentiments, the classic colors and images for Christmas. The suite includes the Tidings & Trimmings Stamps, Christmas Trimmings Dies, Tidings of Christmas Designer Series Paper, and the Evening Evergreen 3/8″ Chevron Weave Ribbon. Click the image below to order yours!

Before decorating the Mini Paper Pumpkin box, I cut the Tidings of Christmas DSP for the box and took the picture below for reference on where to place all the pieces. You will need to cut:
- (1) 3 5/8 x 5 3/8”, for the Top of the box
- (2) 7/8 x 5 3/8”, for the Front and Back edges of the box
- (2) 7/8 x 3 3/8”, for the Left and Right edges of the box

Let’s Decorate the Box
First, cut a 6 1⁄2” piece of Evening Evergreen Chevron Weave Ribbon and adhered it to the 3-5/8″ x 5-3/8″ DSP, then adhered the DSP to the top of the box. Next, I adhered the 7/8″ x 5-3/8″ DSP on the Front and Back edges, and the 7/8″ x 3-3/8″ DSP to the left and right edges. I used Multipurpose Liquid Glue to adhere all the DSP pieces, with liquid glue you have a few moments to make sure that the DSP is right where you want it.
The sentiment is stamped in Evening Evergreen Ink on Basic White cardstock and die cut with the Stitched So Sweetly labels. I die cut a second label and used Stampin’ Dimensionals to layer the sentiment on the larger label. I positioned it over the ribbon slightly to the left to ensure room to add the star.

I die cut the base of the star in Soft Succulent cardstock. Using adhesive sheets with gold foil, I die cut the detailed star layer. The adhesive sheet made it very easy to adhere it to the Soft Succulent cardstock star. If you haven’t tried adhesive sheets yet, I highly recommend them for detailed die cutting. I attached the star using Stampin’ Dimensionals. The Holiday Rhinestone Basic Jewels were the finishing touch.
I hope you enjoyed today’s project! I’d love to be your Demonstrator. If you’d like to purchase any of the supplies I used for this project, Click on the link(s) the below.
Happy Stamping!

Don’t forget about the Starter Kit Promotion

Start with Savings Starter Kit promotion will provide you with an excellent opportunity to purchase your Starter Kit at a great deal! Instead of the standard $99 Starter Kit—which is already a great deal—you can pick up a completely custom Starter Kit for only $75!!! That’s an amazing value!!
PROMOTION DETAILS:
- Promotion Period: November 4-30, 2021
- When a new demonstrator orders their custom Starter Kit, they will be able to redeem $125 of qualifying products for only $75 (normally $99).
- New demonstrators who submit their Independent Demonstrator Agreement (IDA) before November 4 or after November 30 will not be eligible for this promotion. Starter Kit orders must be placed between November 4 and 30 to receive the discount.
- Joining Deadline: November 30, 2021; 11:50 PM (MT)
Tidings & Trimmings Treat Box Read More »


")


")


 Designer Series Paper")