In Color

Tea Boutique – It’s Time for Tea

I am so happy to share with you a card I made with one of my favorite new Suites the Tea Boutique Suite!! It will be available beginning on May 3 in the new 2022-2023 Annual Catalog!

I love all things tea! I was beyond excited when I saw that this suite is part of a group of select products that Demonstrators were able to pre-order on April 1st. So, what’s available in this suite you may be asking? The Cup of Tea Bundle, Tea Boutique 6 x6 DSP, and Tea Boutique Cards & Envelopes. I love everything about this great suite, from the images in the stamp set to the bright colors and pretty flowers in the DSP and Cards & Envelopes.

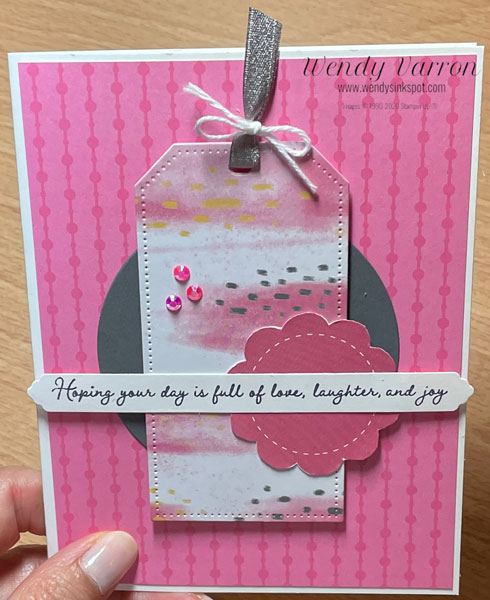
To create my card, I used the Starry Sky Card base from the Tea Boutique Cards & Envelopes pack and layered a piece of Vellum with some Stampin’ Seal. I put the adhesive in the middle where it would be hidden by the additional card layers. I added a square of Basic White cardstock first, then added the slightly smaller squares of the Tea Boutique DSP.

Next, I die cut the tea cup base from the Tea Boutique DSP. Then using Starry Sky Cardstock and an adhesive sheet, I die cut the designed layer of the teacup. With the Adhesive sheet on the back of my cardstock, I was able to quickly add the top layer of the tea cut with no fuss. On the back of the teacup I used a little Stampin’ Seal and adhered a piece of the Gold Simply Elegant Trim. Using a piece of Foam Adhesive sheet I added the teacup to the center of the Squares. I love the look of the Gold added to the teacup, to give it a little eye catching bling like steam coming from the cup.

I wasn’t sure what sentiment to use or where to put it. In the end I decided on adding the cute little tea tag with the sentiment layered on the lemon wedge in the bottom right of the card. I’m really happy with the way it turned out.

The Tea Boutique Suite and the new 2022-2024 In Colors, including Starry Sky which I used on my card today, will be available beginning May 3, 2022. I hope you enjoyed this sneak peek at some of the new products coming soon!

Happy Stamping!!

Tea Boutique – It’s Time for Tea Read More »

March Customer Thank You Cards

This month my Customer Thank You Cards are inspired by the Annual Catalog. If you are ever looking for inspiration the Annual Catalog is a great place to start, it’s a treasure trove of amazing creations. I took the inspiration from page 68, the Simply Elegant Suite card. I love the elements in this card, it showcases Designer Series Paper and stamping directly on to the cardstock card base.

To make my card I started with stamping the beautiful swirl from the Sentimental Swirl stamp set on the left side of the cardbase. I love stamping tone on tone, it really makes the already pretty colors so much richer. I also stamped some of the swirls on the inside of my cards.

Next, I cut strips of the Abstract Beauty DSP and Gold Foil paper. I adhered the DSP to the Gold Foil Strip, then using Multipurpose Liquid Glue, added them to the right side of the card base.

I stamped the sentiment from the Flowering Tulips stamp set in Magenta Madness on the label. Before adding the label to my card, I adhered a gold foil element from the Expressions in Ink Ephemera Pack to the back of the lable with some Stampin’ Seal. I cut a piece of Foam Adhesive sheet which I added to the back of the label over the Gold Foil element. Doing this keeps the Gold Foil element lifted off the card but firmly in place on the back of the label.

I wanted to use all the 2020-2022 In Colors and the Abstract Beauty DSP was perfect to pair with these pretty colors. Once I started taking photos of my cards, I had some inspiration to add just a touch of bling, I brushed a little Wink of Stella on the swirls. I love the look, but it was hard to photograph.

Just Thinking of You Today Card Measurements:

  • Cardbase: 5-1/2″ x 8-1/2″, score in half at 4-1/4″
  • Abstract Beauty DSP: 1-1/2″ x 5-1/2″
  • Gold Foil: 3/4″ x 5-1/2″

I’d love to be your Stampin’ Up!® Demonstrator. All the Stampin’ Up! supplies used to make my card are available in my online store. Simply click any of the product photos below!

Product List

Happy Stamping!

March Customer Thank You Cards Read More »

Blessings of Home Cards to Color

Love to color? This set of cards to color is just what you need. I find coloring is relaxing and helps me unwind, these are going to be fun to color. The inspiration for my project came from Chris Ann Tomasso, I absolutely loved her set of cards that she created. The pretty floral images are stamped with the Blessings of Home and Hand Penned Petals stamp sets. I love how well they go together.

To create the Image on the front of the box and each of the cards inside, I die cut the largest scalloped rectangle with the Scallop Contour Dies on Basic White card stock. The pretty flower images are stamped in Memento ink and Stampin’ Blends to color the card for the front of the box. I stamped 2 of each of the flower images for the cards inside.

Now, lets decorate the box. I added a piece of Heart & Home DSP to a 4-1/4″ x 5-1/2″ Acetate Card box. Leaving the box flat I put a piece of Tear & Tape along the edge of the DSP to adhere to the box and wrapped it around, finishing with Tear & Tape on the other edge.

I added a some Fresh Freesia Open Weave Ribbon with Tear & Tape. To adhere the card front to the box I cut a few strips of a Foam Adhesive Sheet to give the card some stability when I attached it.

To finish the box, I tied a bow and attached it off to the side of the card with a Mini Glue Dot. Then added a few of my favorite Iridescent Rhinestone Basic Jewels. I love how they catch the light and shimmer.

I hope this inspires you to create some cards to color as well. All the Stampin’ Up! supplies used to make my project are available in my online store. Simply click any of the product photos below!

Product List

Happy Stamping!

Blessings of Home Cards to Color Read More »

Hand Penned Memories & More

The Hand Penned Memories & More Card Pack, and the Hand Penned Memories & More Cards & Envelopes make creating cards for any occasion quick and easy. If you need a simple and pretty card, these products are perfect!

I decided to use just a few elements of this card that I selected form the Hand Penned Memories & More Card Pack and do as little stamping as possible. I fussy cut sentiment and used the Layering Circle Dies to cut the circle. To add in a bit of color I cut a Fresh Freesia scalloped circle from the 2021-2023 Designer Series Paper Assortment.

Next, I used the Tailor Made Tags to cut out the tag from Pale Papaya Cardstock. I stamped the flowers on the tag from the Hand Penned Petals stamps in Pale Papaya for tone on tone look. To put my card together I layered the scalloped circle on the Memories & More Card base, then the tag and the smaller circle with Multipurpose Liquid Glue. I added the sentiment with Stampin’ Dimensionals.

The bow on the tag was tied with Basic White Bakers Twine. Finally, I added the 2021-2023 In Color Jewels for the center of a few of the flowers. I really like the layers on this card and how easy it was to make, so I created a second card using the What A Year Memories & More Card Pack.

What A Year Card

For this second card I wanted to use Polished Pink (pink is my favorite color). I started with a piece of the Polished Pink 2021-2023 In Color Designer Series paper on a piece of Basic White Cardstock for the card base. I used a card from the What A Year Memories & More Card Pack to die cut the tag using the Tailor Made Tags and fussy cut the Polished Pink Flower. Using the Layering Circles Dies I cut a Basic Gray circle.

The sentiment is the stamped element on this card. I stamped the Many Messages Stamp on Basic White cardstock in Tuxedo Black Memento Ink. Then I die cut the labels with the Messages Die. These Many Messages stamp and Messages dies are great, now I’ve got lots of stamped labels ready to go. To finish this card I added a piece of Gray Granite Shimmer Ribbon tied with Basic White Bakers Twine and of course a few 2021 – 2023 In Color Jewels.

What A Year Card Measurements:

  • Basic White Card Base: 5-1/2″ x 8-1/2″, fold in half
  • In Color DSP Assortment: 4″ x 5-1/2″

Thank you so much for stopping by my blog today. I’d love to be your Stampin’ Up! Demonstrator. All the Stampin’ Up! supplies used to make my cards are available in my online store. Simply click any of the product photos below!

Product List

Happy Stamping!


Hand Penned Memories & More Read More »

Eden’s Garden – Dear Friend

This pretty card was created with the Eden’s Garden Collection. I love the shades of green and the gold foil accents in the Ever Eden Designer Series Paper. It coordinates perfectly with the Soft Succulent & Evening Evergreen sheets of the 2021-2023 In Color Shimmer Vellum, and the Soft Succulent & Evening Evergreen Open Weave Ribbons. That’s one of the things I love about Stampin’ Up! products, the perfect color coordination across all their products. Color coordination makes me happy!

Creating the Card

To create the layers of my card I started with a piece Evening Evergreen cardstock for the base of my card. Then I cut a piece of the Ever Eden DSP to 3-1/2″ x 5-1/2, and 2 strips of Gold Foil Specialty Paper to 1/2″ x 5-1/2″. I adhered the DSP to the Gold Foil on the long edges and attached the DSP to the cardbase. You can see, in the image above,I cut the Gold Foil a touch longer than 5-1/2″. Not to worry, I just snipped the ends off with my Paper Snips.

The label was die cut with the Tailor Made Tags on Basic White cardstock. Using the Eden’s Garden Stamp set, I stamped the leaves in Soft Succulent around the edges of the tag. Next, I stamped the sentiment in Evening Evergreen. I die cut a few of the leaf stems from the Eden Dies in Vellum and the Soft Succulent and Evening Evergreen Shimmer Vellum. I attached them to the bottom of the label using a few glue dots. I tied a piece of the Soft Succulent Open Weave Ribbon before attaching the label to my card with some Stampin’ Dimensionals.

To finish my card I added a few of the Garden Gems. I’m sure by now you know I can’t resist adding a bit of bling whenever I can. I love the look of this card. I hope you do as well, leave a comment below and let me know what you think of my card.

Eden’s Garden Dear Friend Card Measurements

  • Evening Evergreen Cardstock card base: 5-1/2″ x 8-1/2″, score in half at 4-1/4″
  • Ever Eden DSP: 3-1/2″ x5-1/2″
  • Gold Foil Specialty Paper: (2) 1/2″ x 5-1/2″

I’d love to be your Stampin’ Up! Demonstrator. All the Stampin’ Up! supplies used to make my card are available in my online store. Simply click any of the product photos below!

Happy Stamping!

Eden’s Garden – Dear Friend Read More »

Edens Garden

The Eden’s Garden Suite is one of my favorite Suites. I love the colors of the Ever Eden Designer Series Paper as well as the sentiments and images in the Eden’s Garden Cling Stamp set. And of course, I can’t forget the Garden Gems. If the specialty papers and gems in this suite are on your wishlist, they are only available while supplies last, don’t wait to order them, as they will not be in the January – July 2022 Mini Catalog.

Putting it all together

Using several pieces of Washi Tape to hold the die in place, I die cut the edge of my note card with the Eden Die to make this pretty edge. I added a piece of the In Color Shimmer Vellum on the inside of the card. It’s such a pretty effect against the die cut edge. Then added a piece of the Ever Eden DSP.

The sentiment was stamped on a piece of the In Color Shimmer Vellum with Staz On Ink, then die cut with the label from the Eden Dies. I adhered it to a piece of Very Vanilla cardstock, and using Stampin’ Dimensionals attached it to to the card. Finally, I added a few of the Garden Gems to give it a bit of bling.

Let me know in the comments below how you like today’s card. I’d love to be your Stampin’ Up! Demonstrator. All the Stampin’ Up! supplies used to make my card are available in my online store. Simply click any of the product photos below!

Eden’s Garden Card Measurements

  • Card base: Very Vanilla Note card or Cardstock cut to 5″ x 7″, scored in half at 3-1/2″
  • Ever Eden DSP: 2-1/2″ x 5″
  • In Color Shimmer Vellum: 3-1/2″ x 5″
  • Very Vanilla Cardstock: 1-1/4″ x 4-1/4″

Happy Stamping!

Edens Garden Read More »

Holly Jolly Wishes

I usually prefer traditional colors of red, green and white for Christmas cards but just couldn’t resist making a card with the Holly Jolly Wishes Cling Stamp set & the Whimsy & Wonder DSP. I love the colors in this DSP, and the iridescent foil in the patterns give it the perfect touch of bling!

I started with a Mint Macaron card base and added a layer of the Whimsy & Wonder DSP. I love the packages in this pattern. In keeping with the pattern of the DSP, I added the Glittered Organdy Ribbon wrapped around the top of the card like a package.

I added one of the Wonderful Snowflakes, which are part of the Whimsy & Wonder Suite Collection. It coordinates beautifully with the Whimsy & Wonder DSP. Then I stamped the sentiment in Misty Moonlight on Basic White cardstock. Using the Layering Circles Dies, I die cut the sentiment and layered it on a scallop circle that I die cut from the Whimsy & Wonder DSP. I really like the subtle look of the pattern on the DSP showing.

To finish my card I added an In Color Jewel to the Snowflake and tied the ribbon bow and attached it to the card with a glue dot. And last but not least, I brushed a Wink of Stella on the Misty Moonlight scalloped circle.

I hope you enjoyed my card today. Thanks so much for stopping by!

Card Measurements:

  • Card base: 5-1/2″x 8-1/2″, score in half at 4-1/4″
  • DSP layer: 4′ x 5-1/4″

Happy Stamping!

Holly Jolly Wishes Read More »

Scroll to Top