Simple Stamping

Fun with Ribbon Stamping

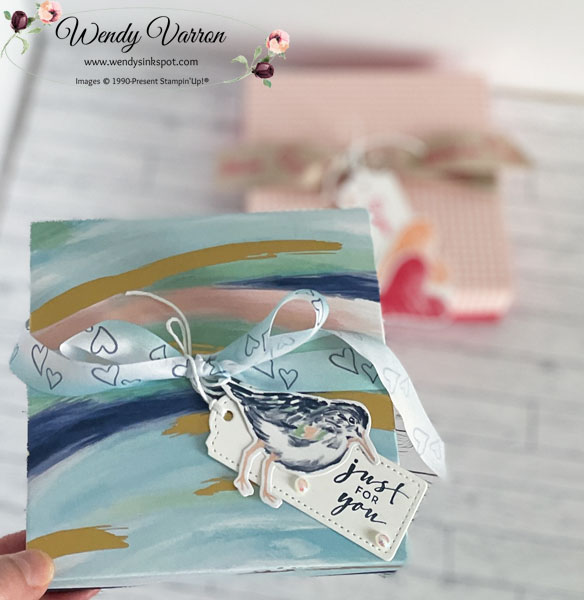
Have you ever tried stamping on ribbon? It’s an easy and fun way to personalize ribbon for gift boxes, cards, bags etc. I stamped on both the Natural finish Ribbon and the Balmy Blue & White Variegated Ribbon for my gift boxes.

To create the box bottom, I cut a piece of Night of Navy cardstock at 7″ x 7″, score on all four sides at 1-1/4″. Cut slits for the tabs. I added a few small pieces of Tear & Tape on each tab, then folded them to create the corners.

For the box top, I used a piece of By the Bay 6″ x6″ DSP, scored on all four sides at 3/4″. Again I cut the slits for the tabs. I added a few small pieces of Tear & Tape on each tab, then folded them to create the corners.

Next, I stamped hearts with the Country Bouquet Stamp set in Night of Navy directly on the Balmy Blue & White Variegated Ribbon. To keep the ink from smearing, leave the ribbon to try, I let this ribbon sit for about a half hour. You’ll want to wait longer for a heavier ribbon like the Natural Finish Ribbon that I used on a second box. Once dry I tied the ribbon on the box.

The tag is made with Tailor Made Tags Dies. I stamped the sentiment in Night of Navy then, die cut the bird from the By the Bay DSP with the Seaside Bay Dies and adhered to the tag. To finish the tag I added a few Flat Pearls and tied it to the bow with White Bakers Twine.

I created this second box with the Country Bouquet Collection Suite.

Gift Box Measurements

  • Box Base: 7″ x 7″, score on all 4 sides at 1-1/4″
  • Box Top: 6″ x 6″, score on all 4 sides at 3/4″

I’d love to be your Stampin’ Up!® Demonstrator. All the Stampin’ Up! supplies used to make my boxes are available in my online store. Simply click any of the product photos below!

Happy Stamping!

Fun with Ribbon Stamping Read More »

Luv 2 Stamp Group Blog Hop Lucky Clover Treats

Welcome to the Luv 2 Stamp Group’s 2023 Blog Hop! We are excited to share projects with you again for the third year. This year we are shaking things up and bringing you all new monthly themes to inspire your next project!

Once you are done with each post, scroll down to the bottom and you will see a list of Blog Hop participants, you can click on their name to go to their post, or you can click the next button to go to the next post in line. Happy crafting!

Our first Blog Hop Theme of 2023 is Sweet Treats!

My festive St. Patrick’s Day Treats were inspired by the Jan-June 2023 Mini Catalog. Page 8 of the mini catalog I noticed these cute treats created with the Country Floral Lane Suite. These cute treats can be recreated for any occasion and they are quick to make.

I have been waiting for a St. Patrick’s Day stamp set, the Luck Clover Bundle first bundle I put on my mini catalog shopping list. It was perfect for creating these treat holders for St. Patrick’s Day or to just wish someone good luck!

To create the wrappers I started with a piece of Granny Apple Green Cardstock cut to 5-1/2″ x 6-3/4″. On the long side score the cardstock at 2″, 2-1/4″, 4-1/2″, 4-3/4″. Then I stamped the clovers in Granny Apple Green along the top and bottom edges. I used Tear & Tape to adhere the wrapper closed. The Dandy Designs DSP layer of the wrapper is cut to 4-1/2″ x 6-3/4″, for this layer of the wrapper I didn’t make any score lines, I just wrapped it around the cardstock layer and adhered again with Tear & Tape.

To decorate the font of the wrappers I used Basic White Cardstock and die cut the scalloped circle with the All That Dies and stamped clovers on them in Granny Apple Green. I stamped each of the sentiments in Granny Apple Green and snipped them out with my paper snips. I adhered them with Mini Glue Dots.

I stamped the large clovers in Granny Apple Green using the Stamparatus. I prefer to stamp with Stamparatus on larger solid images works better for me than using a clear block, this way I can re-ink and stamp the image if it’s not clear. I punched them out with the Lucky Clover Punch and added them to the wrapper with Mini Glue Dots.

I can’t resist adding a little bling to my projects and for these fun treats I added a few Iridescent Pastel Gems. Before slipping in the chocolate bar I wrapped a piece of the Burlap Ribbon from the Real Red & Burlap Ribbon Combo pack around the bar. Then tied them at the top with a piece of White Crinkle Seam binding colored with Soft Sea Foam Stampin’ Blends.

Be sure to Hop along with all of our Blog Hop participants and see all their amazing projects! Just click on their name in the list below to go to their post, or you can click the next button to go to the next post in line.

Luck Clover Sweet Treats Measurements

  • Granny Apple Green Cardstock – 5-1/2″ x 6-3/4″, score on the long edge at 2″, 2-1/4″, 4-1/2″, 4-3/4″
  • Dandy Designs DSP – 4-1/2″ x 6-3/4″

I hope you enjoyed my Sweet Treat project! All the Stampin’ Up! supplies used to make my treat sleeves are available in my online store. Simply click any of the product photos below!

Happy Stamping!

Luv 2 Stamp Group Blog Hop Lucky Clover Treats Read More »

Luv 2 Stamp Group Blog Hop-Seaside Bay

Welcome to the Luv 2 Stamp Group Blog Hop!

We are excited to share projects with you again this year. We hope to inspire you to create beautiful new projects using Stampin’ Up! products. For our theme this month we are featuring New Products coming on January 5th!

Once you are done with each post, scroll down to the bottom and you will see a list of Blog Hop participants, you can click on their name to go to their post, or you can click the next button to go to the next post. Happy Crafting!

One of the Stamp sets I received with my pre-order is the Seaside Bay Stamp set. I I love the crab image in this set. It reminds me of the summers when I was a kid, we spent a week at the beach with my grandparents. Every year one night for dinner we would have a bushel of steamed crabs. Grandad taught us how to open them, pick them and crack open the claws.

To create my card I started with a Balmy Blue Cardbase. I selected 3 patterns from the By The Bay Specialty Designer Series Paper. I cut 2 strips of the DSP to 1/2″ x 5-1/2″ and attached them to the front of the cardbase. I love the pattern of the Night of Navy DSP pattern it looks like water.

With a second pattern of the By the Bay DSP I trimmed it to 3-3/4″ x 5-1/2″ and adhered it to the cardbase.

To create the label, I selected a 3rd pattern of the By the Bay DSP and trimmed it to 2-1/4″ x 3-1/2″. I adhered it to the Night of Navy pattern cut to 2-1/2″ x 3-3/4″. On a piece of Basic White cardstock, I stamped the sentiment in Night of Navy and added the sand stamp in Sahara Sand. I die cut it with the Something Fancy Dies. I attached it to the label layer with Stampin’ Dimensionals. I stamped the crab on Basic White in Pacific Point and fussy cut it out and adhered it to the sentiment.

To finish the front of the card I added a few Iridescent Pastel Gems! I love a bit of sparkle on a card.

Inside the card I added a Basic White panel with a strip of DSP cut to 1/2″ x 5-1/2″.

All the amazing products I used to create my card, Seaside Bay Stamp Set, Something Fancy Dies, By the Bay Specialty DSP (pictured below with the Iridescent Pastel Gems) will be available beginning January 5, 2023!!

For more inspiration from the Luv 2 Stamp Group Blog Hop Team, click on the image below to visit the talented Kurstan del Rosario. Don’t forget to continue following links on each blog to see everyone’s projects!

Seaside Bay Card Measurements

  • Balmy Blue card base: 5-1/2″ x 8-1/2″, score and fold in half
  • By the Bay DSP: (2) for card front 1/2″ x 5-1/2″
    • 3-3/4″ x 5-1/2″
    • 2-1/4″ x 3-1/2″
    • 2-1/2″ x 3-3/4″
  • Basic White inside panel: 4″ 5-1/2″
  • By the Bay DSP: (1) for inside card 1/2″ 5-1/2″

I hope you enjoyed this sneak peek at some of the new products coming in the 2023 Jan – April Mini Catalog. They will be available January 5th, add them to your list now! You can shop for all the other products I used now. Just click any of the images below to shop.

Happy Stamping!

Luv 2 Stamp Group Blog Hop-Seaside Bay Read More »

Demonstrator Training Program Blog Hop-Framed Florets

Welcome to the Demonstrator Training Blog Hop! We are so happy that you could join us today for this blog hop for ideas and creative inspiration. We are a group of Stampin’ Up!® Demonstrators from around the world that are taking part in training that is helping us to build a successful Stampin’ Up!® business and reach some goals we have set. We really appreciate your support.

You may be starting here or have come from another blog – either way you can find the link list at the bottom of this post so that you can see every blog post today.

My Customer Thank You cards were created using the Framed Florets Bundle and the Fitting Florets DSP. I love the font of the sentiments, and all the flowers in the Fitting Florets DSP. Don’t forget, the Fitting Florets DSP and Gold Adhesive Backed Swirls that I used on my card are available while supplies last, be sure to order them before they are gone.

I decided to change things up a bit, I have a video for you today to show you have quick and easy this card is to put together. As you watch, keep in mind I recorded this early in the morning before I had enough coffee 🙂 So without further ado…here it is bloopers and all!

I hope you enjoyed the video and my card. Don’t forget to hop along by clicking the links below to see all the other amazing projects we have for you this month.

Framed Florets Card Measurements:

  • Cardbase:
  • Polished Pink Cardstock: 3-3/8″ x 4-7/8″
  • Fitting Florets DSP: 3-1/4″ 4-3/4″

I’d love to be your Stampin’ Up!® Demonstrator. All the Stampin’ Up! supplies used to make my card are available in my online store. Simply click any of the product photos below!

Happy Stamping!

Demonstrator Training Program Blog Hop-Framed Florets Read More »

Inspirations In Ink Blog Hop-Season of Chic

Welcome to the Inspirations In Ink Blog Hop! Thank you so much for hopping along with us! This month we are featuring Stampin’ Up!’s Season of Chic Bundle. Once you are done with each post, scroll down to the Blog Hop List participants, you can click on their name to go to their post. We hope you find some inspiration and enjoy all of our Season of Chic Bundle Projects!

The the Textured Chic Suite has so many beautiful products in the suite. The Season of Chic Stamp Set has images for all seasons and the Chic Dies to cut them out, the gold foil in the Textured Chic Designer Series Paper and Distressed Gold Specialty paper. And don’t miss the matching Textured Chic Memories and More Cards, and the Textured Chic Memories and More Cards & Envelopes. So many possibilities!

Let me show you how I created this pretty card. I started with a Textured Chic card base and created a Z-fold by scoring the front panel of the card base at 2-1/2″and folding it back.

I cut 2 strips of Textured Chic DSP and adhered them to each of the inside sections of the folded panel. Then I adhered another piece of Textured Chic DSP on the inside on the right. With so many beautiful patterns in this DSP pack, I chose to use 3 different patterns.

Next, I stamped the sentiment in Evening Evergreen on Basic White cardstock and die cut it with a square from the Stylish Shapes dies. Then adhered it to with Stampin’ Dimensionals to one of the Textured Chic Memories and More cards.

I die cut a few leaves with the Distressed Gold Specialty Paper that I thought would go well with the leaf images in the Memories and More Card, and adhered them to the corners of the square. I adhered the Memories and More card to the folded front panel. Remember when adding this to your card to put adhesive on just one side of the card back so your card will open properly.

On the inside of the card I wanted the Basic White pane to show just a bit like a frame for Memories and More card on the font. To do this I cut the a piece of Basic White cardstock to 3-1/2″ x4-1/2″, which is just a bit bigger than the Memories and More Card and adhered to the inside of the card. It worked out perfectly, then I added a few of the leaves I cut earlier. Finally, I added a few Champaign Rhinestone Basic Jewels to bring out the gold foil of the Designer Series Paper.

Blog Hop List

I hope you enjoyed my Season of Chic Thinking of You card. As mentioned at the top, this is a blog hop so make sure you ‘hop’ around to all the amazing projects on this hop! Click on the links below to visit them.

Season of Chic Card Measurements:

  • Textured of Chic card base from Memories & More Cards & Envelopes
  • Textured Chic card from Memories and More Card pack: 2″ x 4″
  • Textured Chic DSP: (2) 1-7/8″ x 6″, 4″ x 6″
  • Basic White Cardstock 3-1/2″ x 4-1/2″

I’d love to be your Stampin’ Up!® Demonstrator. All the Stampin’ Up! supplies used to make my card are available in my online store. Simply click any of the product photos below!

Happy Stamping!

Inspirations In Ink Blog Hop-Season of Chic Read More »

Demonstrator Training Program Blog Hop – September Customer Thank You

Welcome to our Stampin’ Up!® Demonstrator Training Program Monthly Blog Hop!

We are so happy that you could join us today for this blog hop for ideas and creative inspiration. Our blog hop focuses on the Thank You cards we are sending to our customers.

I wanted to feature a Fall theme to my thank you cards. The Leaf Labels & Amber Gems Combo Pack are perfect for this quick and easy card. I colored in a piece of Perfectly Penciled DSP with Watercolor Pencils and brushed on a Wink of Stella over the leaves, which not only give a bit of sparkle to the DSP but also helped to blend in the colors of the Watercolor Pencils. Then I adhered the DSP to a piece of Merry Merlot Cardstock. I used Stampin’ Dimensionals to adhere the Layers to the Crumb Cake Cardstock base.

I die cut the stitched circle with the Stylish Shapes Dies and a piece of Brushed Metallic Cardstock. Then with a bit of Stampin’ Seal+ on the back, I added some of the gold trim from the Simply Elegant Trim, then added it to the lower left corner of of my card.

I brushed a little Merry Merlot, and Pumpkin Pie ink with a Blending Brush on a Leaf Label, to give it a bit of color, and added it to the Brushed Metallic Circle with Stampin’ Dimensionals.

The Sending Smiles “A Note of Thanks” sentiment is stamped Merry Merlot on Basic White Cardstock. Then die cut with the Stylish Shapes Dies. I added it to the card over the leaf and a few of the Amber Gems to complete the card.

A Note of Thanks Card Measurements

  • Crumb Cake Cardstock Base: 5-1/2″ x 8-1/2″, score and fold in half at 4-1/4″
  • Merry Merlot Cardstock: 4-1/8″ x 5-3/8″
  • Perfectly Penciled DSP: 3-7/8″ x 5-1/8″
  • Scrap of Basic White Cardstock for the label
  • Scrap of Brushed Metallic Cardstock for circle

I’d love to be your Stampin’ Up!® Demonstrator. All the Stampin’ Up! supplies used to make my card are available in my online store. Simply click any of the product photos below!

Happy Stamping!

Demonstrator Training Program Blog Hop – September Customer Thank You Read More »

August Customer Thank you Cards

Welcome to our Stampin’ Up!® Demonstrator Training Program Monthly Blog Hop!

We are so happy that you could join us today for this blog hop for ideas and creative inspiration. Our blog hop focuses on the Thank You cards we are sending to our customers.

You may be starting here or have come from another blog – either way you can find the link list at the bottom of this post so that you can see every blog post today.

For this months Customer cards I decided to use the Splendid Day Designer Series Paper and the Beautiful Shapes Dies, to create a clean and simple card. I love how they turned out!

To create my card I cut card bases in both Soft Sea Foam and Fresh Freesia CardStock. Then I used the Beautiful Shapes Dies to die cut several hexagons from the Splendid Day Designer Series Paper. I adhered the 2 largest hexagons with multipurpose liquid glue, and the smallest hexagon with Mini Stampin’ Dimensionals on Basic White cardstock. I stamped several images from the Hello Beautiful Stamp set to add a bit of texture to the card, then attached the Basic White layer to the card base.

The sentiment is from the Pansy Patch stamp set, stamped in Tuxedo Black Ink, on a strip of Basic White cardstock. Then punched each side with the Lovely Labels Pick a Punch and added it to the card front with Stampin’ Dimensionals. I added a few of the 2021-2023 In Color Opal Rounds because I just couldn’t resist adding a little more sparkle to the cards.

For the inside of my card I stamped the Bee and foliage images from the Splendid Thoughts Stamp set on Basic White cardstock, then adhered it to the inside of the card.

Hello From Me to You Card Measurements:

  • Cardbase: 5-1/2″ x 8-1/2″, score at 4-1/4″
  • Basic White Layer: 4″ x 5-1/4″
  • Basic White Inside: 4′ x 5-1/4″
  • Basic White Strip for Sentiment: 1/2″ x 4″

I’d love to be your Stampin’ Up!® Demonstrator. All the Stampin’ Up! supplies used to make my card are available in my online store. Simply click any of the product photos below!

Happy Stamping!

August Customer Thank you Cards Read More »

Scroll to Top